Until I started making my own pasta, I always thought homemade pasta required a special pasta maker, a lot of space to hang up curtains of noodles, and a ton of time to devote in the kitchen.
The fancy red or green pasta with Italian words all over the packages? Wrote them off as impossible to replicate at home.
But I couldn’t have been more wrong.
You can make the best pasta at home with the most basic of kitchen implements: a smooth surface, a rolling pin, a sharp knife, and a half-hour of hands-on time.
Small appliances can shave off a few minutes if you have a stand mixer to knead the dough or a pasta maker to roll it out, but once you get the hang of making pasta from scratch, your hands can be just as quick. (I promise!)
It’s so easy that I’ll sometimes roll out a batch of pasta dough right before dinner.
This is possible, time-wise, because compared to the dried boxed pasta you can buy in the store, fresh homemade pasta is already luxurious on its own. Its velvety texture means it needs little more than a spicy minty tomato sauce to satisfy (or try my skin-on tomato sauce too, which is ridiculously easy to make).
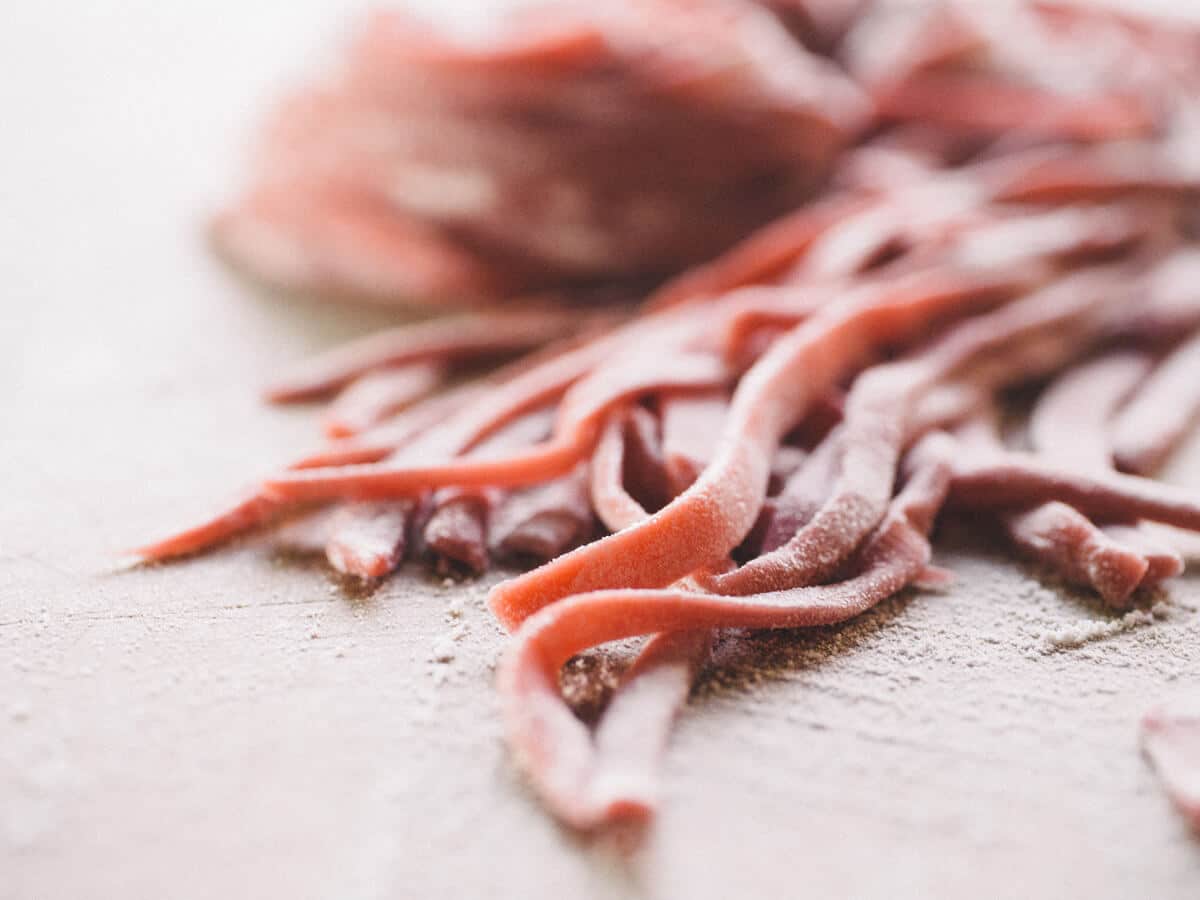
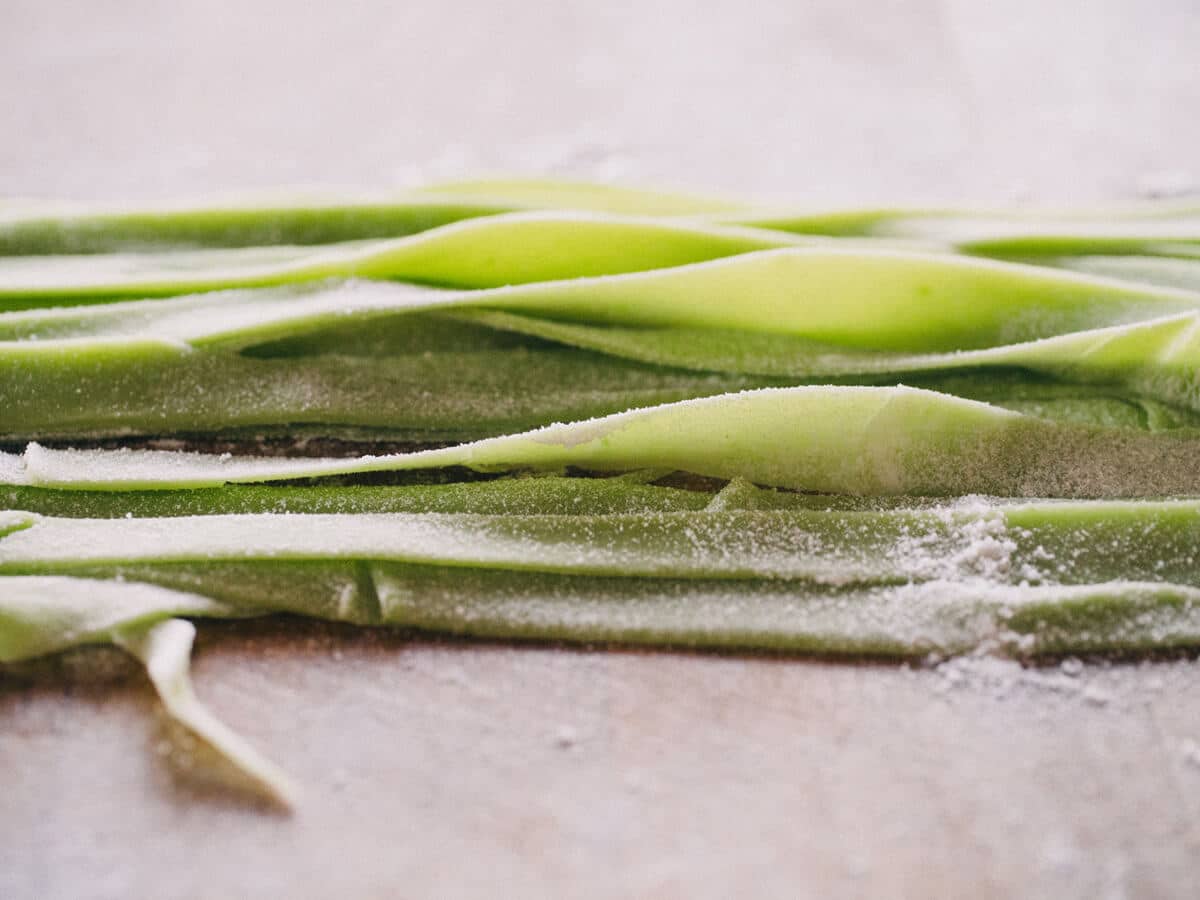
Since I like wide noodles, my favorite is handmade fettucine or pappardelle. I love the rustic quality of hand-cut pasta—how each noodle is just slightly different in thickness or length.
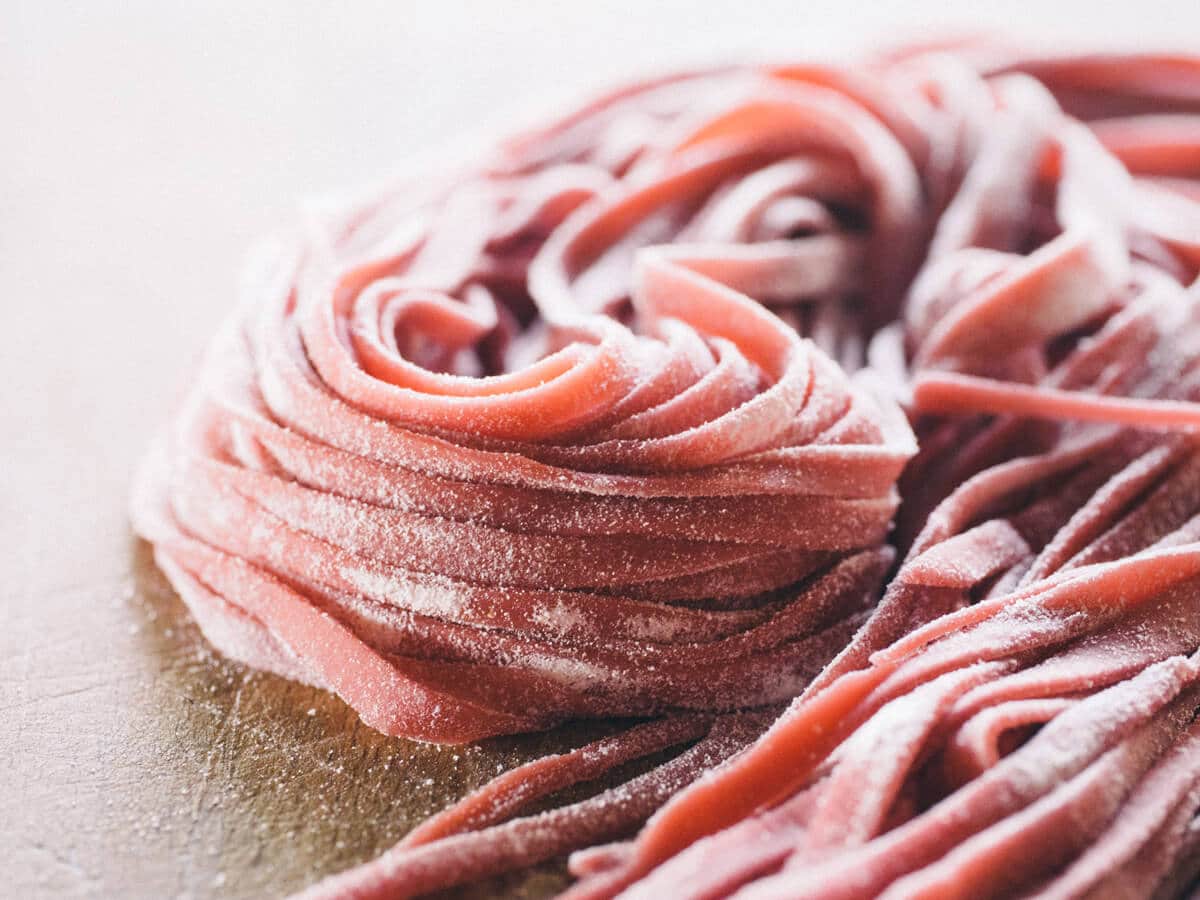
I also love how colorful pasta you make at home is free from artificial food coloring and questionable dyes. All you need is some natural coloring from real-food ingredients for gourmet pasta without the gourmet price tag!
Keep reading and I’ll show you how I do it in my small kitchen.
The magic ratio for homemade pasta
For making pasta by hand, my magic ratio is 2 cups flour to 3/4 cup liquid.
This makes 1 pound of pasta, or 4 servings.
A moderate protein, unbleached all-purpose flour works well for the dough. (I typically use Gold Medal brand, which has 10.5 percent protein.) There are special flours you can use to achieve a slightly different texture, like Italian “00” (doppio zero) or semolina flour, but in my opinion, you can make a mighty fine dough with the all-purpose flour you already have in the pantry.
The liquid consists of eggs, which give “bite” and body to the pasta; olive oil, which adds silkiness and a subtle richness; and if you’re so inclined, vegetable juice or fresh herbs for added color or flavor.
How to measure flour for these recipes
I use the “scoop and sweep” method for measuring flour: scoop a heaping cup of flour, then sweep a straightedge across the top.
If your flour has been compacted at the bottom of a bag or canister, fluff it up with a fork before scooping. There is no need to sift the flour before measuring it. This is as easy as it gets!
Substituting other types of flour for all-purpose flour
You can use Italian “00” flour, semolina flour, or a half-and-half blend of all-purpose (white) flour and whole wheat flour. I don’t recommend swapping out all of the all-purpose flour for whole wheat flour, since this will result in pasta that’s super dense with an off-putting flavor.
Do not use self-rising flour, as this type of flour contains baking powder and can lead to some unexpected or undesired results during cooking.
I’ve never tested these recipes with gluten-free flour, so I can’t attest to how well they’d turn out. If you do experiment with gluten-free flour, please share your results in the comments!
Why freezing fresh pasta is better than drying pasta for storage
Quite often, I find myself making several batches of pasta at once so I can store and save them for future meals.
When it comes to saving pasta, I’m a big proponent of freezing rather than drying for a few reasons:
- Frozen pasta retains all the color, flavor, and texture of fresh pasta.
- It cooks faster than dried pasta.
- It won’t get moldy, since you can freeze it right away.
- It saves space, since you won’t need to drape it over wooden dowels or the backs of chairs while you wait for the pasta to fully dry.
- Frozen pasta won’t break during storage, a big issue with pasta that’s dry and brittle, especially if you lack adequate pantry space.
So if you find that you can’t use up all the pasta at once, I wholly recommend freezing the unused portions (which I’ll explain how to do in the master instructions below).
Frozen pasta doesn’t even need to be thawed when you’re ready to use it. Simply drop the noodles into a boiling pot of salted water and add a couple extra minutes to the cooking time.
Getting started
I start my pasta the traditional way—by heaping flour onto my kitchen counter and whisking in the eggs—but beginning pasta makers may be better off doing that in a bowl until the process becomes second nature.
You might have to wash an extra dish, but at least you won’t get egg all over your shoe.
Below are four variations of homemade pasta. The ingredients are a little different for each one, but the method is the same for all. Before you get started, I recommend reading the instructions all the way through, as well as the Notes and FAQ sections in the end.
Let me know which variation below is your favorite!
Disclosure: If you shop from my article or make a purchase through one of my links, I may receive commissions on some of the products I recommend.
Homemade egg pasta
Makes 1 pound
Ingredients
2 cups all-purpose flour, plus more for rolling and dusting
3 large eggs
2 tablespoons olive oil
Homemade herb pasta
Makes 1 pound
Ingredients
2 cups all-purpose flour, plus more for rolling and dusting
3 large eggs
2 tablespoons minced fresh herbs (try basil or parsley)
2 tablespoons olive oil
Homemade vegetable pasta
Makes 1 pound
Ingredients
2 cups all-purpose flour, plus more for rolling and dusting
2 large eggs
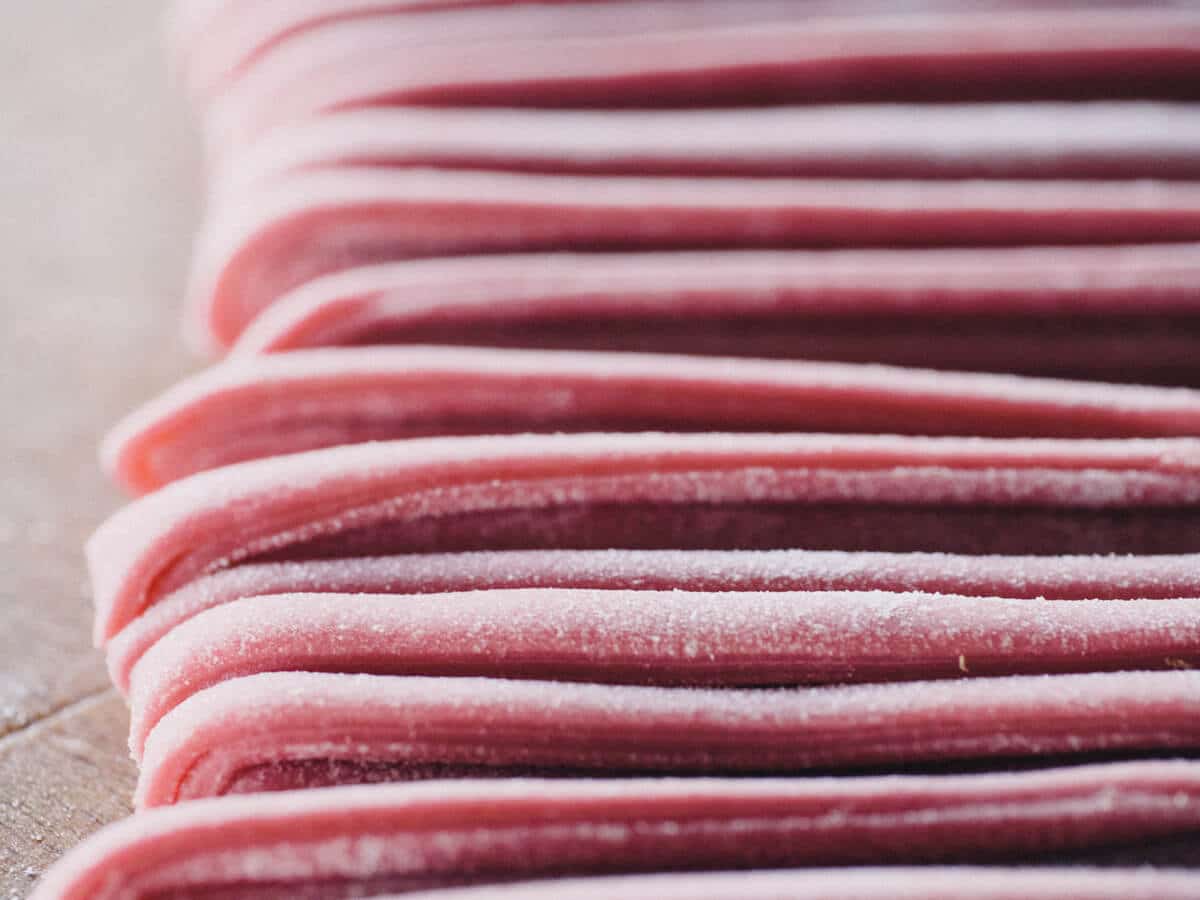
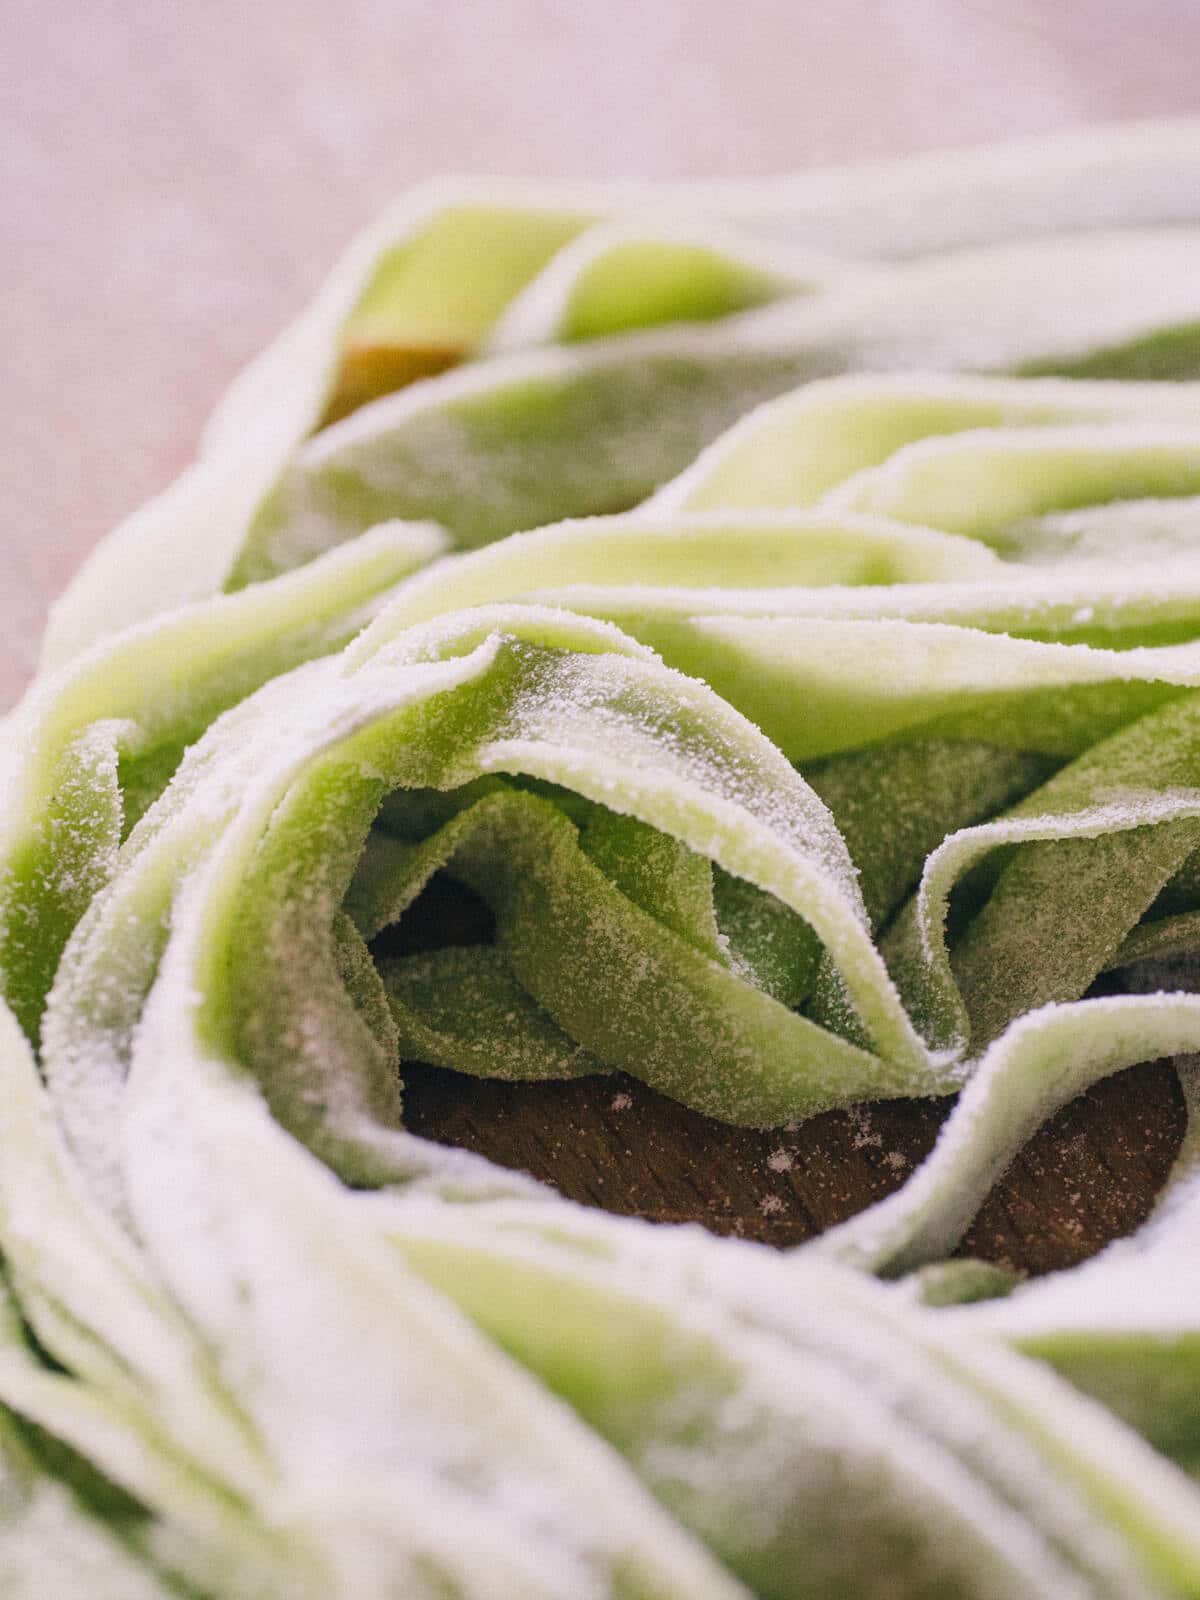
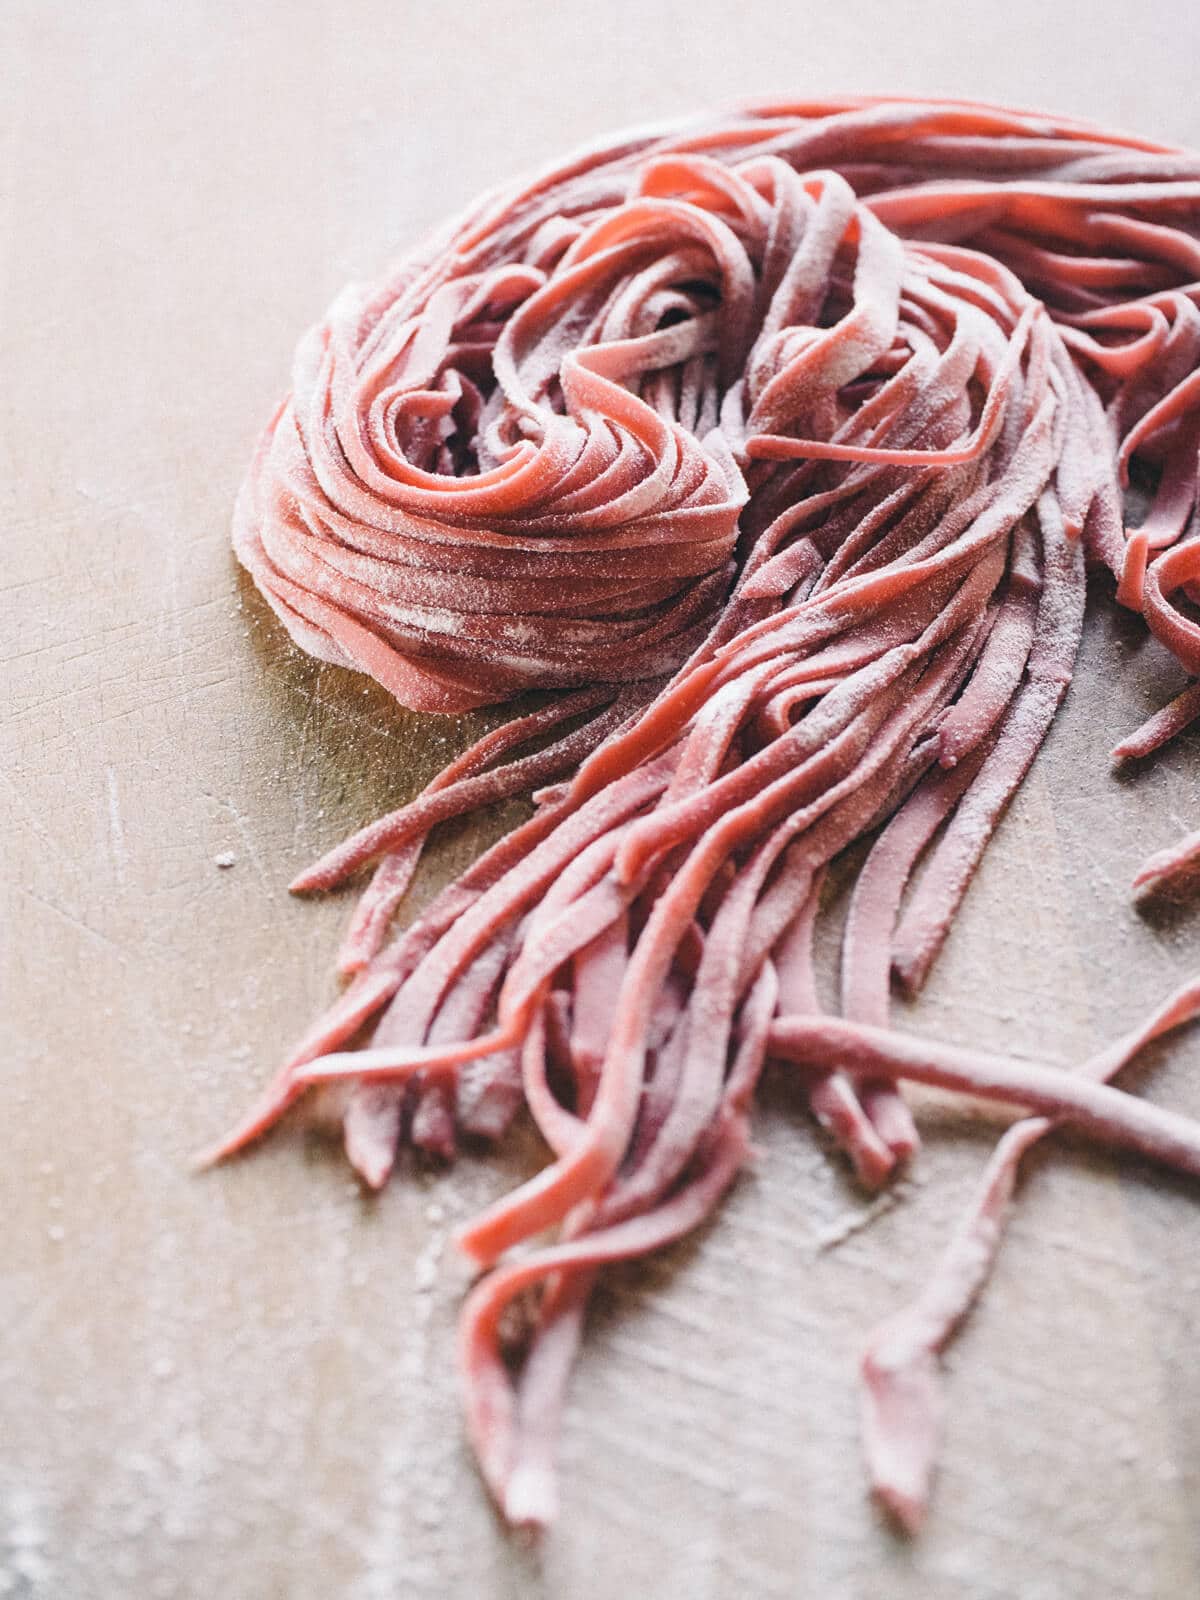
1/4 cup vegetable juice (try beet, spinach, or carrot juice, or even tomato paste or pumpkin puree to add color)
1 1/2 tablespoons olive oil
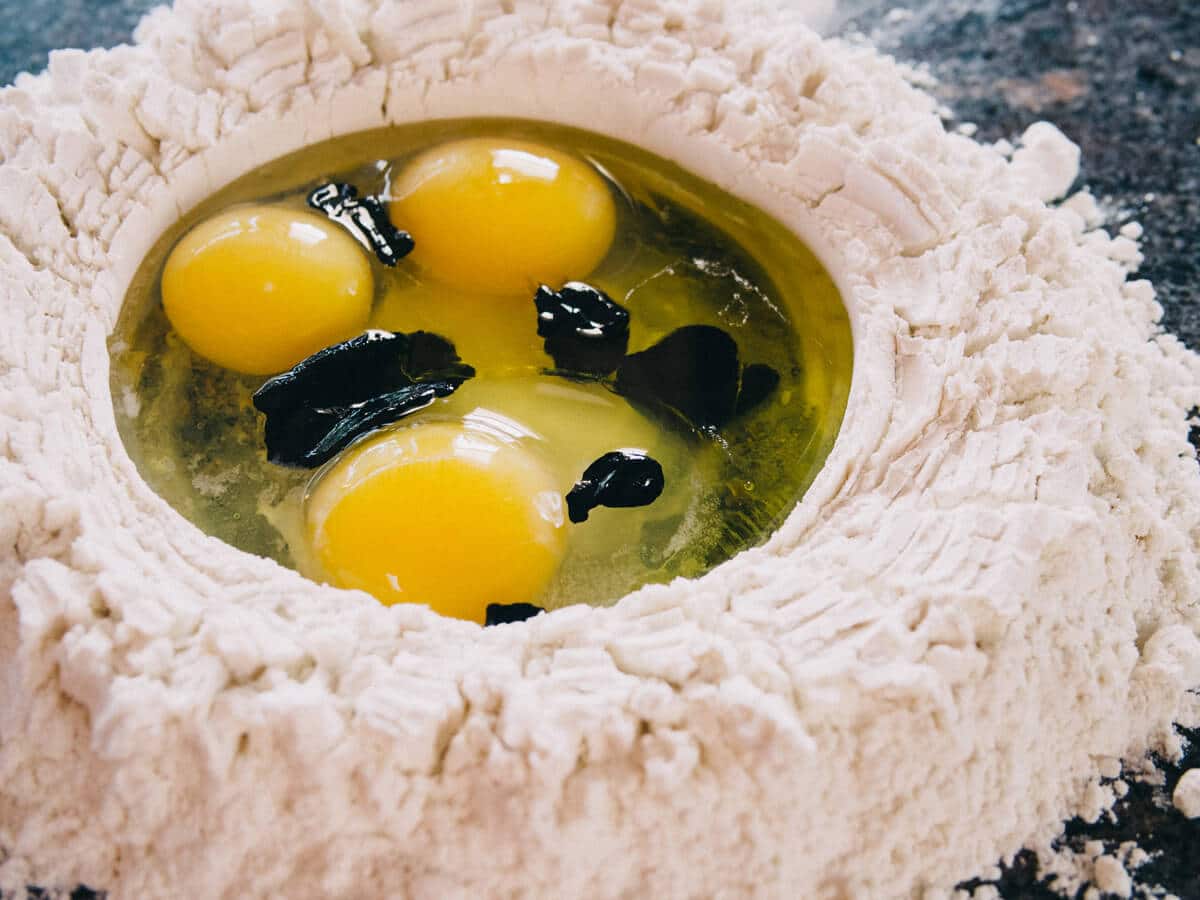
Homemade squid ink pasta
Makes 1 pound
Ingredients
2 cups all-purpose flour, plus more for rolling and dusting
3 large eggs
1 1/2 tablespoons olive oil
1 tablespoon squid ink or cuttlefish ink (I use this brand)
Note for squid ink: You can also use 2 (4g) packets like these ones.
How to make fresh pasta: master instructions for all recipes
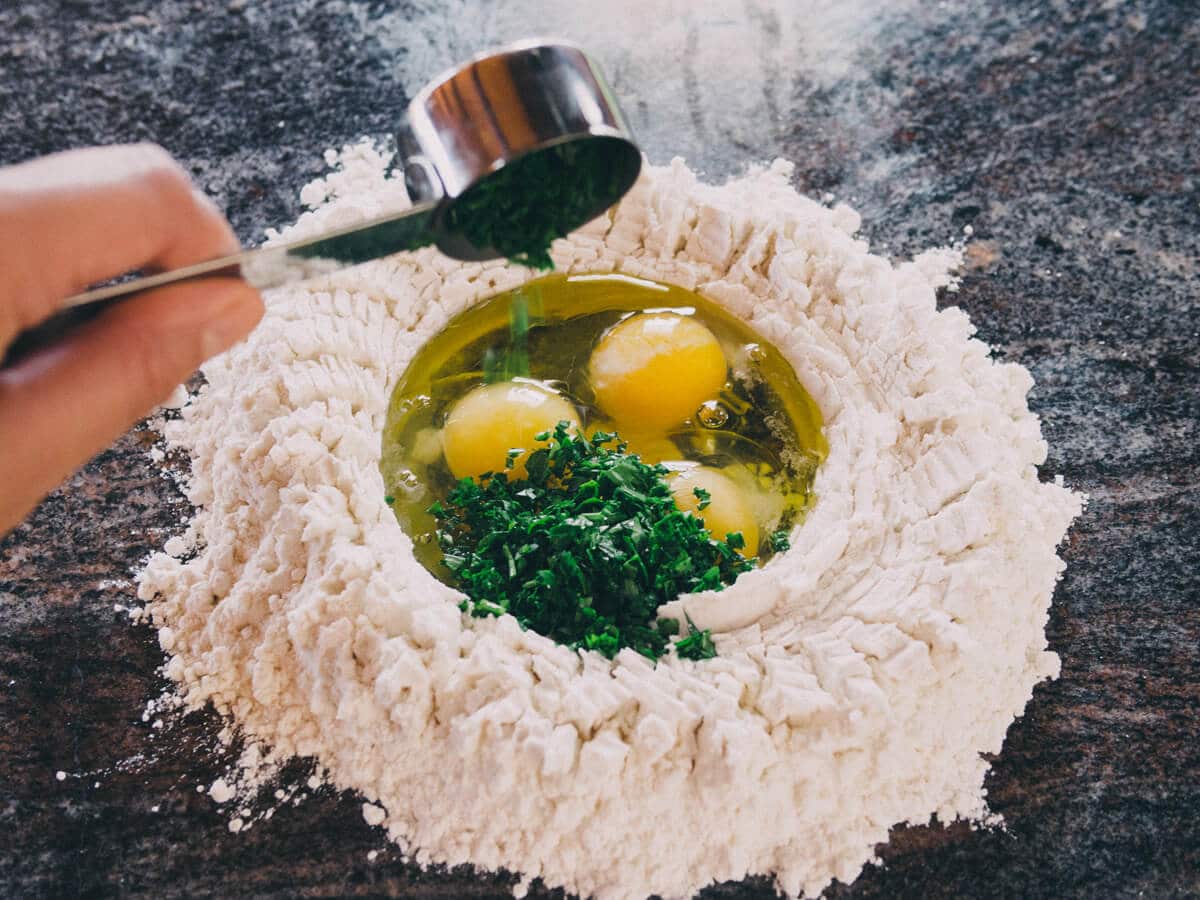
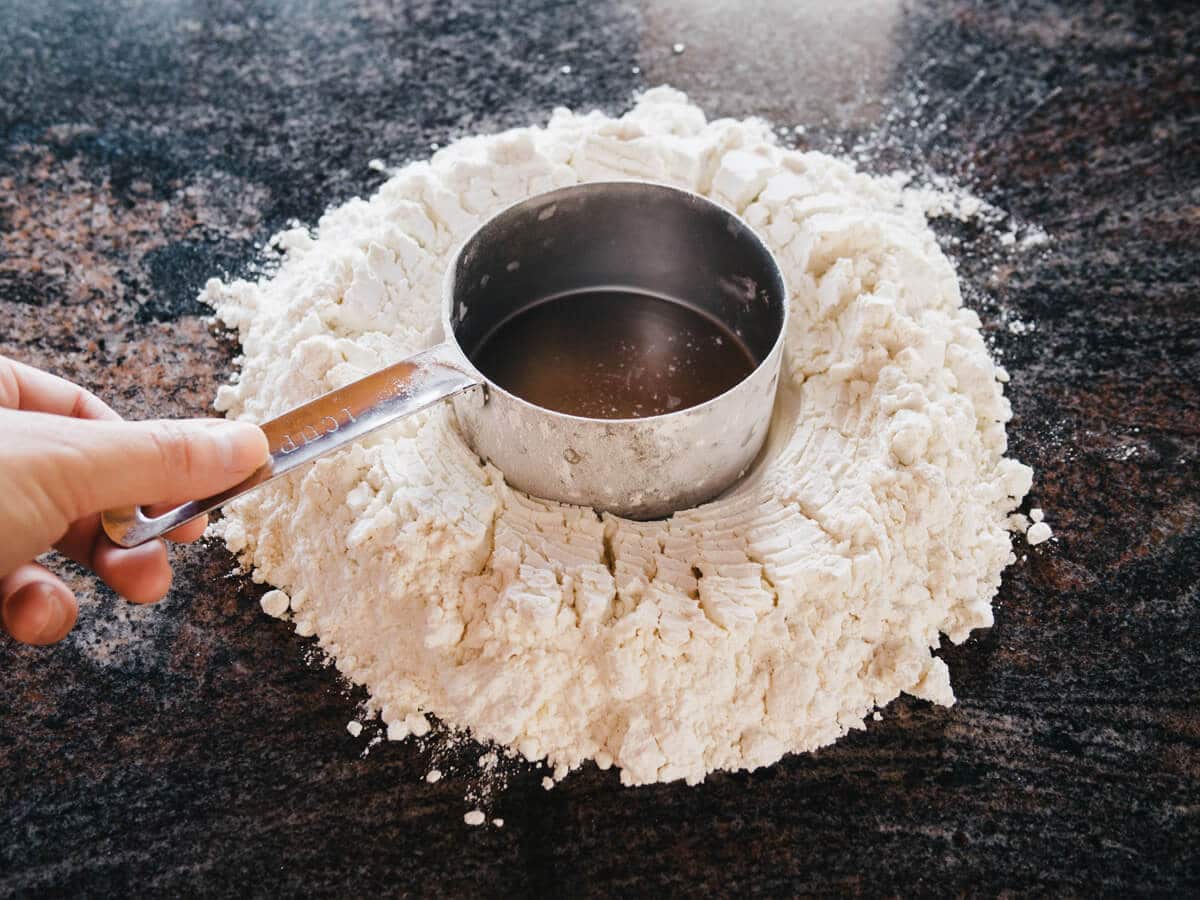
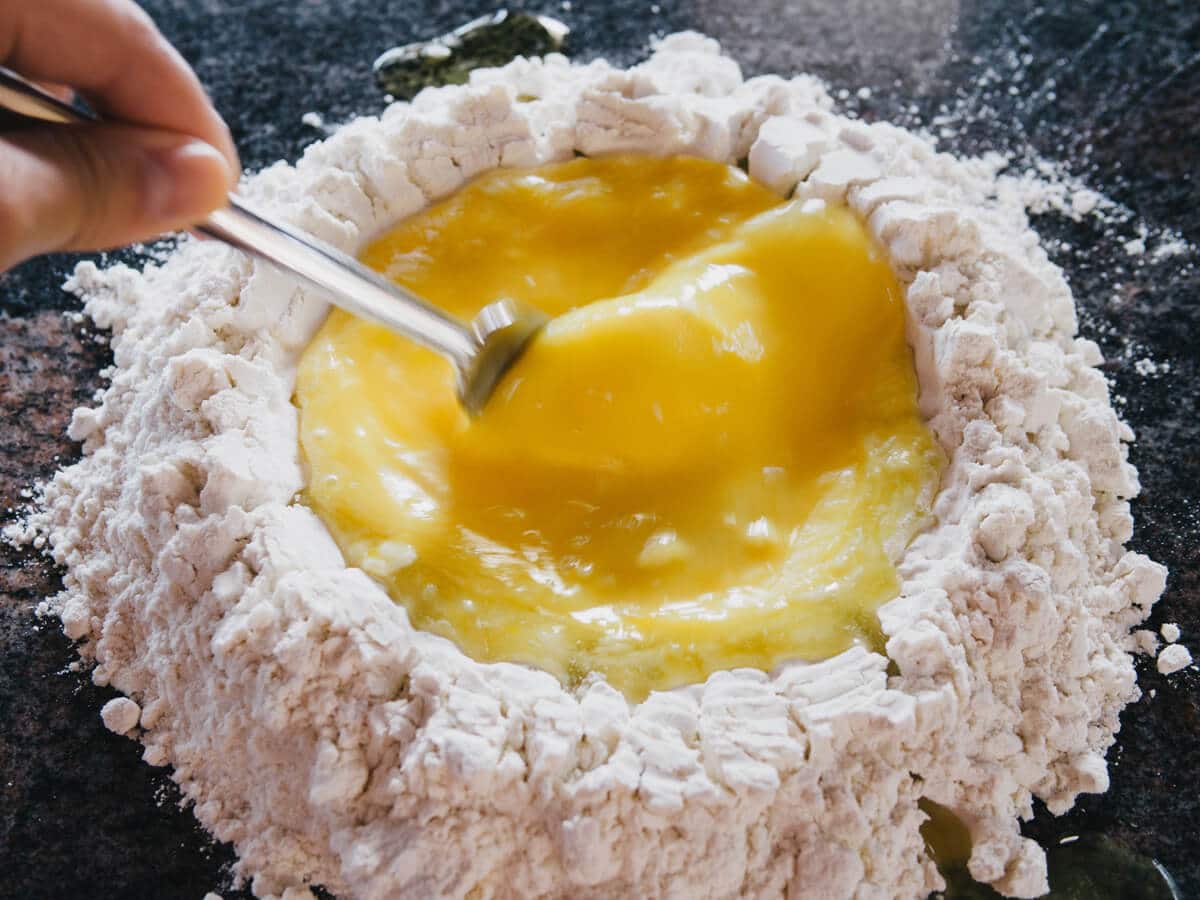
Mound the flour onto your work surface and make a large well in the center. (Tip: I use my measuring cup to carve out a deep, perfect well about 5 inches in diameter.)
Crack each egg into the well, followed by the remaining ingredients in your chosen pasta recipe.
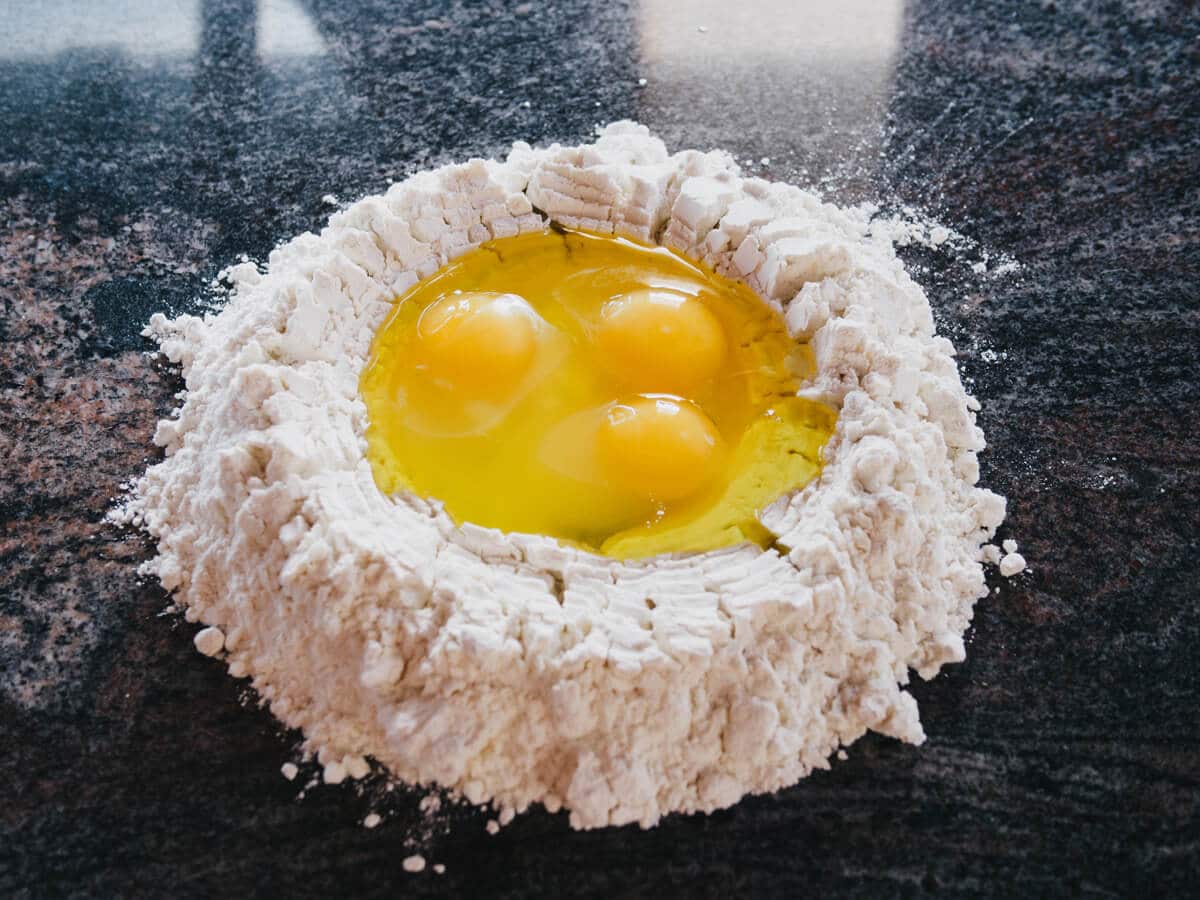
Using a fork, beat the eggs and oil (plus any herbs, vegetable juice, or squid ink, if using) until well combined.
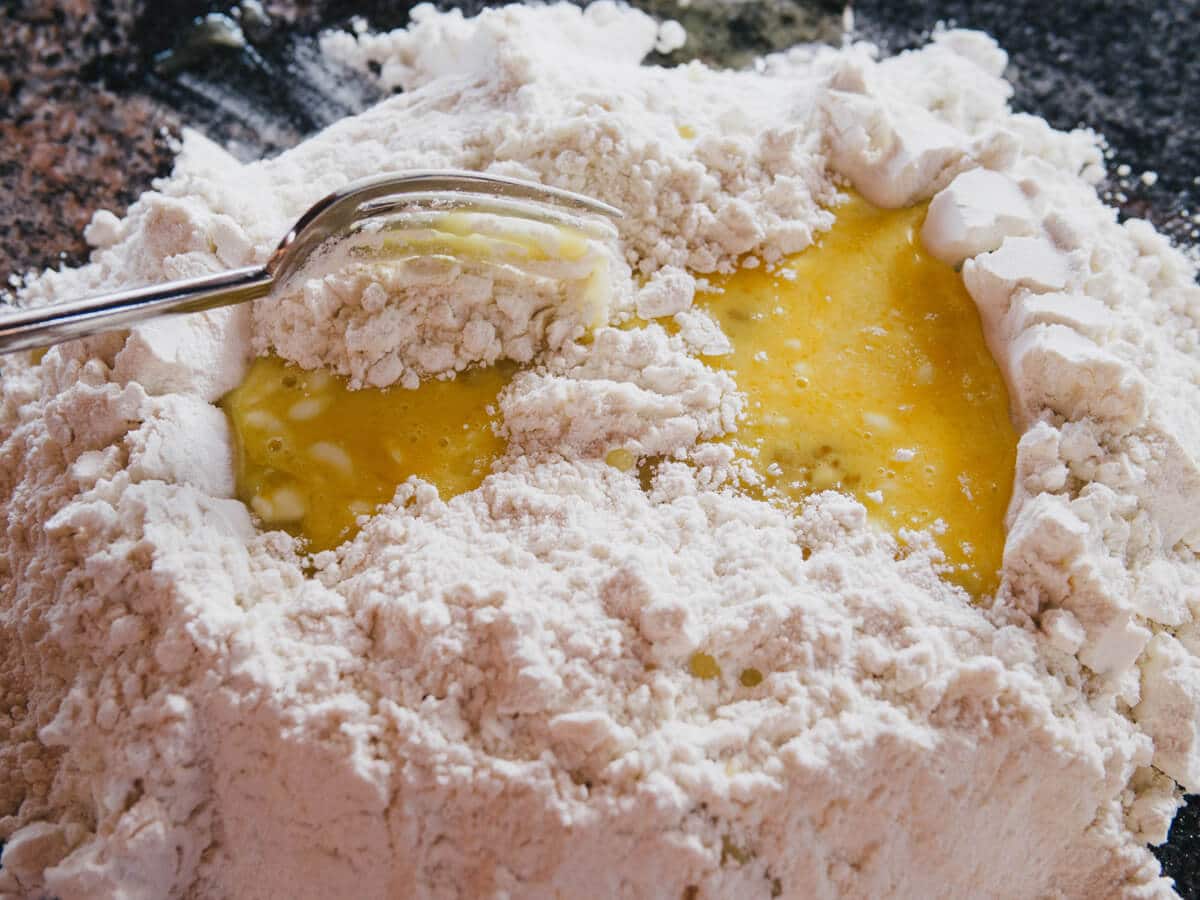
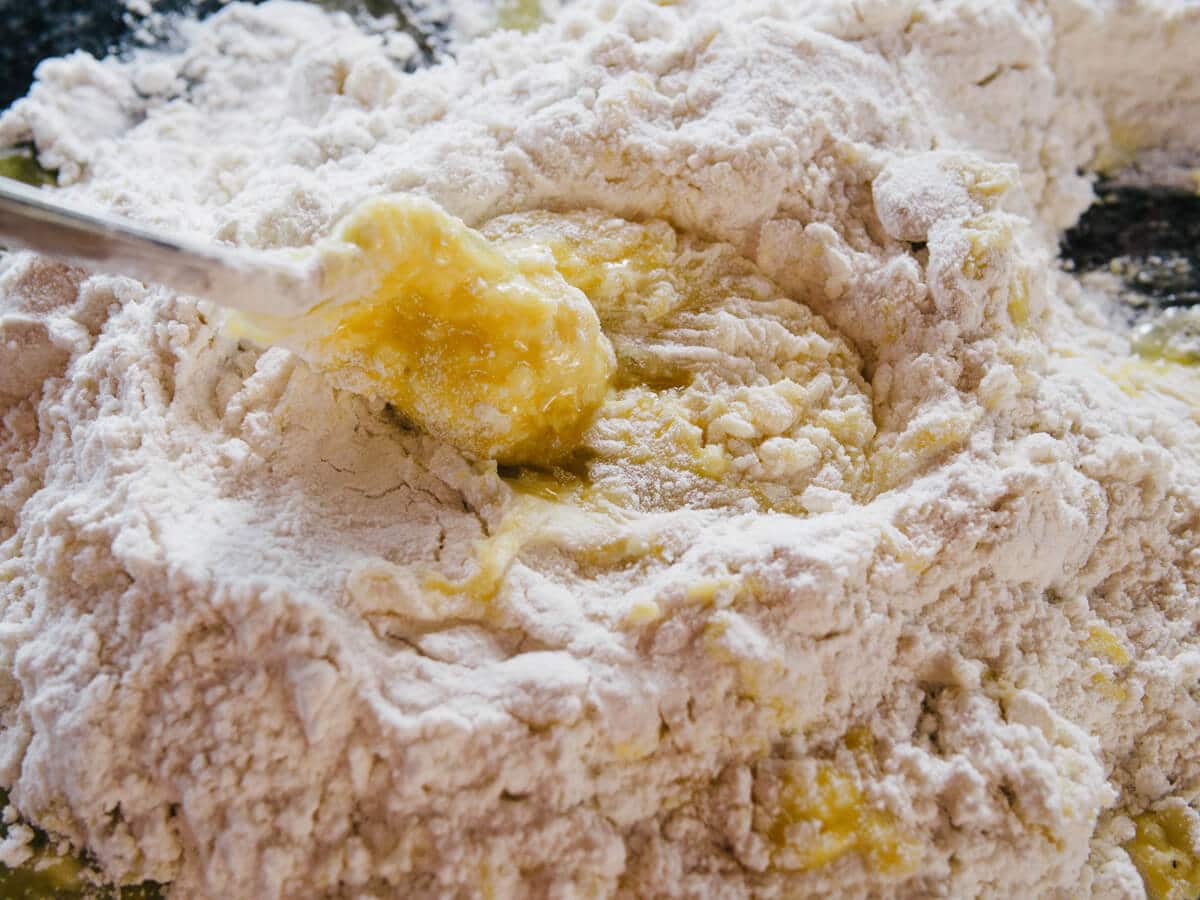
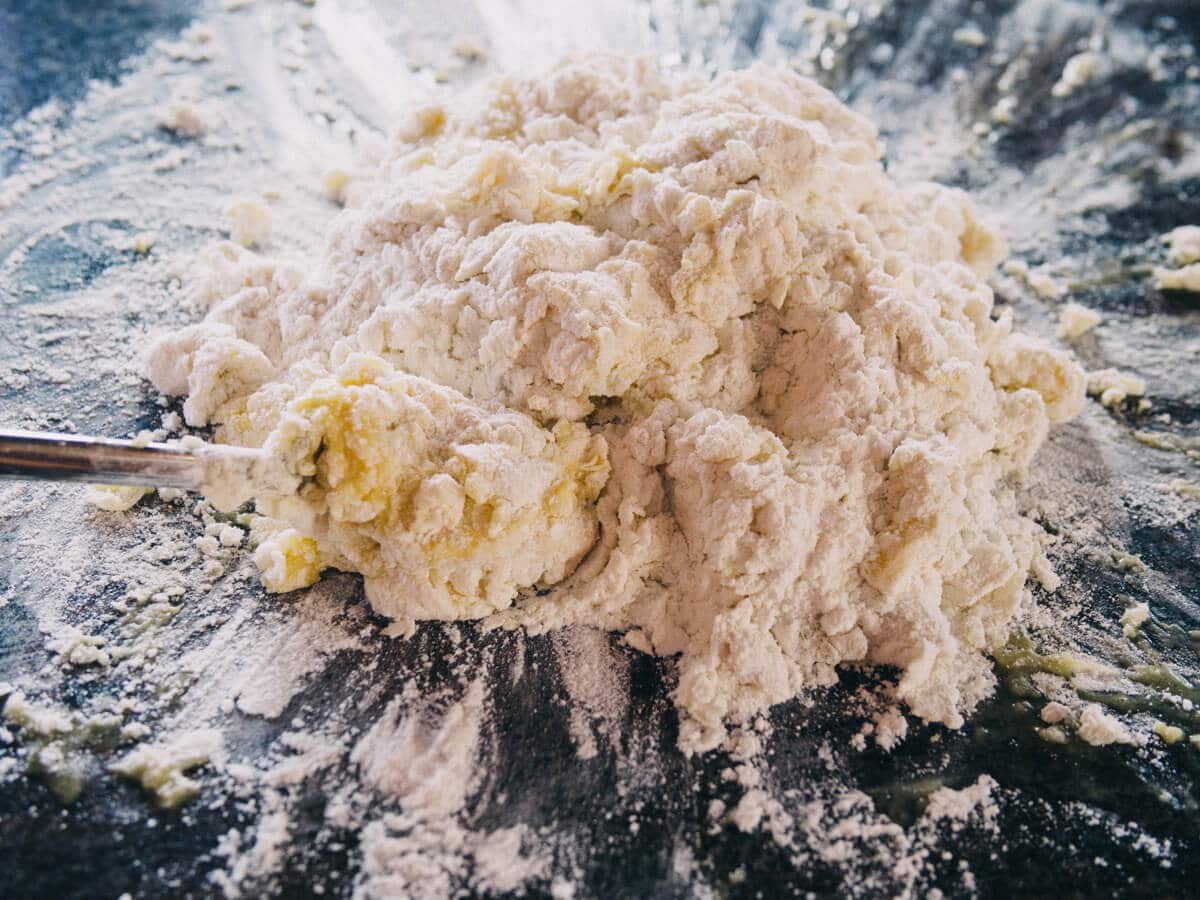
Little by little, add the flour to the egg mixture and beat until all of it is incorporated.
Mix the dough with your fork until it begins to take shape and you can gather it into a loose ball.
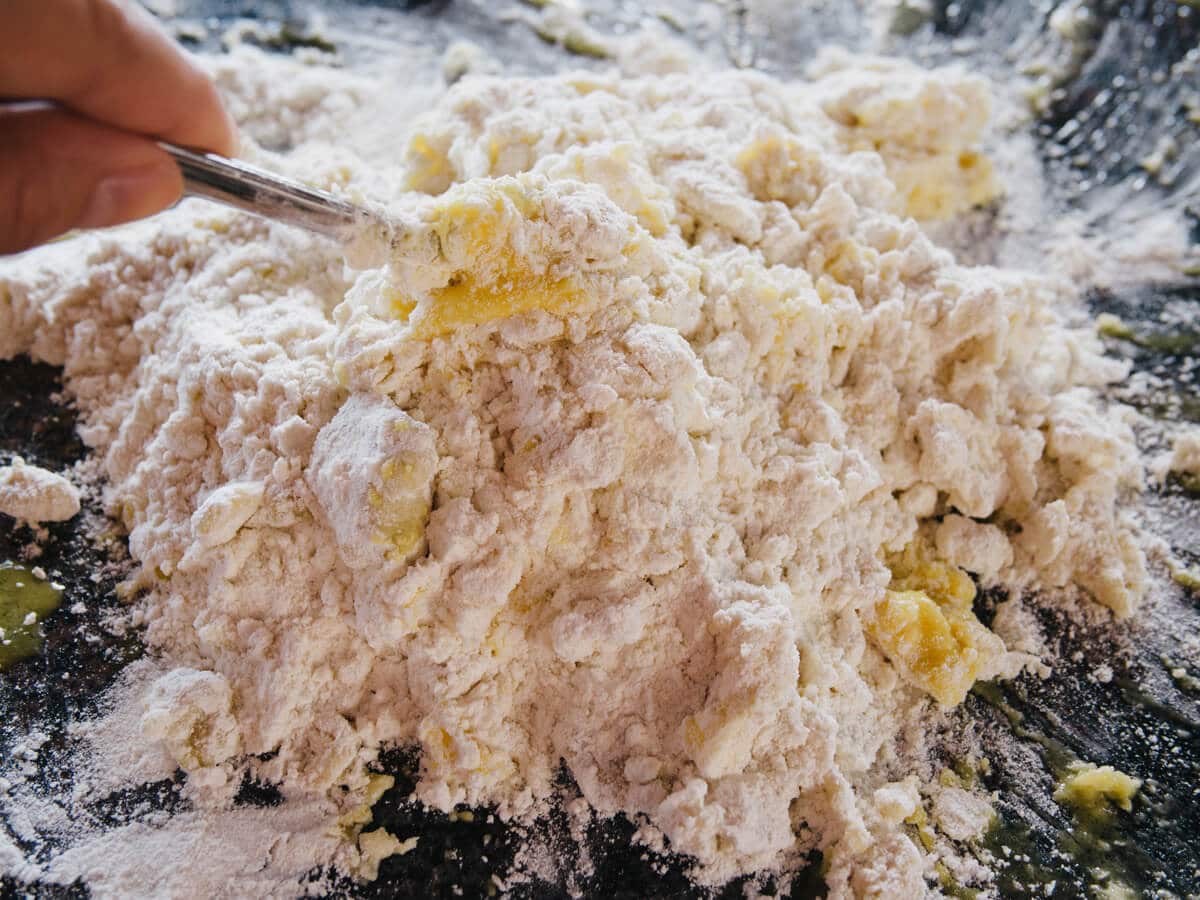
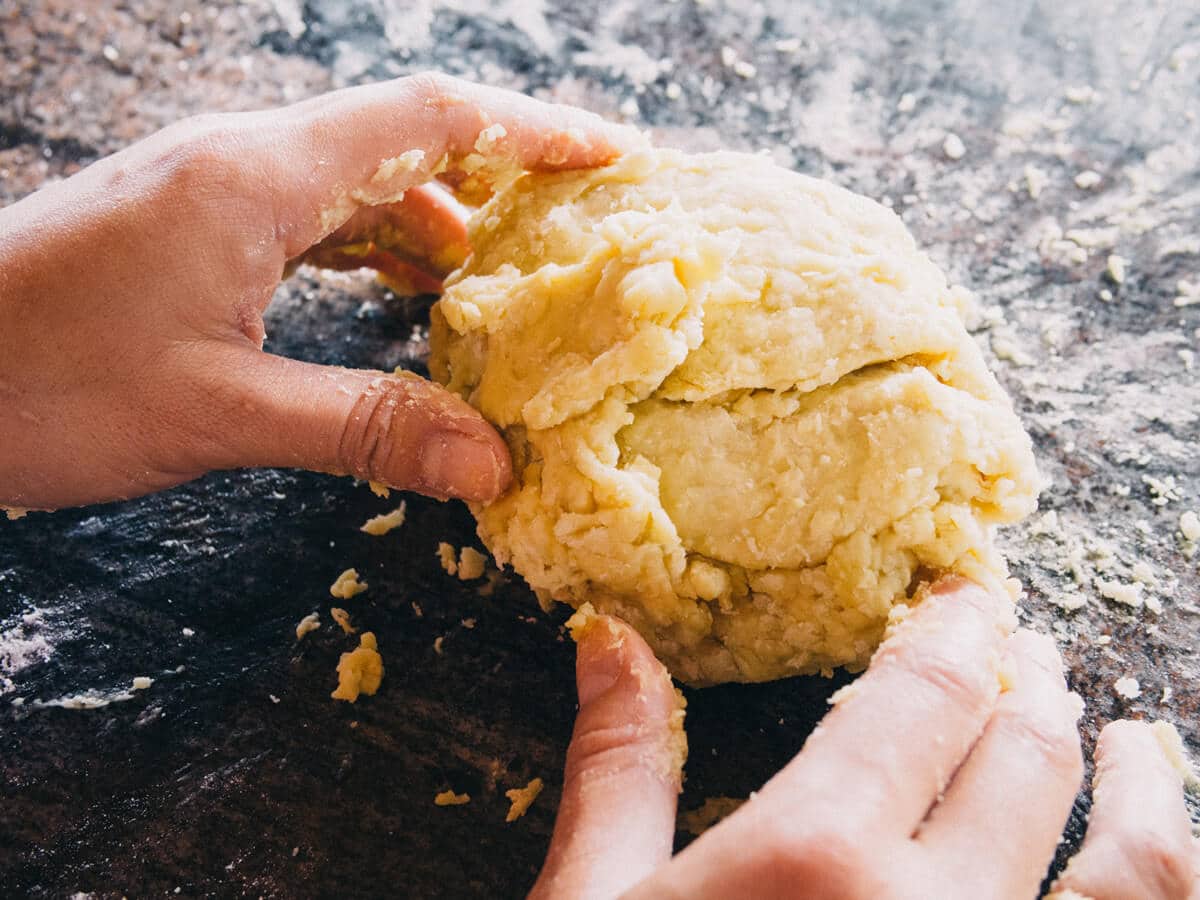
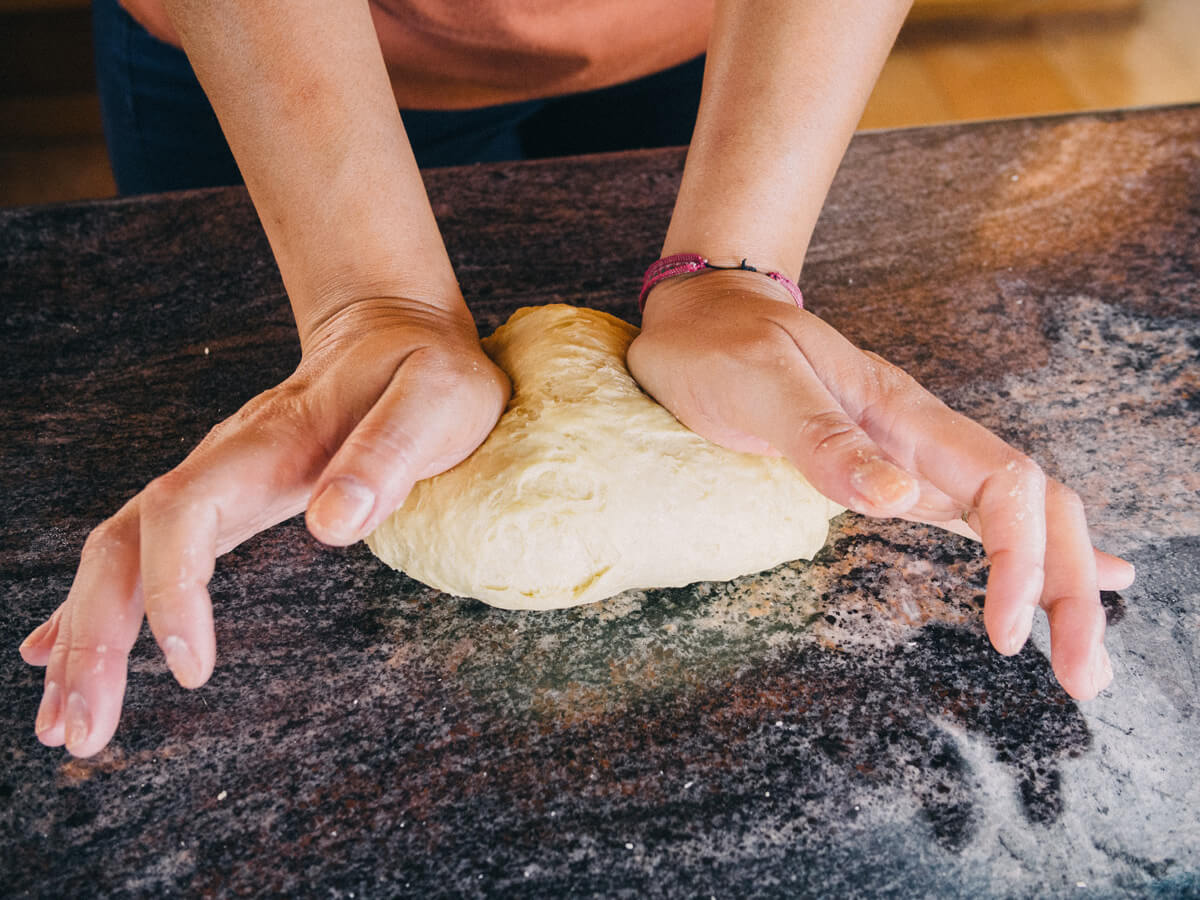
With your hands, start kneading the dough. It will feel soft and jiggly at this stage, but keep kneading for about 10 minutes until the dough firms up.
I like to push the dough down and out with the heels of my hands, then fold it back over onto itself, rotate a quarter-turn, and push down again.
There’s no “proper” method for kneading; think of it as a really intense massage. You want to work the dough with your hands to develop the gluten, which gives it strength and elasticity.
Within a few minutes, you’ll notice the dough becoming harder and harder to knead—making pasta can be a great workout in the kitchen!
If any excess flour or dough crumbs remain on your work surface and won’t stick to the dough, simply scrape them off with a dough scraper or straightedge.
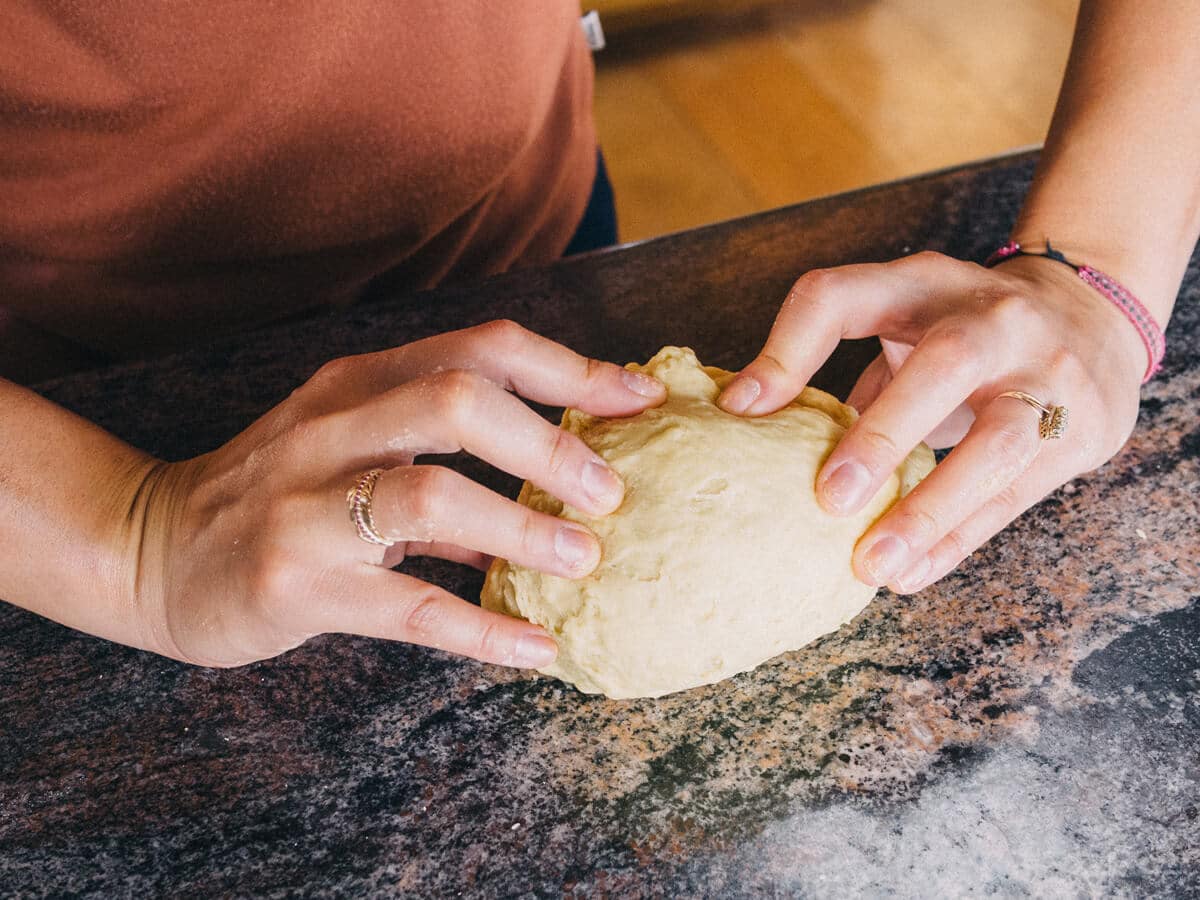
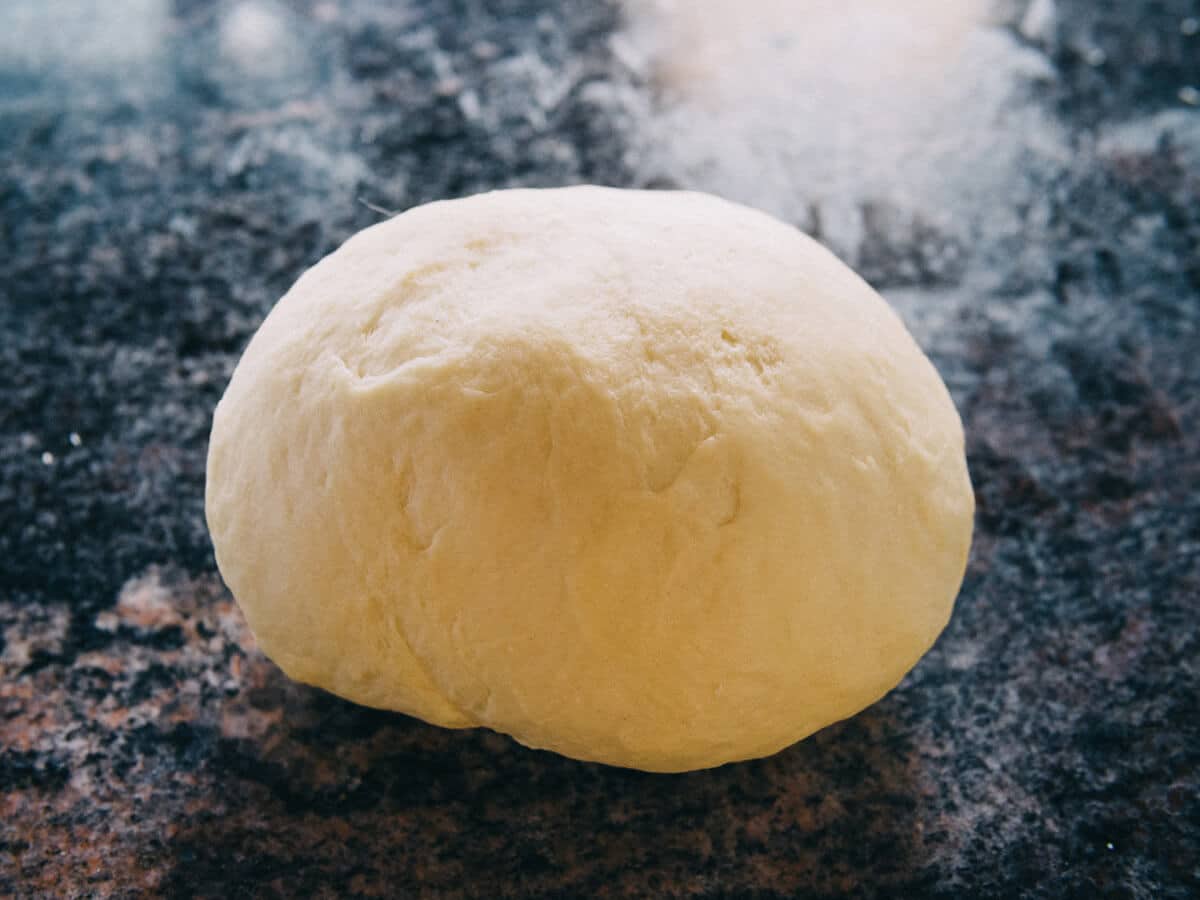
When your dough is stiff, looks smooth and no longer feels sticky, shape it into a ball and cover with a damp kitchen towel to keep it from drying out.
Let the dough rest for at least 30 minutes.
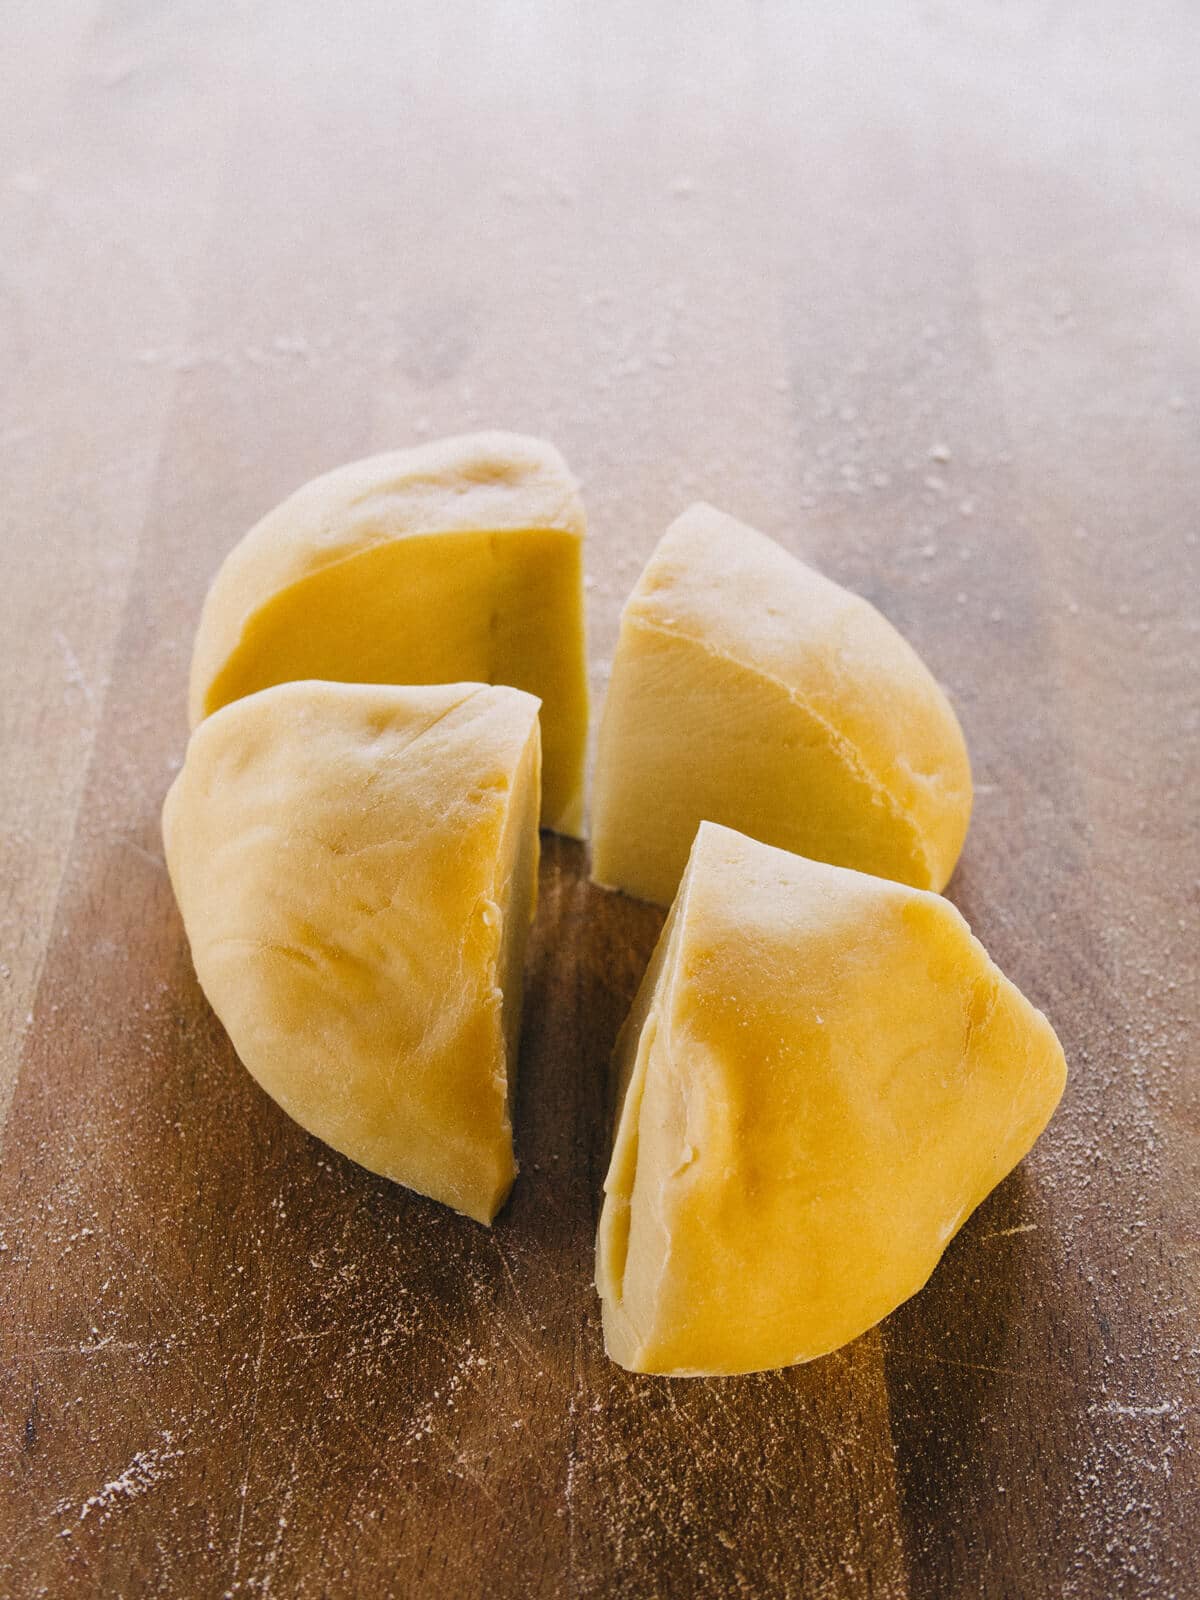
Cut the dough into quarters.
Keep the rest of the dough covered with a damp kitchen towel while you work on each piece.
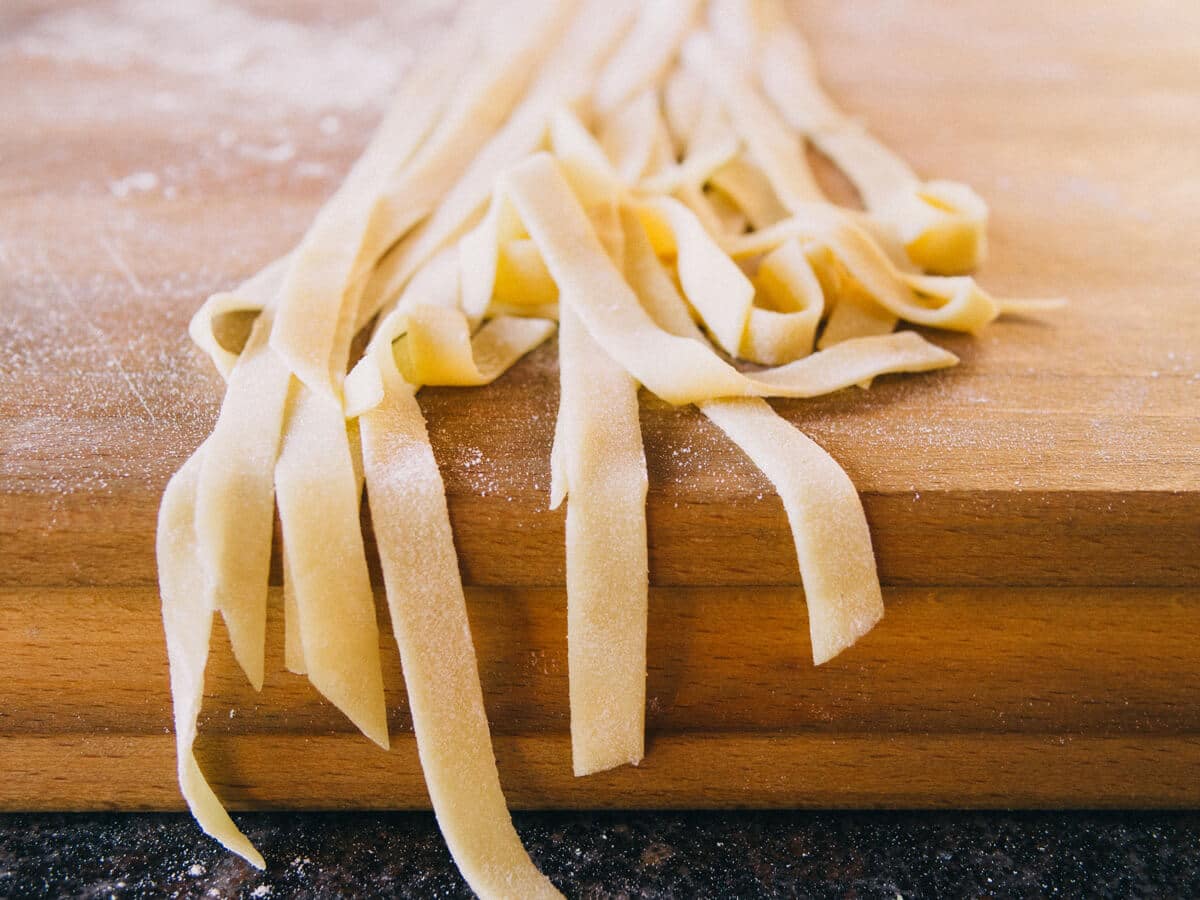
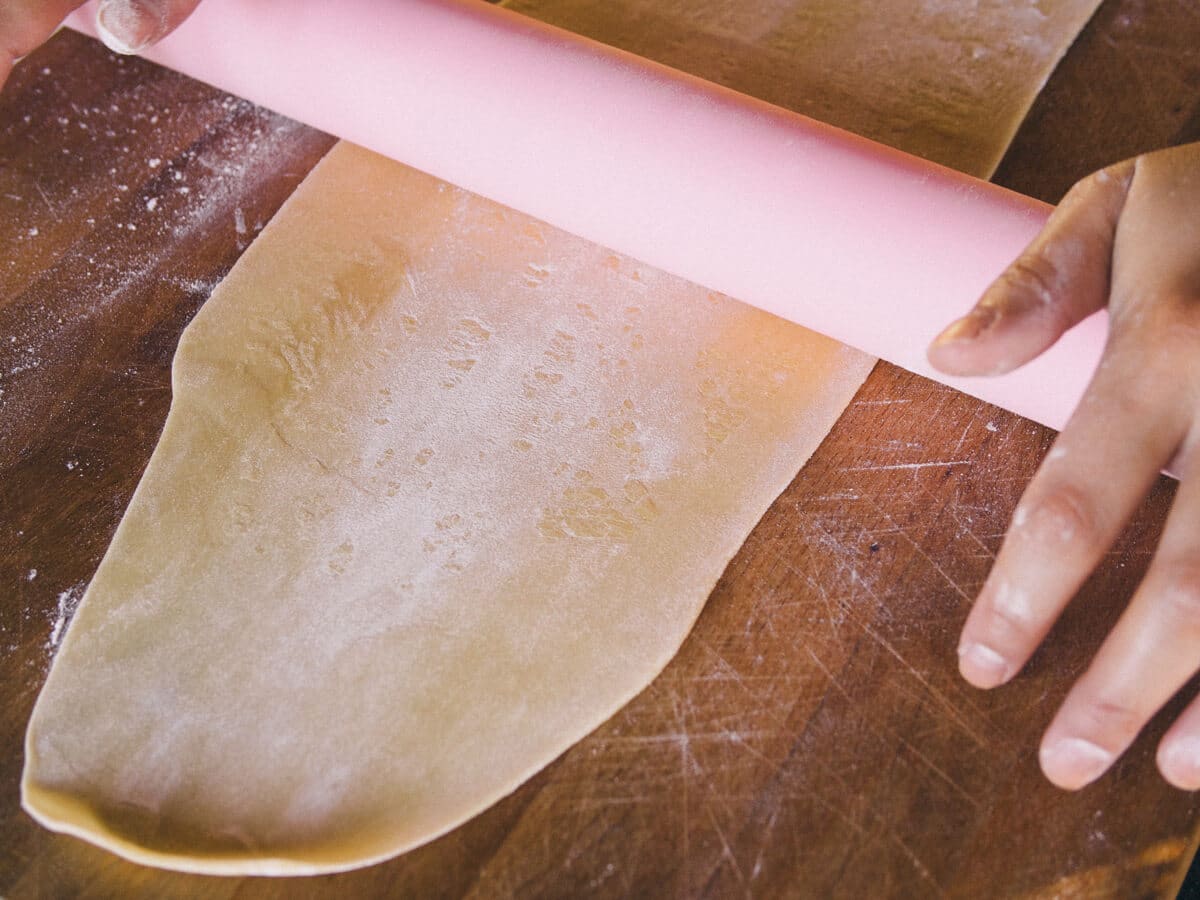
On a floured surface, roll out the dough as thin as you can get it—you should be able to see your hands through the pasta sheet when you pick it up. Dust liberally with more flour to prevent sticking.
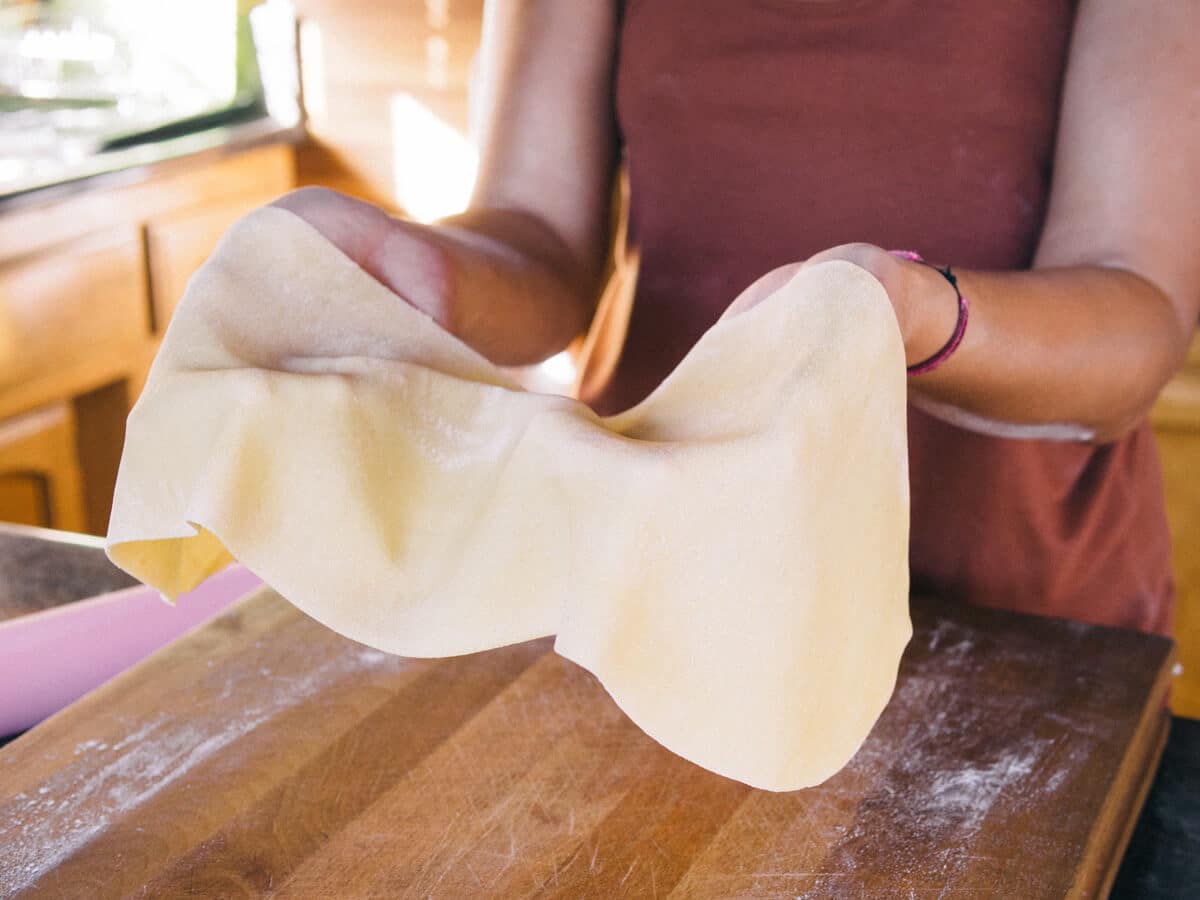
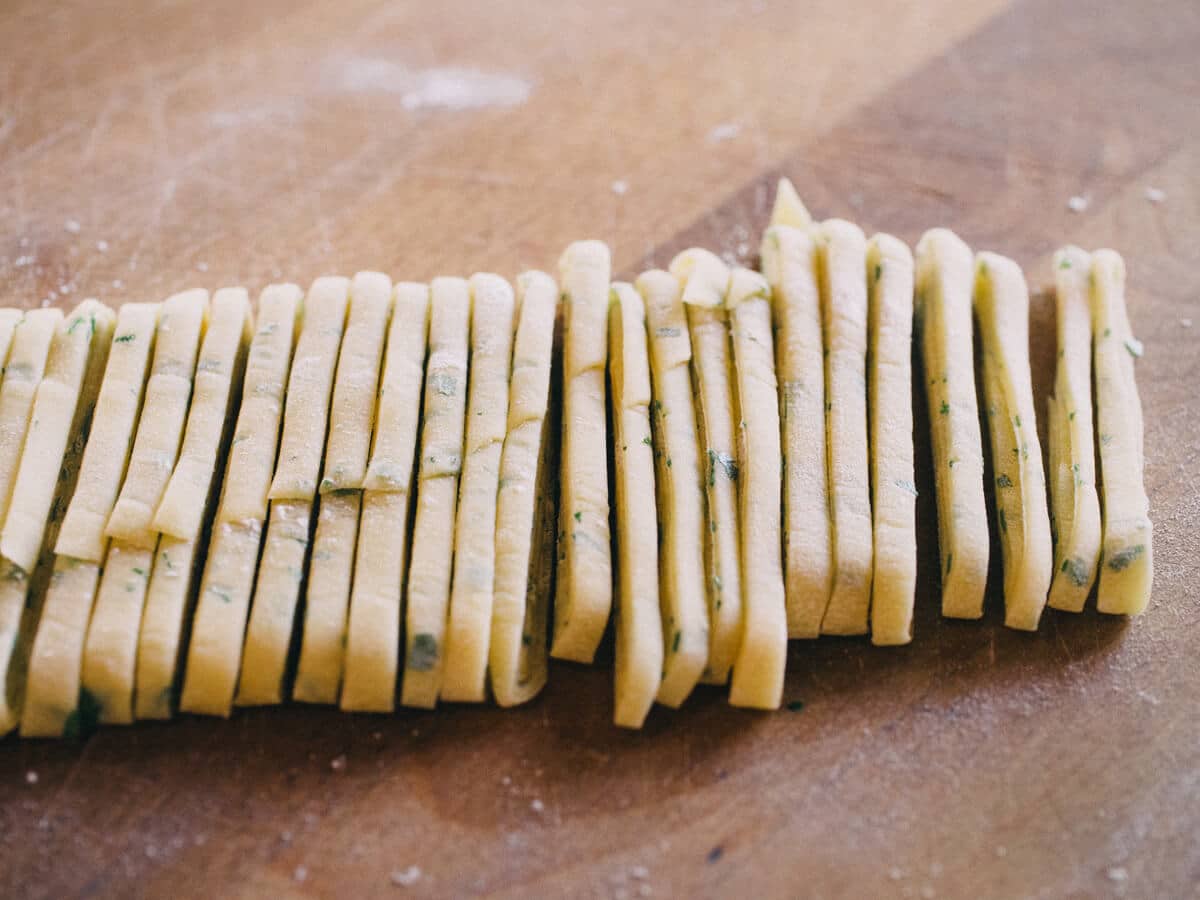
Lay the pasta sheet on a cutting board, with the short edge facing you, and fold the pasta a few times over itself (as if you’re folding a letter).
Then, cut it to your desired width:
- Spaghetti: 1/16 inch
- Linguine: 1/8 inch
- Tagliatelle: 3/16 inch
- Fettucine: 1/4 inch
- Pappardelle: 1 inch
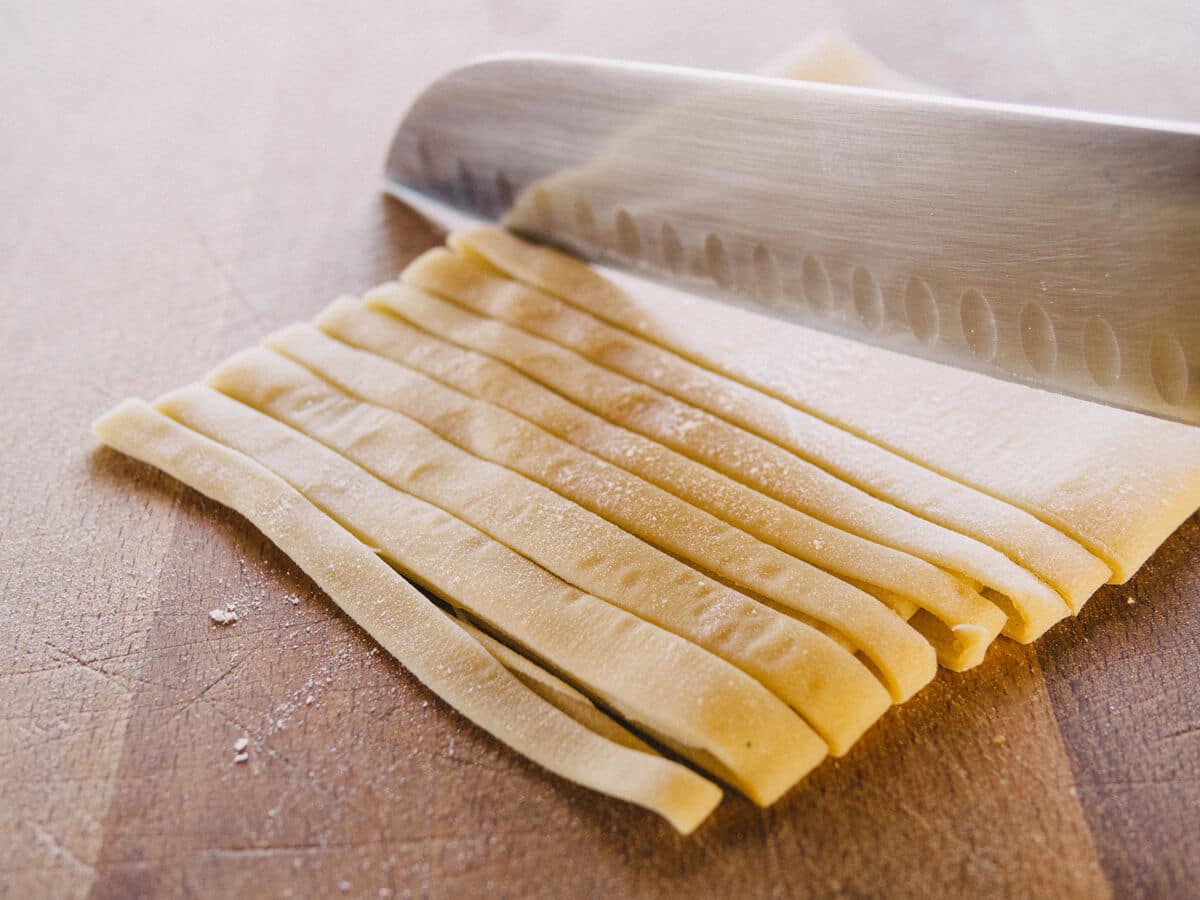
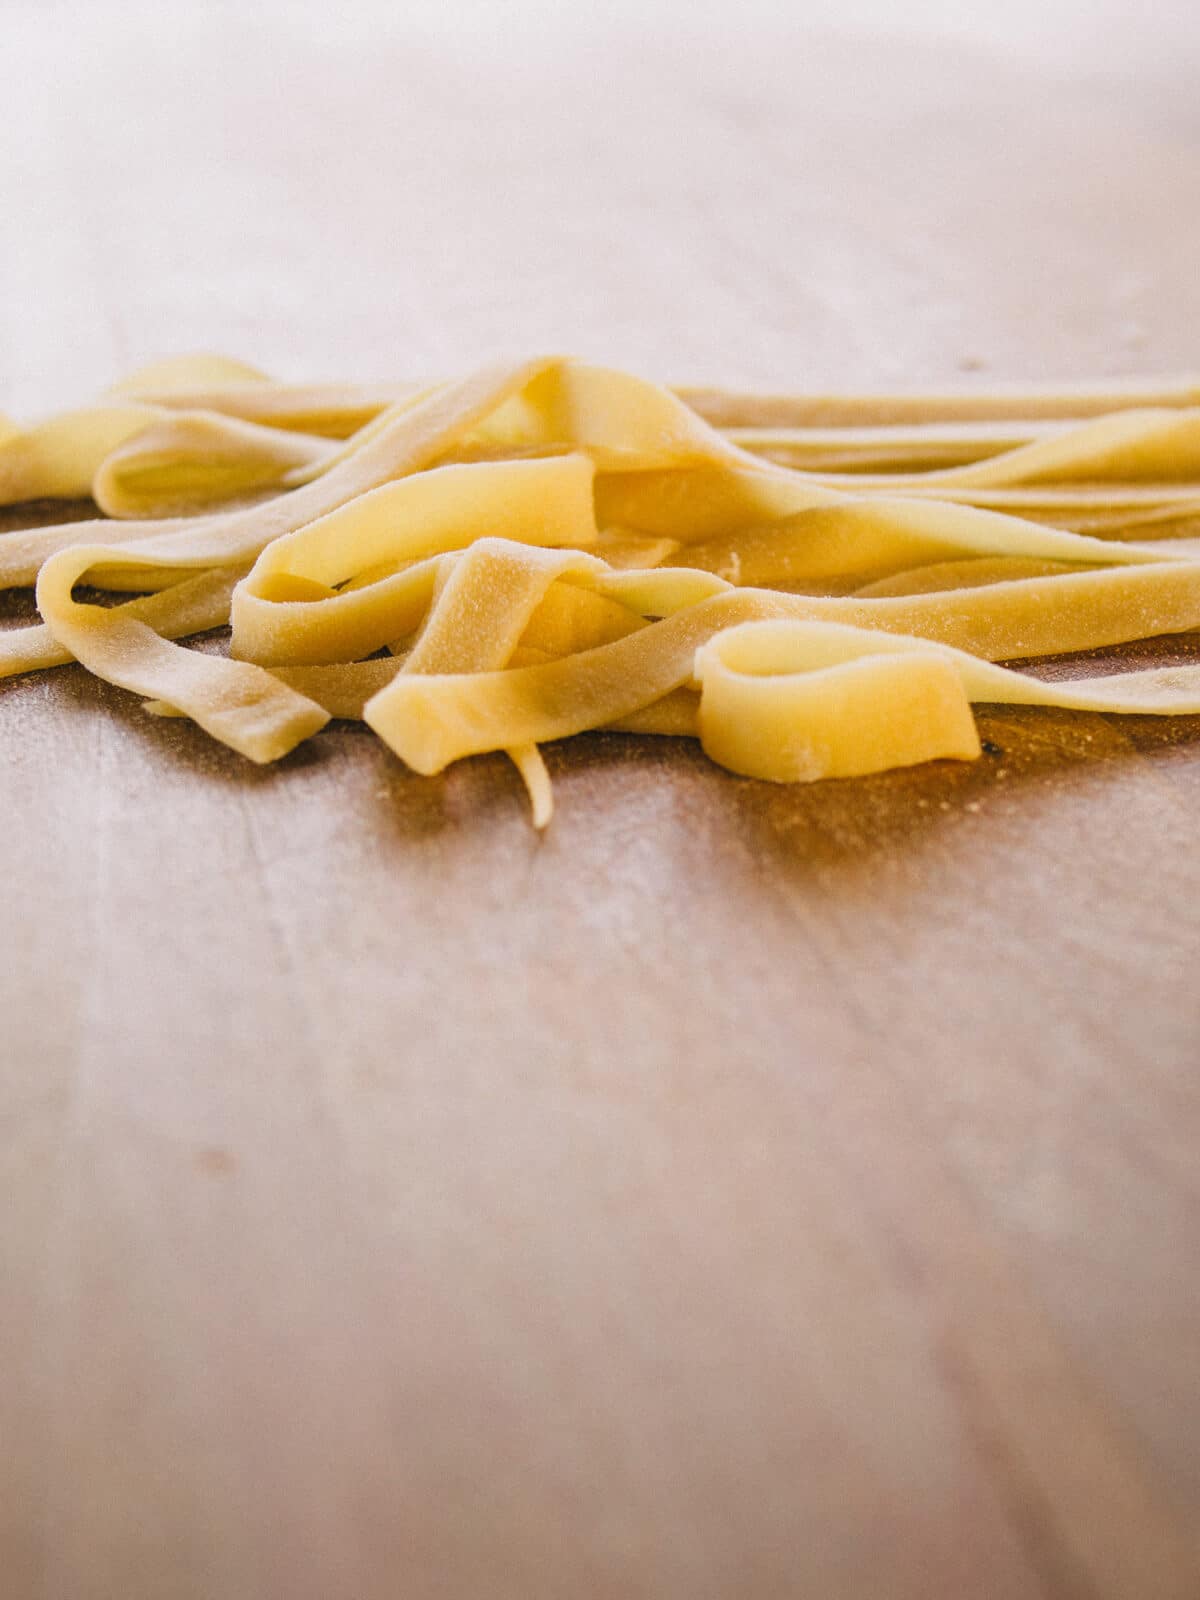
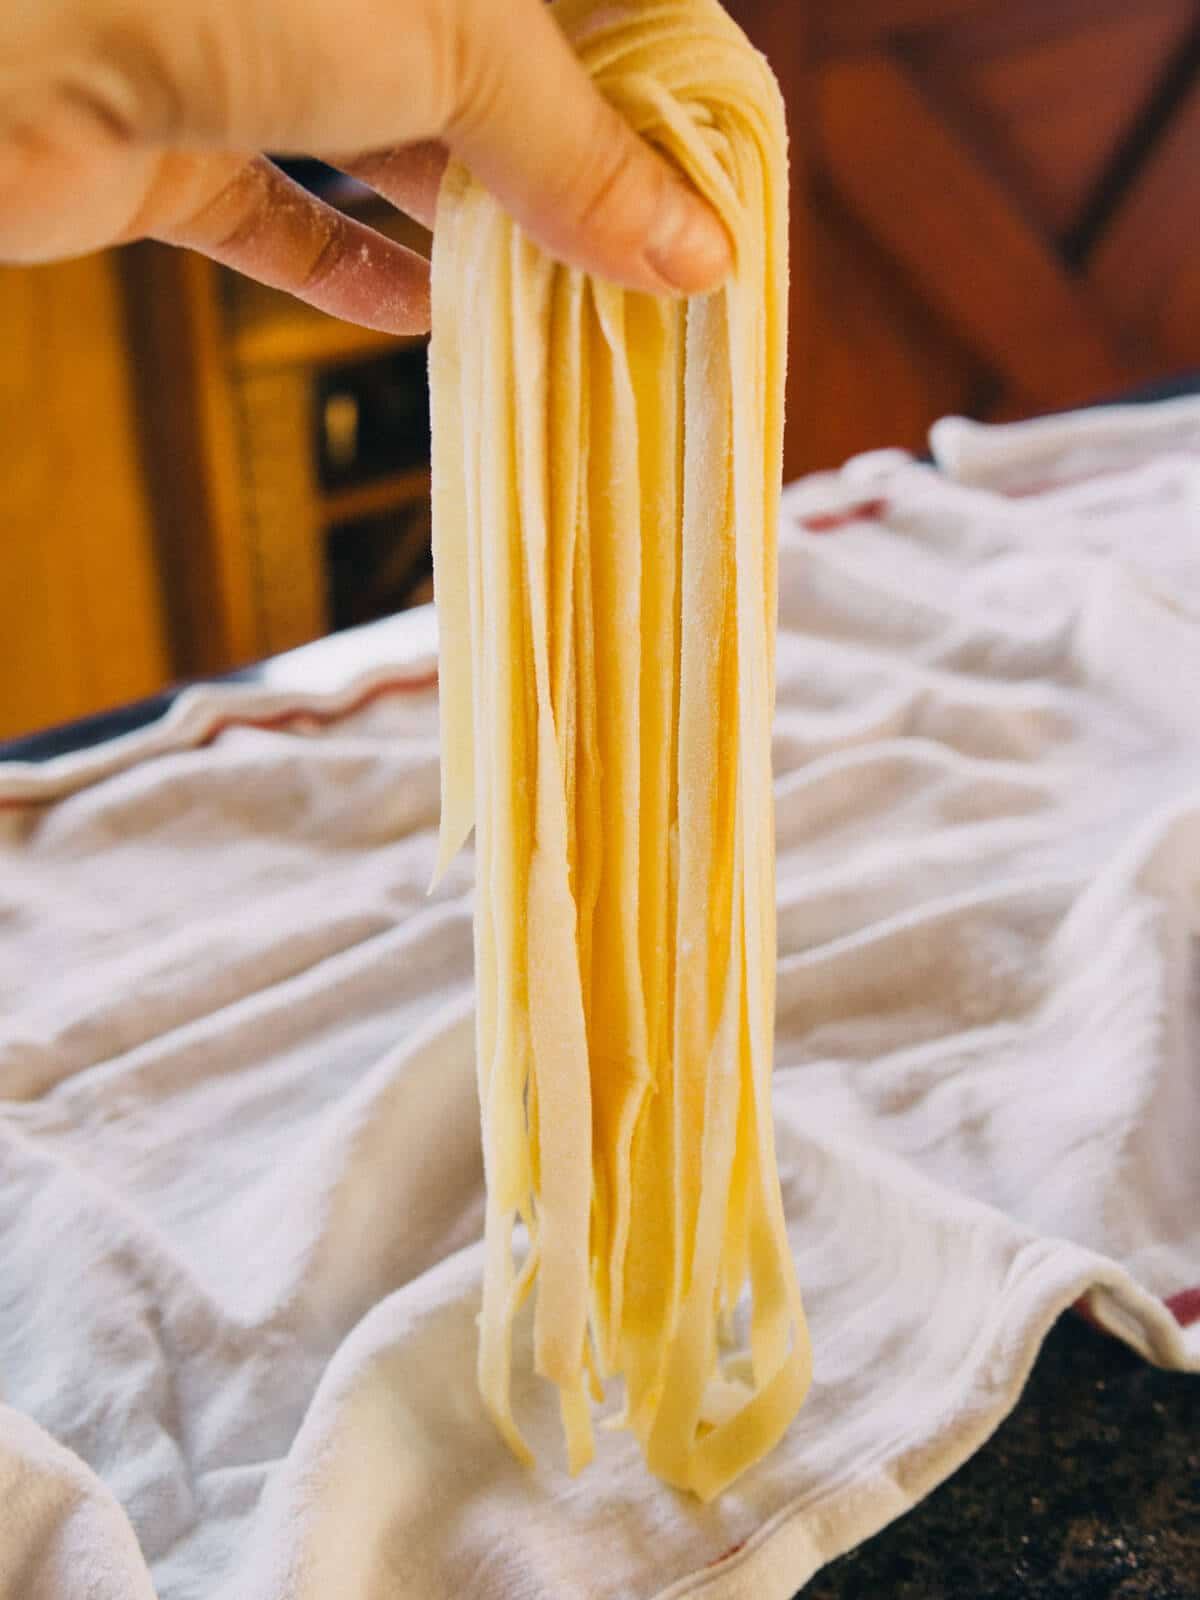
Shake the noodles out, toss with a little flour, then let them rest in loose mounds on a kitchen towel while you roll out the remaining dough pieces.
When you’ve finished cutting all the noodles, simply drop them into a boiling pot of salted water. Fresh pasta cooks in 2 to 5 minutes, depending on thickness.
If you’ll be storing the pasta to use later, lay the noodles out in long strands to rest and dry out a little. Pick up a single-serving portion of noodles and twirl into a nest.
Repeat with the remaining noodles, then place the nests on a cookie sheet and freeze for about 1 hour.
This keeps the pasta from clumping together in storage. Once they’ve firmed up, transfer to a freezer-proof bag or container and freeze again.
Frozen pasta can go straight into boiling water and takes a little longer to cook, but otherwise comes out exactly like fresh pasta.

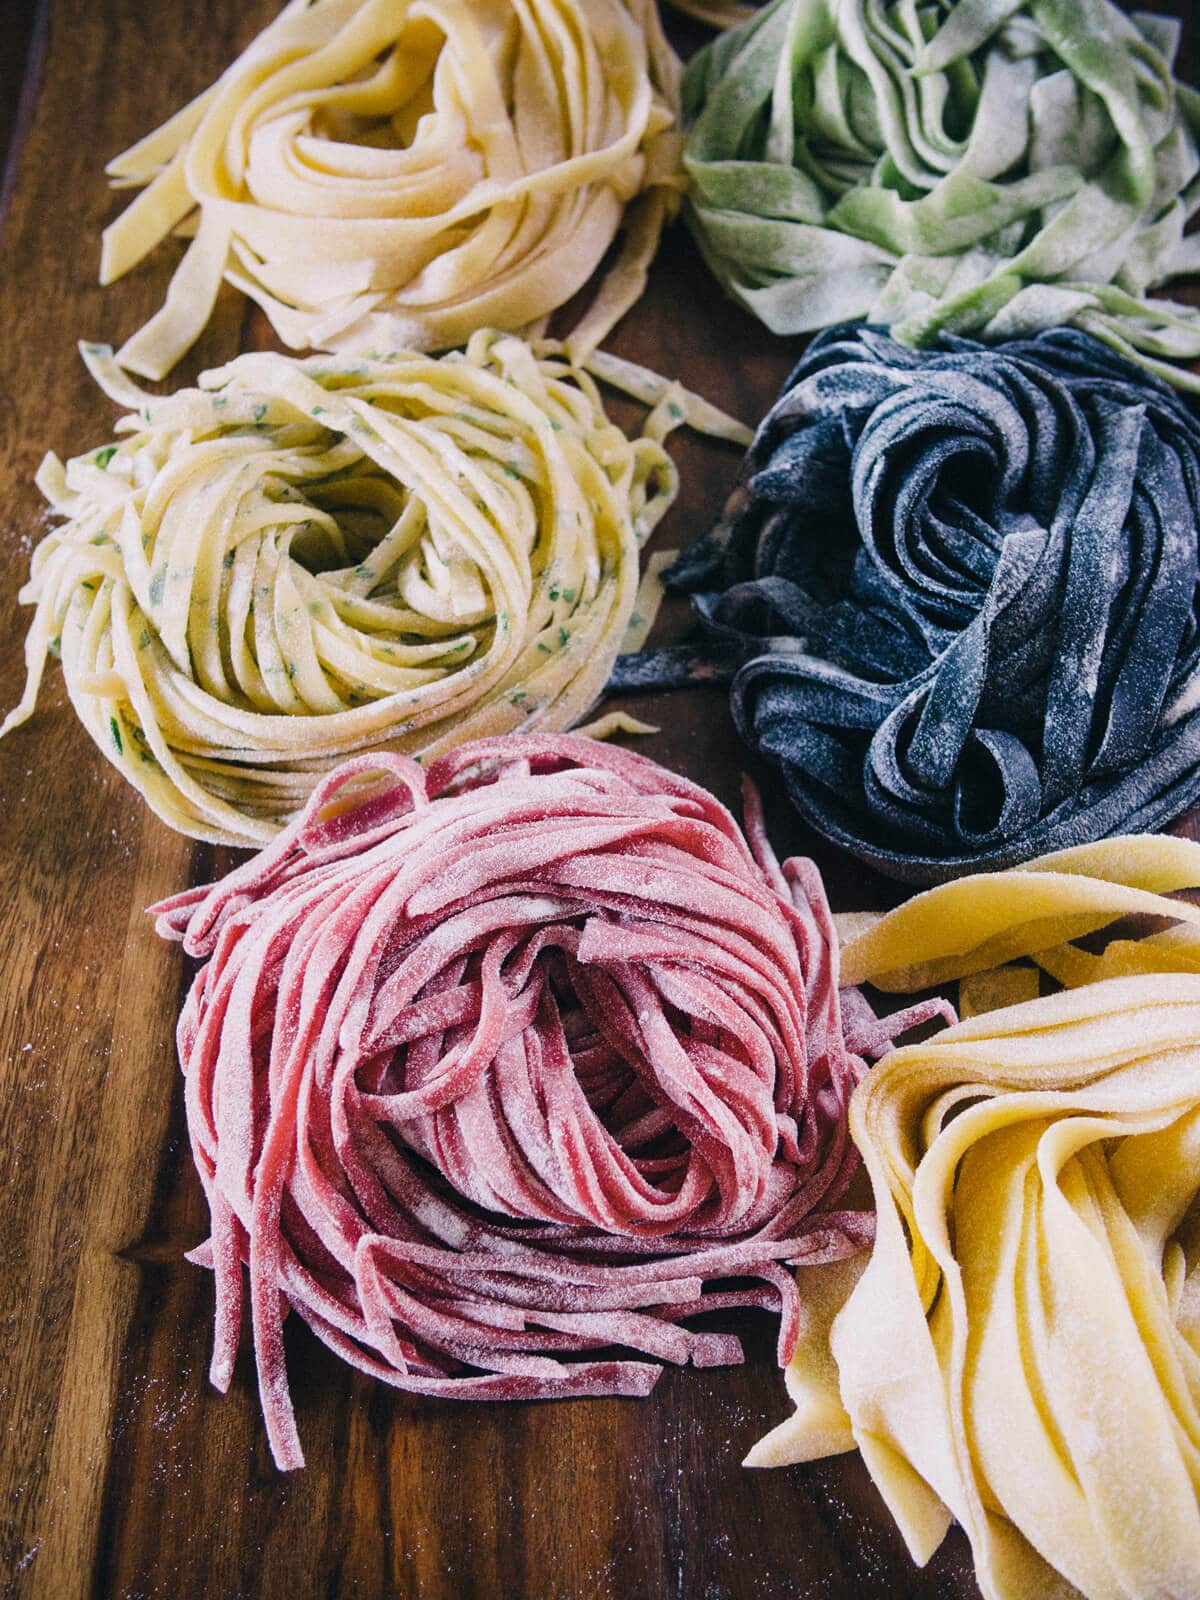
Pictured above, clockwise from top left: spinach pasta, squid ink pasta, carrot pasta, beet pasta, parsley pasta, and egg pasta.
Where to buy
Pasta making supplies
Notes
Don’t use too much flour
Although these recipes call for 2 cups flour, you may not need to use all of it. As you mix the flour into the liquid, incorporate just enough flour as the liquid will absorb until the dough is kneadable. Then knead with your hands until the dough smooths out. You can “mop up” any excess flour with the ball of dough to make it less sticky, if needed.
What pasta dough should feel like
Pasta dough is on the stiffer side—kind of like Play-Doh. It shouldn’t fall apart or be too dry, and it shouldn’t stick to your hands or be too wet. It’s okay if the dough is a little crumbly, as long as all the flour is binding together.
After resting, the texture of the dough will improve as the flour continues absorbing all the liquid.
Accounting for relative humidity
Does the relative humidity in your home affect pasta dough? In my experience, it does.
When I first developed this recipe, I lived on the coast in Southern California. Now that I’m in the high desert of Central Oregon, where the ambient humidity can go as low as 20 percent in winter, I’ve definitely noticed how different my dough feels.
You’ll find over time—as you make this recipe more and more—that my “magic ratio” for homemade pasta isn’t a hard and fast rule. Some days you may need more or less flour to make the dough stiffer or less crumbly, and you just have to trust your own judgment.
Weighing ingredients
If you often find yourself with dough that’s too dry, even when you measure the ingredients exactly, you might have better luck with weighing the flour and liquid to achieve more consistent results.
Traditional wisdom usually calls for 1 egg per 100 grams flour.
But what size egg? After all, eggs aren’t always the same size (even the ones labeled as medium or large on the carton).
That’s why I think a better “rule” to follow is 1.64 grams flour for every 1 gram egg (without the shell). Keep it simple by omitting the olive oil if you use this method.
In my experience:
- 1 egg = 47 grams
- 2 eggs = 93 grams
- 3 eggs = 141 grams
So for 3 eggs that weigh 141 grams, you should use 231 grams flour. This will yield around 3 servings of pasta.
Frequently asked questions
Fresh Homemade Pasta

Here are four easy recipes for homemade pasta! They all use the same master technique and base ingredients, but incorporate a variety of colors and flavors.
Ingredients
Egg Pasta
- 2 cups all-purpose flour, plus more for rolling and dusting
- 3 large eggs
- 2 tablespoons olive oil
Herb Pasta
- 2 cups all-purpose flour, plus more for rolling and dusting
- 3 large eggs
- 2 tablespoons minced fresh herbs (try basil or parsley)
- 2 tablespoons olive oil
Vegetable Pasta
- 2 cups all-purpose flour, plus more for rolling and dusting
- 2 large eggs
- 1/4 cup vegetable juice (try beet, spinach, or carrot juice, or even tomato paste)
- 1 1/2 tablespoons olive oil
Squid Ink Pasta
- 2 cups all-purpose flour, plus more for rolling and dusting
- 3 large eggs
- 1 1/2 tablespoons olive oil
- 1 tablespoon squid ink or cuttlefish ink (see Notes)
Instructions
- Mound the flour onto your work surface and make a large well in the center. (Tip: I use my measuring cup to carve out a deep, perfect well about 5 inches in diameter.)
- Crack each egg into the well, followed by the remaining ingredients in your chosen pasta recipe.
- Using a fork, beat the eggs and oil (plus any herbs, vegetable juice, or squid ink, if using) until well combined.
- Little by little, add the flour to the egg mixture and beat until all of it is incorporated. Mix the dough with your fork until it begins to take shape and you can gather it into a loose ball.
- With your hands, start kneading the dough. It will feel soft and jiggly at this stage, but keep kneading for about 10 minutes until the dough firms up. I like to push the dough down and out with the heels of my hands, then fold it back over onto itself, rotate a quarter-turn, and push down again.
- When your dough looks smooth and no longer feels sticky, shape it into a ball and cover with a damp kitchen towel to keep it from drying out. Let the dough rest for at least 30 minutes.
- Cut the dough into quarters. Keep the rest of the dough covered with a damp kitchen towel while you work on each piece.
- On a floured surface, roll out the dough as thin as you can get it—you should be able to see your hands through the pasta sheet when you pick it up. Dust liberally with more flour to prevent sticking.
- Fold the pasta sheet a few times over itself (as if you were folding a letter) and cut it to your desired width. (See Notes below.)
- Shake the noodles out, toss with a little flour, then let them rest in loose mounds on a towel while you roll out the remaining dough.
- When you’ve finished cutting all the noodles, simply drop them into a boiling pot of salted water. Fresh pasta cooks in 2 to 5 minutes, depending on thickness.
Notes
General pasta widths
- Spaghetti: 1/16 inch
- Linguine: 1/8 inch
- Tagliatelle: 3/16 inch
- Fettucine: 1/4 inch
- Pappardelle: 1 inch
Squid ink or cuttlefish ink
You can also use 2 (4g) packets of squid or cuttlefish ink.
Freezing tips
If you’ll be storing the pasta to use later, lay the noodles out in long strands to rest and dry out a little. Pick up a single-serving portion of noodles and twirl into a nest.
Repeat with the remaining noodles, then place the nests on a cookie sheet and freeze for about 1 hour.
This keeps the pasta from clumping together in storage; once they’ve firmed up, transfer to a freezer-proof bag or container and freeze again.
Frozen pasta can go straight into boiling water and takes a little longer to cook, but otherwise comes out exactly like fresh pasta.
Nutrition Information:
Yield:
4Serving Size:
1/4 poundAmount Per Serving: Calories: 2230Total Fat: 43gSaturated Fat: 9gUnsaturated Fat: 35gCholesterol: 525mgSodium: 231mgCarbohydrates: 387gFiber: 14gSugar: 2gProtein: 69g
Nutrition information isn’t always accurate.
This post updated from an article that originally appeared on December 5, 2014.


Enjoyed your no machine homemade pasta. My Italian mother used to use the entire kitchen to make it. She would roll it out with a sanded broomstick she kept for this use only. She roll it out, flour it well and roll it flat then roll the dough up onto the stick, roll it a bit. Then she would unroll it onto the table, flour it as needed to keep it from sticking together as she rolled it out while it was wrapped around the stick. She repeated until the thickness she wanted. Then she would roll it onto the stick again and slide the pasta roll off the stick. It would come off looking just like yours when ready to cut. She cut it at the desired width and presto pasta.
I love to sit across from her at the table to smell the pasta and listen to it slap on the table as she worked. I can’t describe why the slapping noise. I guess you just had to be there. Thanks for bringing back that wonderful memory.
I know you said you don’t have any tips / experience with gluten free, but what about egg free?
(Just two of the many household family allergies.)
Thank you.
You can fine gluten free flour at most grocery stores. It a one to one ratio with normal flour.
the gluten free flour is King Arthur’s Measure for Measure. You probably already know that 🙂 I found this online:
Bob’s Red Mill Gluten Free Vegan Egg substitute is a vegan baking essential made with four simple and clean ingredients: potato starch, tapioca flour, baking soda, and psyllium husk fiber–no grains, soy, gluten or beans.
It’s available online. Not sure about any grocery stores
You can absolutely make an egg-free pasta. A traditional dough is made with just semolina flour and water at 50% hydration.
I will be trying the home made pasta today. I am happy to have someone like you sharing your information with the world. THANK YOU! HAPPY NEW YEAR LINDA!
One of the tastiest pastas I’ve ever had was admittedly an unappealing grey colour…it was made with mushroom stock/ground mushroom powder.
I’m going to try your recipe with the shroomies!
Hi Linda,
I made this last night with fresh basil. It will take a little practice to cut them evenly and make those neat little nests but, they tasted great! It’s surprisingly easy. All your tips and suggestions are timed well, too.
Thank you for posting it, I’ll definitely be making it again!
I did the math, that is how much the entire recipe is. There are four servings so you have to divide it.
So I can dry the pasta for later use even if I put spinach in the dough? I was worried it would go bad with the extra ingredients.
How would you make this with a stand mixer? It looks amazing. I can’t wait to try it!
Hi
I use a kitchen Aid mixer with the 2 pasta roller attachment.
Use your standard beater for 30 seconds to combine your ingredients
Whem combined switch to the doe hook for about 2 minutes.
I kneed doe by hand in the bowl to pick up any loose flour.
Rest doe as usual.
Look at the kitchenaid video
Attach lasagna attachment and roll out
I have a fettuccine cutter
Makes great pasta
Enjoy
I was so anxious to try this no machine pasta recipe until I read that one serving is 1300 calories!!! Is this correct.?
Hi, for vegetable pasta, we need vegetable juice or vegetable puree? Thank you
Iwas wondering would using wholemeal four affect the outcome too much?
Ok…when I came across this recipe that said “easy homemade pasta”, I instinctively said “bull****”. Heard that one before. But I decided to give it one more shot…and I’m glad I did! This recipe made a delicious batch of pasta sheets! We folded them around ricotta and smothered them in homemade short rib ragu. O.M.G. Will definitely make again!
Epic pasta! I had never made fresh pasta before and thought I couldn’t because I didn’t have a machine… But this turned out amazing! It was super easy for me to do even as an inexperienced cook. Thank you for sharing this fabulous recipe (I made the vegetable-coloured pasta recipe by the way).
Hello 🙂 the recipe is amazing. I tried the basic one a few times ands just fantastic. Thinking of trying the spinach one now but i have a question, if i cant conveniently find ready made spinach juice, can i just juice it in a blender myself? And if so, how much water should i add? I wouldnt want it to be too watery so it doesnt ruin the dough
Thanks in advance 🙂
You can definitely juice your own spinach, as that’s what I usually do. I add just enough water to be able to turn it into a thick puree, and then I strain the solids. Having spinach juice that’s too watery won’t really ruin the dough, it just won’t add enough color. Good luck! 🙂
Hi, thank you for sharing your great recipes.For this recipe we need vegetable juice or vegetable puree. Thank you for your answer
Hi there:) Can you use almond flour or coconut flour?
I’m not familiar with using wheat flour substitutes, so I’m afraid I can’t help you there.
The simple answer is no. Non wheat four contain little to no gluten, even using gluten free flour you still wont have a decent result and if you accidentally cook it too long it falls to pieces. Think When flour mixes with water, the gluten proteins form a sticky network that has a glue-like consistency.
This glue-like property makes the dough elastic and gives bread the ability to rise during baking or to be stretched or rolled out for noodles and pasta.
Interestingly, the name gluten derives from this glue-like property of wet dough.
Wow! This is awesome. Can’t wait to try this out.
Good luck! It’s a really fun and satisfying process. 🙂
Wonderful timing for this article–thank you!. I’m going to make good use of all this information because I just received my custom made Noodle Board! If anyone doesn’t know what that is, it is a wonderful kitchen item from yesteryear, often sold today as a decorative cover for the stove. They usually look like a large, rustic cutting board with three raised sides and are used both to roll out and cut noodles and to dry them. I had mine custom made from oak, with 6 inch sides and no holes, because I wanted it to be perfectly smooth, food grade with no finish, and capable of holding onto all the flying flour that will be going on. I’ll use refined olive oil to season it, then it will be ready to go, for making noodles, tortillas, pie crusts, biscuits, cinnamon rolls, and anything else that makes a mess on the counter.
That sounds wonderful! I looked into pasta boards recently because our new kitchen doesn’t have smooth counters, and I thought about just making one to the exact size I need. You’re giving me another reason to revisit that idea!
Best decision I ever made for a kitchen item. I love it! I changed my mind on the refined olive oil finish and used refined walnut oil instead. It really brought out the grain of the wood while protecting it. Any good quality, refined vegetable oil should work, and you can research that. I don’t prepare food with refined oils, but for this purpose I needed an oil that wouldn’t “go rancid”. You aren’t slathering the board with oil, but rubbing it in periodically to maintain the wood.
I make a “spoon oil” (that can be used on cutting boards and pasta boards as well) using walnut oil: https://gardenbetty.com/homemade-spoon-oil-or-as-i-like-to-call-it-spoon-butta/
The “spoon oil” should work great after applying the initial oil finish. Walnut oil is a good “curing oil” when it is refined. I’m glad I used it for the initial wood treatment. I’m going to make and use “spoon oil” to keep my new noodle board and cutting boards happy. Also, I’ve made several pasta recipes based on your great article. Please keep them coming!
Is it okay to use oatmeal flour?
Unfortunately I’m not familiar with oatmeal flour.
I just tried this recipe! It was my first time making homemade pasta and it turned out great! I did a tomato- basil version!
Yum!
Beautiful post!! I can’t wait to try! I have a question: when you say the general rule is 2 cups flour to 3/4 cup liquid… By “liquid” do you mean eggs plus oil (eg: in the egg noodle recipe)?
Thank you! And yes, the liquid includes both egg and oil.
I just tried your recipe; it’s my first time making homemade pasta. It turned out beautifully!
I’m so happy to hear that!
Wow that was amazing to read! Very informative and beautifully written and photographed. You addressed all my concerns/fears of fresh pasta making and now I think I have to give this a try!
Thank you, I hope it turns out great for you!
Linda I have to tell you, hands down the best presentation of any product or food prep. I have ever seen, bar none. a lot of times even in great posts there is a vital point forgotten and makes the end result a waste of time and someone will miss out and maybe give up on following future recipes. SO GREAT BIG THUMBS UP TO YOU AND THAT GREAT PASTA. Thanks for all your hard work.
Woohoo! Thanks for the awesome comment and I’m so happy you rocked the homemade pasta!
What a gorgeous and well-explained post! Thank you!
You’re welcome, I hope you have a chance to try it!
Can you knead the pasta with the dough hook in the mixer? I have a 350 watt Kitchen Aid mixer that makes wonderful bread dough that I was hoping would work for the pasta too.
Yes, you can use a mixer. You might need to finish it off with some hand-kneading, however, to really get all the air pockets out.
Can this be made ahead and stored in the fridge until dinner?
Yes, just make sure you dust the noodles with flour and wrap them in a dry towel so they don’t become too moist and sticky in the fridge.
I noticed you kneed it on granite and roll on wood. We have a large granite countertop and I have noticed that the sheet of pasta keeps sticking to the countertop making it hard to pick up to keep rolling, or stikcs when cutting out ravioli/tortelloni. Is that because of the granite or something else? If the granite, is there a way to avoid this. I don’t have room for a large wood cutting board. Thanks
Dust your counter and your rolling pin with more flour to prevent sticking (I do the same for my wood surface).
What gorgeous pictures! 🙂 I have a trouble shooting Q…I have picture perfect pasta until it is boiled…it is pliable, kneads beautifully, cuts easily, and looks just like yours in the photo before it is cooked. BUT, when I boil it, the surface gets wrinkly. Does not affect firmness or taste, and from afar it looks fine, but when you look at it out close, it is wrinkly…is this normal? Am I expecting too much? Or, if not, how can I avoid the wrinkled surface? Thanks!!!
I’m not exactly sure what you mean when you say wrinkly, or how close you’re looking at it when you say “up close.” If it starts out smooth but gets pockmarks after boiling, it’s possible you had some air bubbles in the pasta. My own boiled pasta doesn’t have wrinkles, but it does have a slight texture because I roll it out on a butcher block (as opposed to marble or granite). I prefer the surface that way as it helps sauces adhere better.
Can you use coconut flour too or will it not taste as good ???
I’m not familiar with coconut flour so I’m sorry I can’t help you here. It has such a different composition from wheat flour that you will have to make several adjustments to account for its absorbency, texture, and flavor.
Love this! All these beautiful colors would look fun cut into cute shapes. Would the dough hold its shape if it were cut into tiny hearts for instance?
Yes, as long as you let the dough rest long enough. You can also make other pasta shapes with this same dough, like bowties and tubes. They hold their shape better if they’re left out to dry just a touch.