
Every spring and fall, I grow a beautiful bed of komatsuna (Brassica rapa var. perviridis), a type of Japanese mustard green related to turnip and rapini. It’s the fastest growing green in my garden (ready to harvest as baby greens within three weeks, fully mature by five weeks), and its spicy, mustardy leaves can be picked at any stage.
I use them as salad greens while waiting for my lettuce to grow, and as stir-fry greens when my bok choy isn’t quite ready yet. They’re especially good in soup, where the stems become tender and the leaves nicely wilted, but not too soggy the way spinach can get. I love them in Asian soups, such as udon, ramen, or a hearty oxtail soup with radish and carrots. And if you let the leaves grow large, they make a good wrap for fillings as well.
I sometimes forget how fast they grow, so imagine my surprise when — after letting my husband take care of the garden for a week while I caught up on work — I walked outside and saw the komatsuna nearly exploding out of their bed (the other stuff exploding behind the komatsuna is my rhubarb plant — only one, I might add!).

Since there was no way I could eat that many salads, stir-fries and soups all at once, I decided to put them up in one big batch of Vietnamese pickled mustard greens, or cải chua as it’s called.
Cải chua is one of the traditional pickles in Vietnamese culture, the same way đồ chua is. I actually grew up eating more of the pickled mustard because it’s the perfect accompaniment to my family’s many salty home-cooked dishes, like cá kho tộ (braised and caramelized catfish in a clay pot) and thịt ko (braised and caramelized pork belly with hard-boiled egg). These are dishes you typically won’t find on a Vietnamese restaurant menu, but they’re made in every Vietnamese home.
But cải chua is not just a Vietnamese thing. The spicy and sour flavor works well with almost any rich and hearty dish, such as fried fish, grilled sausage, Cajun-style seafood, meatballs and rice, or even a pungent Korean or Chinese noodle soup (I like to saute my cải chua with garlic and ginger before adding it as a topping; it gives the whole soup a tangy-ness and spiciness you won’t get from other ingredients).
Unlike đồ chua, which is pickled in vinegar, cải chua is typically fermented over a period of weeks. As you learned from my ruby kraut recipe, lacto-fermented foods are highly beneficial on their own; then you add in the mustard oils from komatsuna (or any mustard green), and you have quite a nutritional powerhouse. (Learn about mustard oils from my nasturtium pesto post, and about mustard greens in general from World’s Healthiest Foods.)
Vietnamese Pickled Mustard Greens (Cải Chua)
Makes 2 quarts
Ingredients
For the Vegetables
2 1/2 pounds mustard greens
4 stalks of green onions
1 1/2 tablespoons pickling salt
4 Thai bird’s eye chiles (or 2 serrano peppers)
For the Brine (Optional)
2 cups water
1 tablespoon pickling salt
Making Your Vietnamese Pickled Mustard Greens (Cải Chua)
I use komatsuna in this recipe, but you can use any mustard green you have on hand.

Thoroughly wash, dry, and chop the greens into bite-sized portions. I like to de-stem the komatsuna and cut the stems into 1-inch pieces, then use a chiffonade technique to cut the leaves into long ribbons.

Chop the green onions into 2-inch pieces.

In a very large bowl, combine the greens, onions and salt, and toss to evenly distribute all the salt. Let the vegetables sit for 20 to 30 minutes while the salt draws out moisture.

Knead the veggies with your hands until the greens have wilted and the volume is reduced to half. There should be a pool of liquid in the bottom of the bowl.

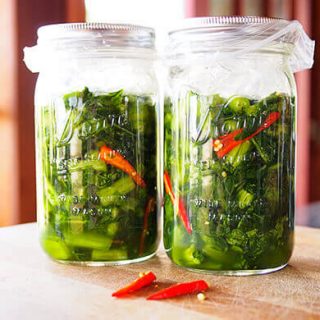
Split the chiles in half lengthwise. Fill the jars about two-thirds of the way with equal amounts of greens and chiles. Tamp down the veggies with the back of a spoon to squeeze out as much liquid as you can.


If your veggies are not fully submerged in their own juices, you can top them off with brine. Bring water and salt to a boil, and stir until the salt is dissolved. Let the brine cool, then pour it into your jars until the veggies are barely covered (they will continue to expel liquid as they ferment, so you don’t want to overfill the jars).
Run a chopstick or the end of a long spoon around the jars to release any trapped air pockets. You want to make sure the veggies are completely covered in liquid.

Line the jars with plastic zip-top bags and press down on the veggies. Fill the baggies with a little water (or a rock) to keep them weighted. The baggies should completely contact the surface of the veggies so that no part is exposed to air.

Seal the jars loosely with lids and store them at room temperature out of direct sunlight. Every day or so, check the jars to ensure the veggies are still submerged, pressing down on them with a spoon as needed to release more liquid. As long as the liquid stays above the veggies, you won’t see any mold.

As the greens start to ferment, they’ll turn a lovely shade of olive. Properly fermented mustard greens retain their mustardy bite, but have a pleasantly sour taste and smell like pickles… spicy pickles! If they smell off in any way (yeasty, rotten, or not very pickle-like), chuck them and start over.
You can taste the cải chua after one week to gauge the amount of sourness and spice, but typically it won’t be ready for two to three weeks. The warmer your room is, the faster it’ll ferment.
Once the cải chua has soured to your liking, remove the baggies, reseal with lids, and refrigerate. It will keep for a long, long time — much longer than you’ll need before you finish it all!

Vietnamese Pickled Mustard Greens (Cải Chua)
Cải chua is one of the traditional pickles in Vietnamese culture, the same way đồ chua is. I actually grew up eating more of the pickled mustard because it’s the perfect accompaniment to my family’s many salty home-cooked dishes, like cá kho tộ (braised and caramelized catfish in a clay pot) and thịt ko (braised and caramelized pork belly with hard-boiled egg).
Ingredients
For the Vegetables
- 2 1/2 pounds mustard greens
- 4 stalks green onions
- 1 1/2 tablespoons pickling salt
- 4 Thai bird’s eye chiles (or 2 serrano peppers)
For the Brine (Optional)
- 2 cups water
- 1 tablespoon pickling salt
Instructions
- Thoroughly wash, dry, and chop the greens into bite-sized portions.
- Chop the green onions into 2-inch pieces.
- In a very large bowl, combine the greens, onions and salt, and toss to evenly distribute all the salt. Let the vegetables sit for 20 to 30 minutes while the salt draws out moisture.
- Knead the veggies with your hands until the greens have wilted and the volume is reduced to half. There should be a pool of liquid in the bottom of the bowl.
- Split the chiles in half lengthwise.
- Split the chiles in half lengthwise. Fill the jars about two-thirds of the way with equal amounts of greens and chiles.
- Tamp down the veggies with the back of a spoon to squeeze out as much liquid as you can.
- If your veggies are not fully submerged in their own juices, you can top them off with brine.
- Bring water and salt to a boil, and stir until the salt is dissolved. Let the brine cool, then pour it into your jars until the veggies are barely covered (they will continue to expel liquid as they ferment, so you don’t want to overfill the jars).
- Run a chopstick or the end of a long spoon around the jars to release any trapped air pockets. You want to make sure the veggies are completely covered in liquid.
- Line the jars with plastic zip-top bags and press down on the veggies. Fill the baggies with a little water (or a rock) to keep them weighted. The baggies should completely contact the surface of the veggies so that no part is exposed to air.
- Seal the jars loosely with lids and store them at room temperature out of direct sunlight.
- Every day or so, check the jars to ensure the veggies are still submerged, pressing down on them with a spoon as needed to release more liquid. As long as the liquid stays above the veggies, you won’t see any mold.
- You can taste the cải chua after one week to gauge the amount of sourness and spice, but typically it won’t be ready for two to three weeks. The warmer your room is, the faster it’ll ferment.
Notes
I use komatsuna in this recipe, but you can use any mustard green you have on hand.
Recommended Products
As an Amazon Associate and member of other affiliate programs, I earn from qualifying purchases.
-
 Ball Mason 32 oz Wide Mouth Jars with Lids and Bands, Set of 12 Jars.
 -
 Organic Bamboo Cutting Board Set of 3 with Lifetime Replacements - Wood Cutting Board Set with Juice Groove - Wooden Chopping board Set for Kitchen, Meat and Cheese - Wooden Cutting Boards for Kitchen
 -
 ZWILLING Pro 7-inch Rocking Santoku Knife, 7'', Black/Stainless Steel


