
When it comes to starting a new strawberry patch from scratch, you usually have two options: buying potted plants or plugs from a garden center, or ordering bare-root strawberries online.
I’ve done both, and for a brand-new strawberry bed, bare roots have two compelling advantages over potted plants:
- They’re much more cost-effective, especially if you’re trying to fill a bed all at once. Bare roots are usually sold in bundles of 15 or 25 plants, and the more you buy, the lower the price per plant.
- When you buy strawberry bare roots from farms or online nurseries, you often have a far wider selection of strawberry cultivars than you’d find at a local nursery.
Related: How to plant bare-root perennials in pots
In my new garden, budget and variety were my reasons for going with bare-root strawberries and I have to say, they’re just as easy (if not easier) to plant and grow as potted strawberries, and they’re also quicker to establish than summer transplants.
Read more: Are you growing the right type of strawberry for your climate? (It’s a simple mistake many people make!)
More than a hundred plants later, here’s what I’ve learned and how you can successfully plant bare roots to yield big harvests.
Disclosure: If you shop from my article or make a purchase through one of my links, I may receive commissions on some of the products I recommend.
What are bare-root strawberries anyway?
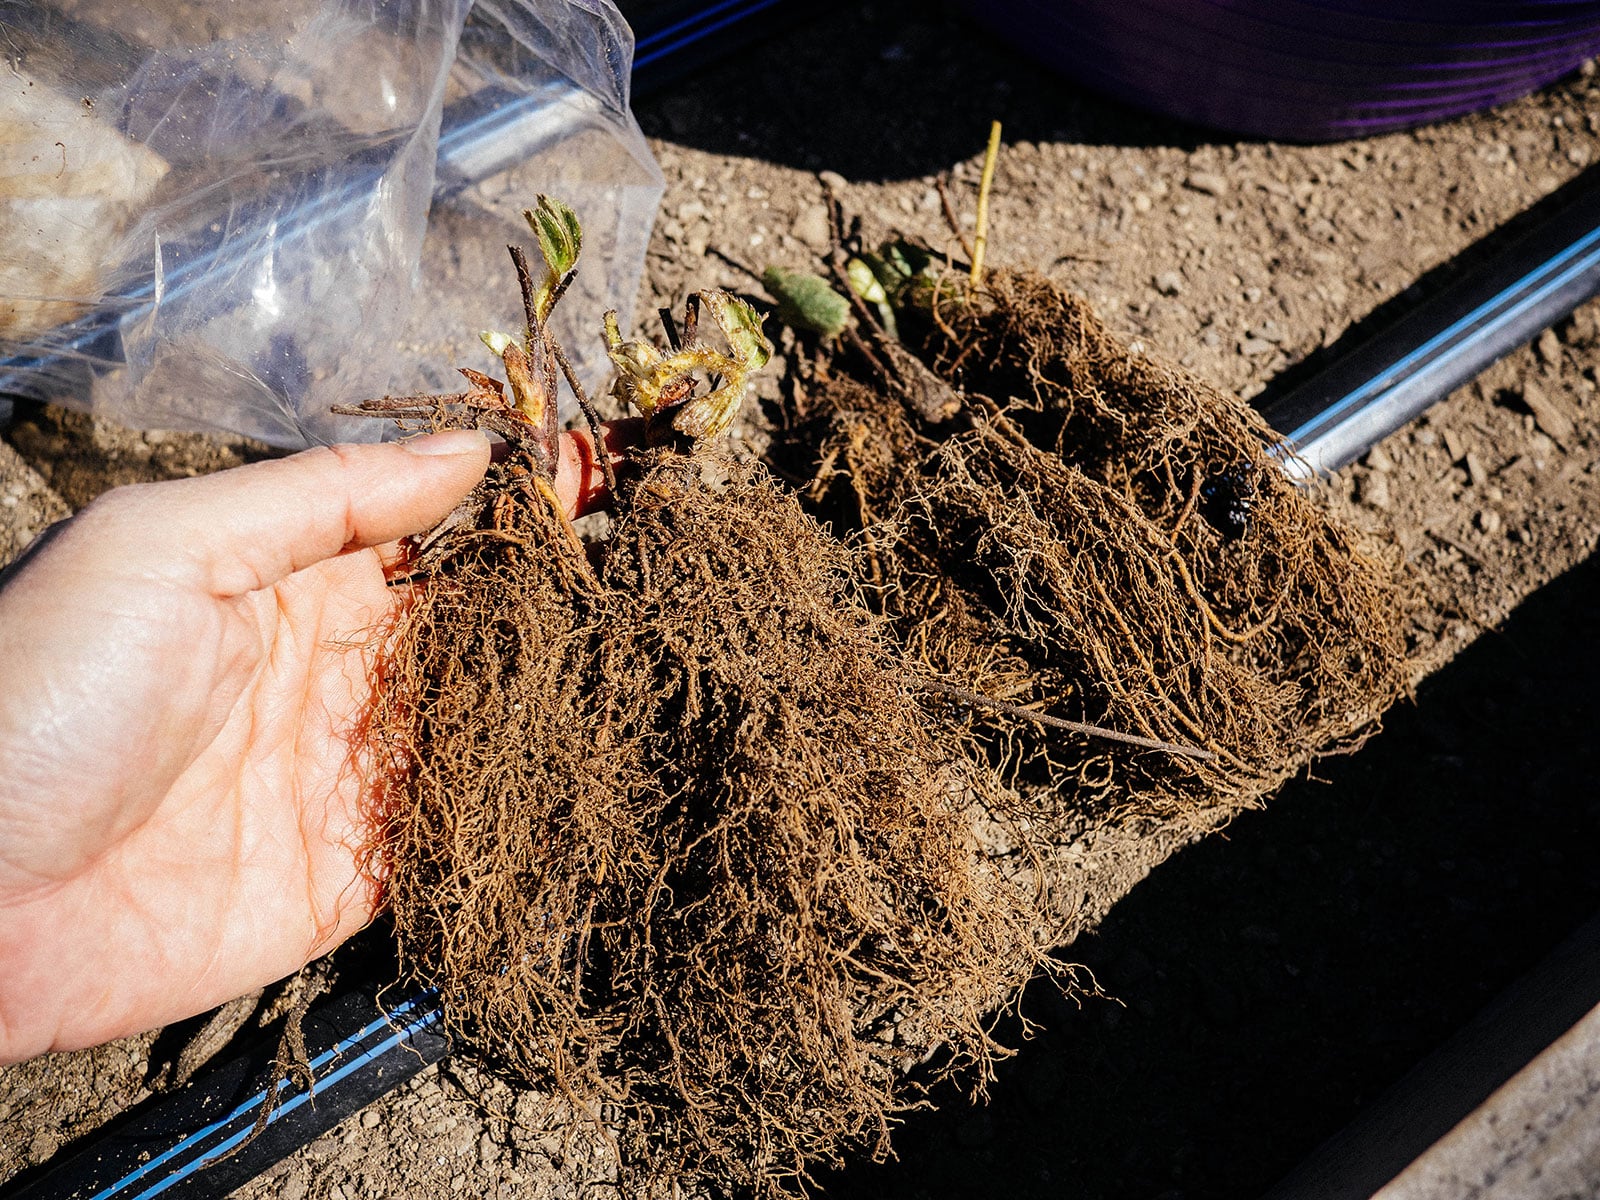
Bare-root strawberries are dormant plants without any soil around the roots (hence, bare roots). They’re young plants that have been grown in a field and then are dug up, put in cold storage, and eased into dormancy before they’re ready to ship.
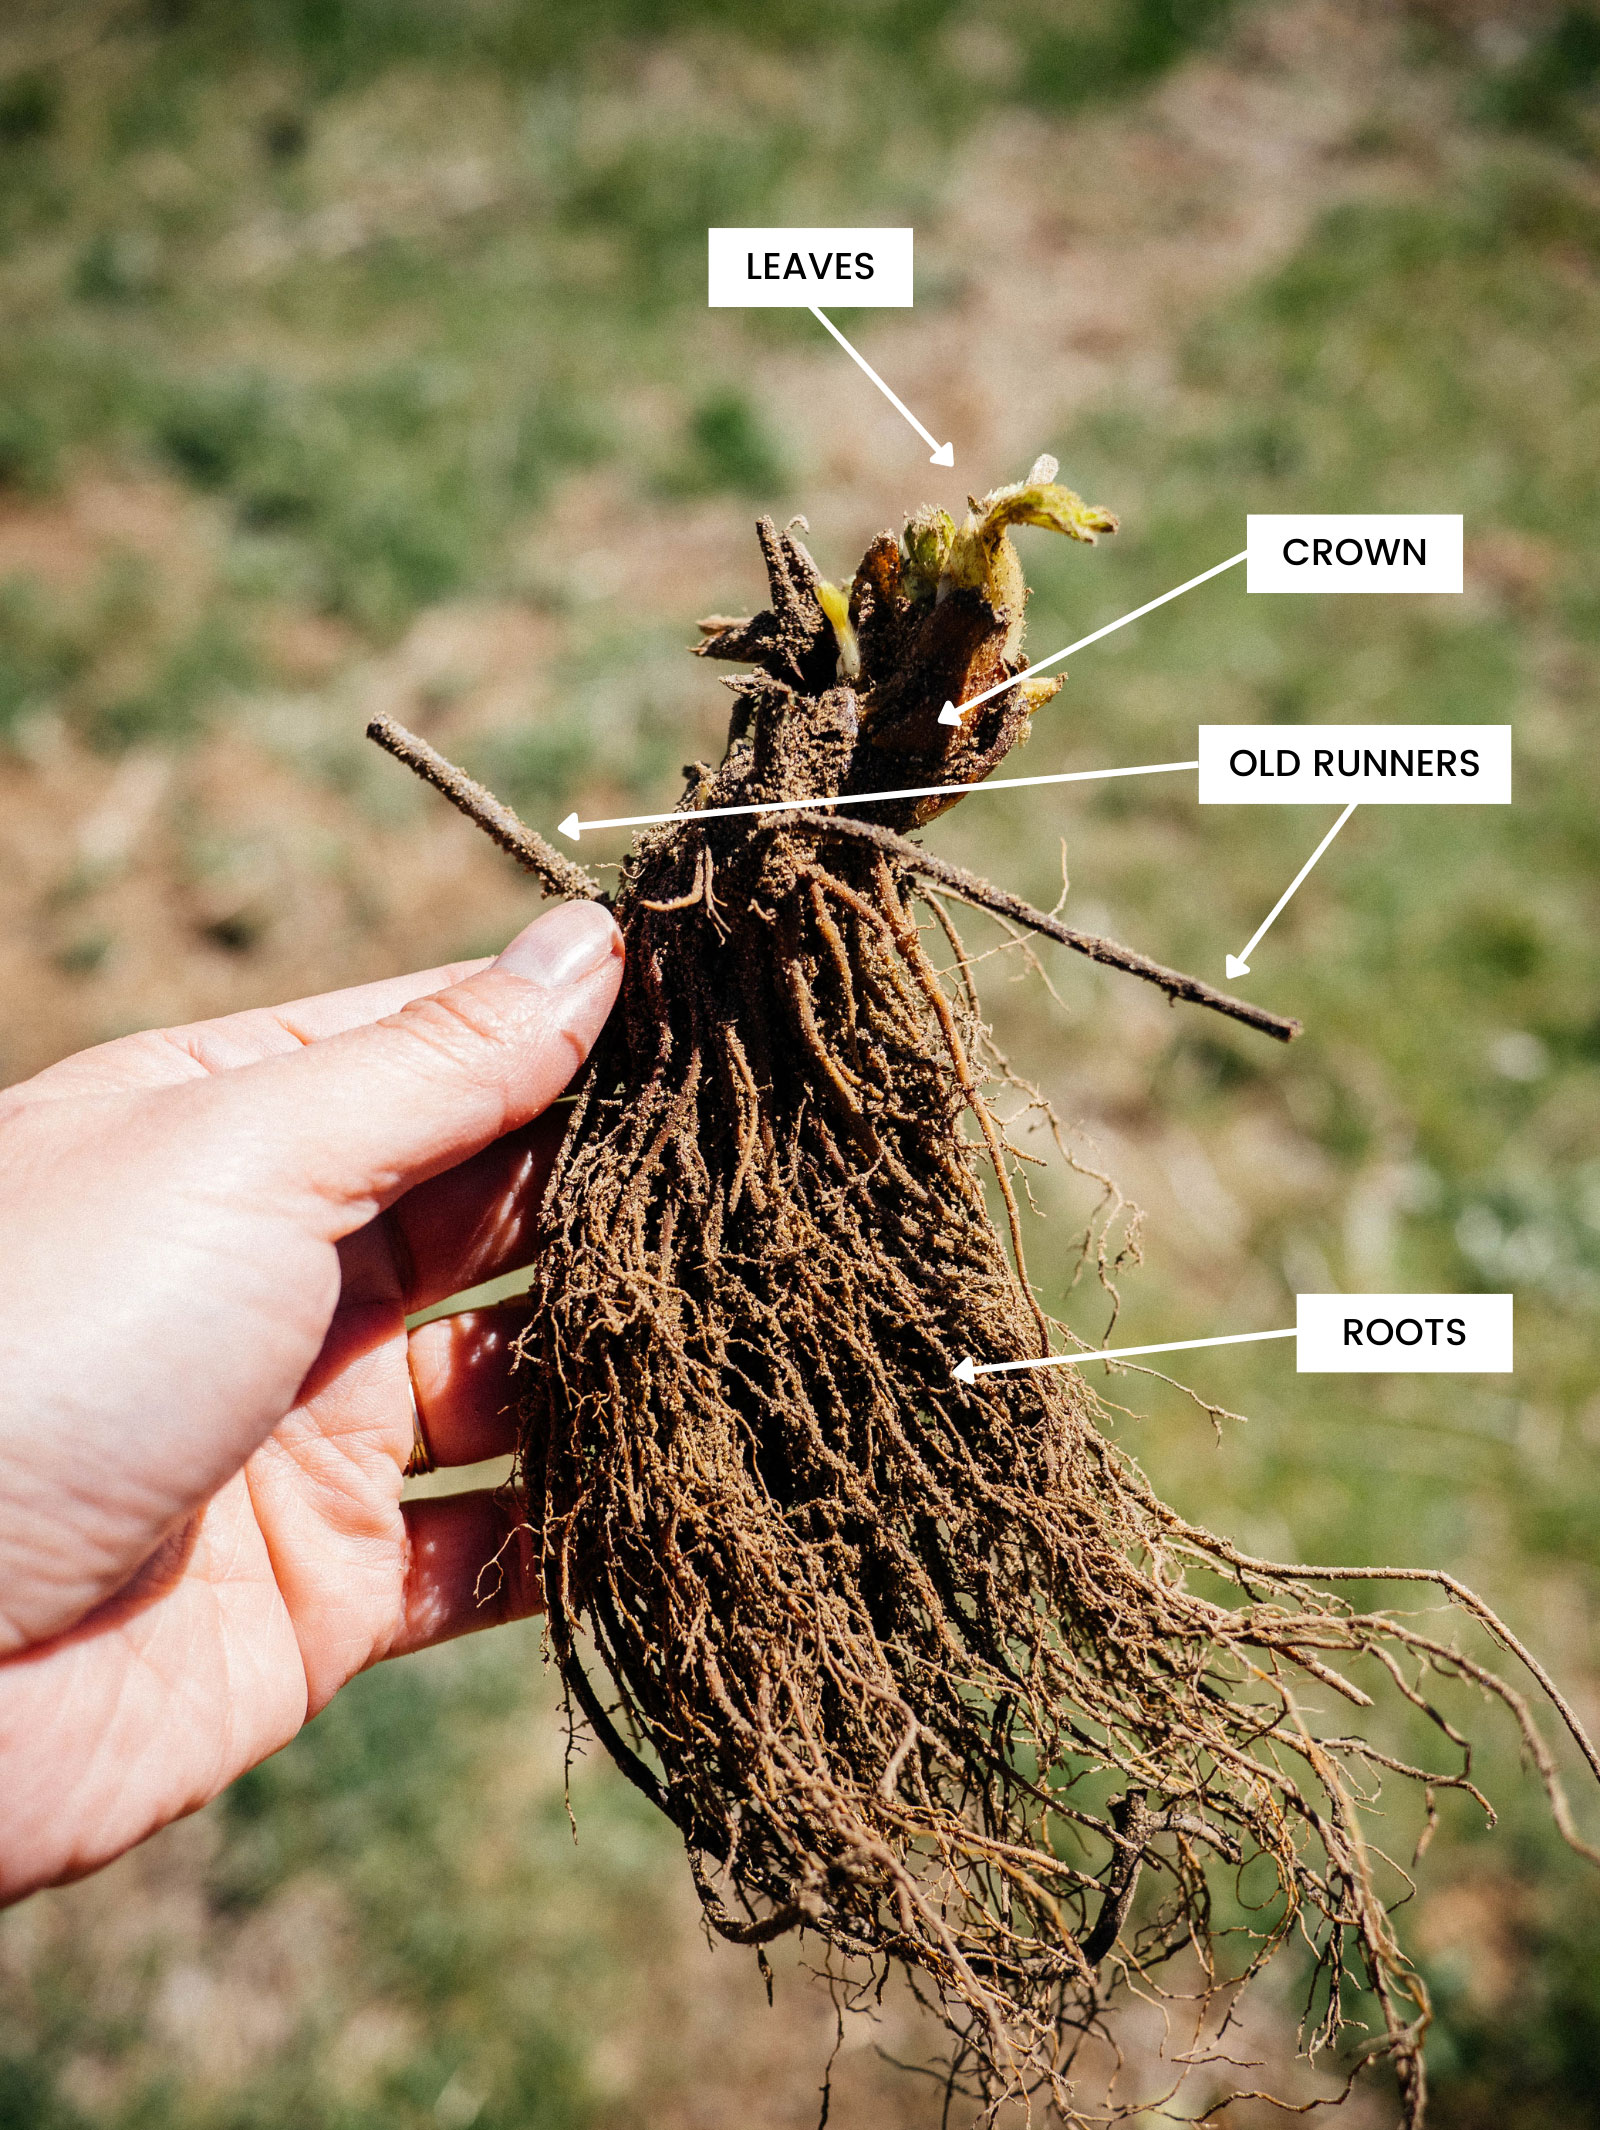
Each plant is a mass of gangly roots attached to a crown, with no foliage at all (or if there is some green, it’s usually just a leaf or two). It might not even look alive, but once planted and given some TLC, it’ll grow into a thriving strawberry plant.
Most bare roots arrive bundled together in plastic bags, which makes them easy and economical to ship. After all, the nursery is saving on potting soil, plastic pots, packaging, and storage space, so you both benefit.
Where to buy
Bare-root strawberry plants
When to plant strawberry bare roots
Bare-root strawberries should be planted in late winter to early spring when they’re still dormant with no visible signs of new growth. (If you do see a stray leaf upon delivery, chances are it’s from last year.)
You don’t have to wait for your last frost date. (In fact, I planted my own strawberries more than two months before my last frost—I just covered the beds with frost cloth for the occasional nights the temps dipped below 25°F.)
Learn more: How to calculate your last and first frost dates accurately
Prime strawberry planting time is as soon as the soil is workable—that is, no longer frozen and not heavy or muddy. Cold weather, frost, and even snow will not harm your new plants.
They might look delicate, but if they’re properly acclimated to the cold, strawberry crowns are hardy down to 10°F and the leaves are hardy to around 22°F. So if the weather has warmed enough for you to dig in the soil (even if temperatures are barely above freezing), it’s a good time to plant.
The earlier you can get your bare-root strawberries in the ground, the better, because they won’t experience transplant shock while they’re dormant. They’ll wake up from their slumber when conditions are right and start growing again without missing a beat. They’ll also get the moisture they need from spring rains, which saves you from having to water them a lot early in the season.
What to do if you can’t plant right away
Ideally, you should plant bare-root strawberries as soon as you receive them. You don’t want to forget about them somewhere in the house, where they’ll get too warm and break dormancy before they’re planted.
But if for some reason you need to hold off, you can safely do so for up to two weeks. Keep the bare roots in their original plastic bag (unopened) and store the bag in the crisper drawer of your fridge.
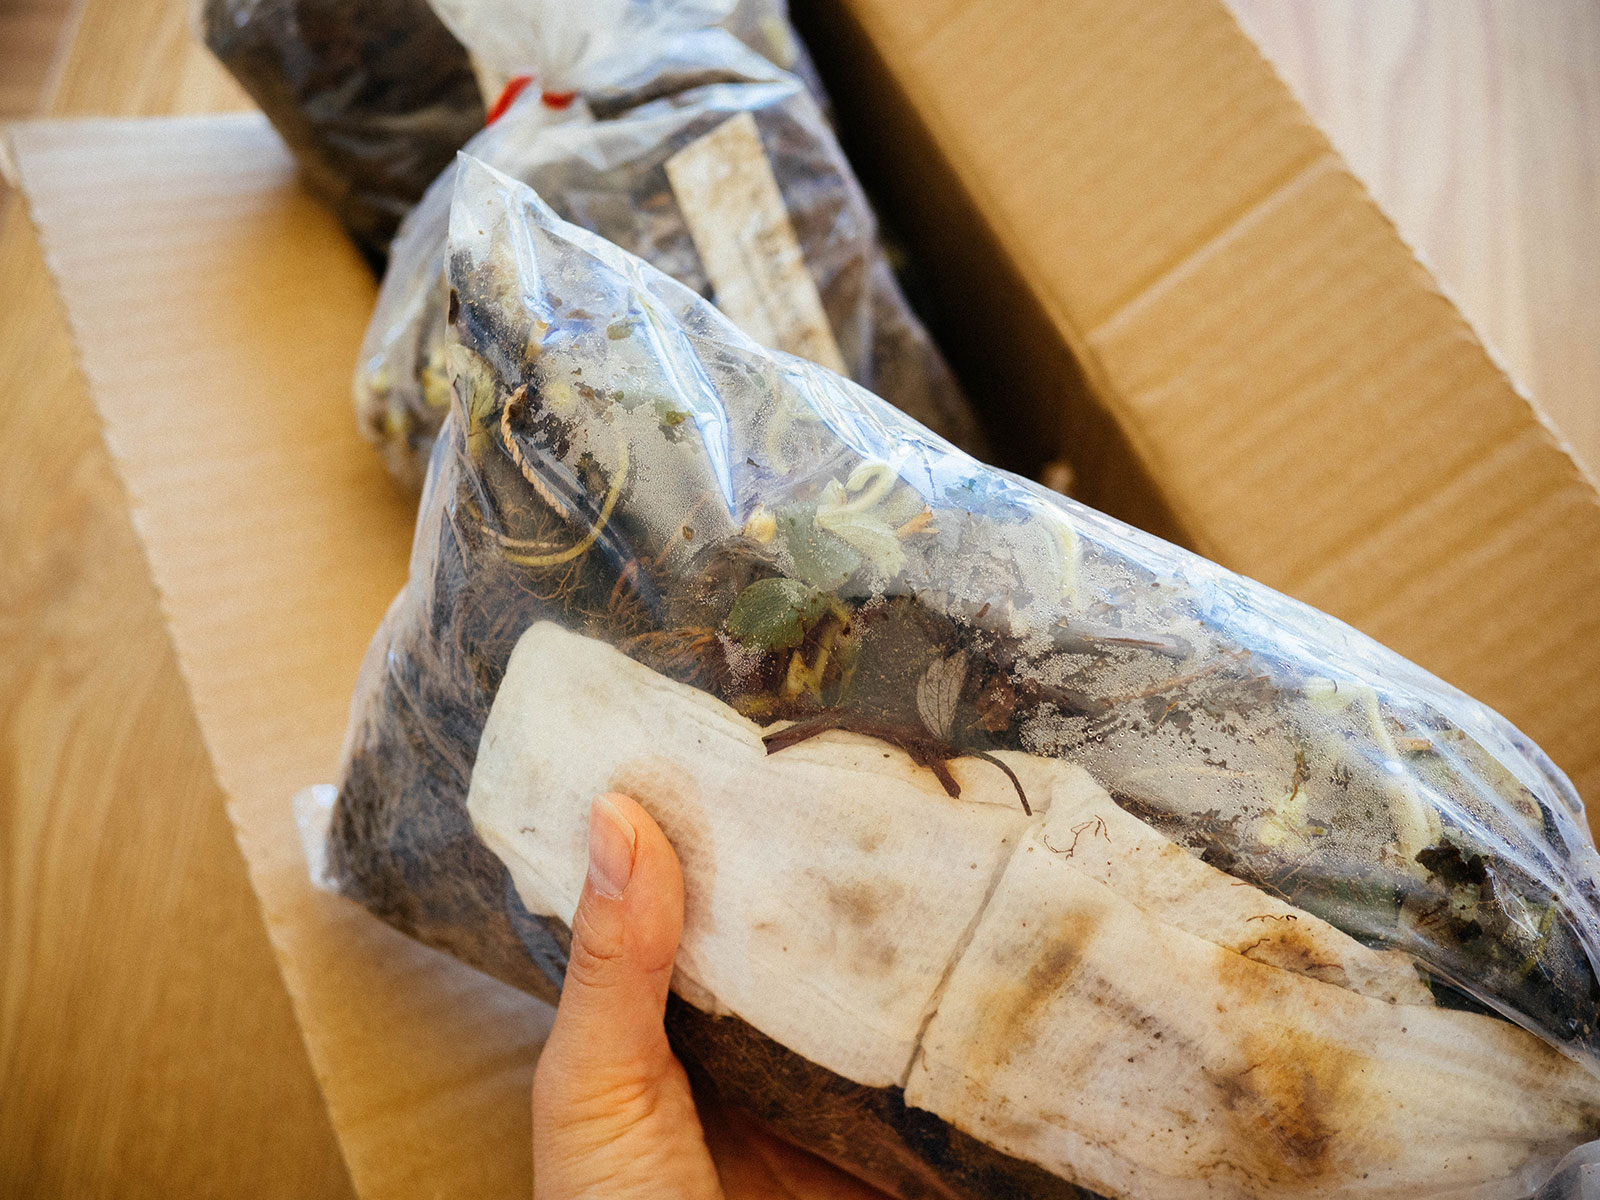
Moisture from the plants themselves should provide enough humidity within the bag to keep them alive. Periodically check the plants to make sure they haven’t dried out too much, or worse, gotten soggy (which can cause them to mold).
If they arrive looking unusually dry and brittle, you can wrap a damp paper towel around the roots. If it looks like there’s excess condensation in the bag, place a dry paper towel inside to help absorb the moisture.
Let’s say… Life gets in the way and you absolutely can’t get your bare-root strawberries in the ground. Rather than losing them all, put the plants in temporary pots or planters (with soil) so they can start growing.
You can transplant them in the garden when you’re ready. They might look a little sad immediately afterward, but they’ll recover as long as they’re well watered.
How to plant bare-root strawberries
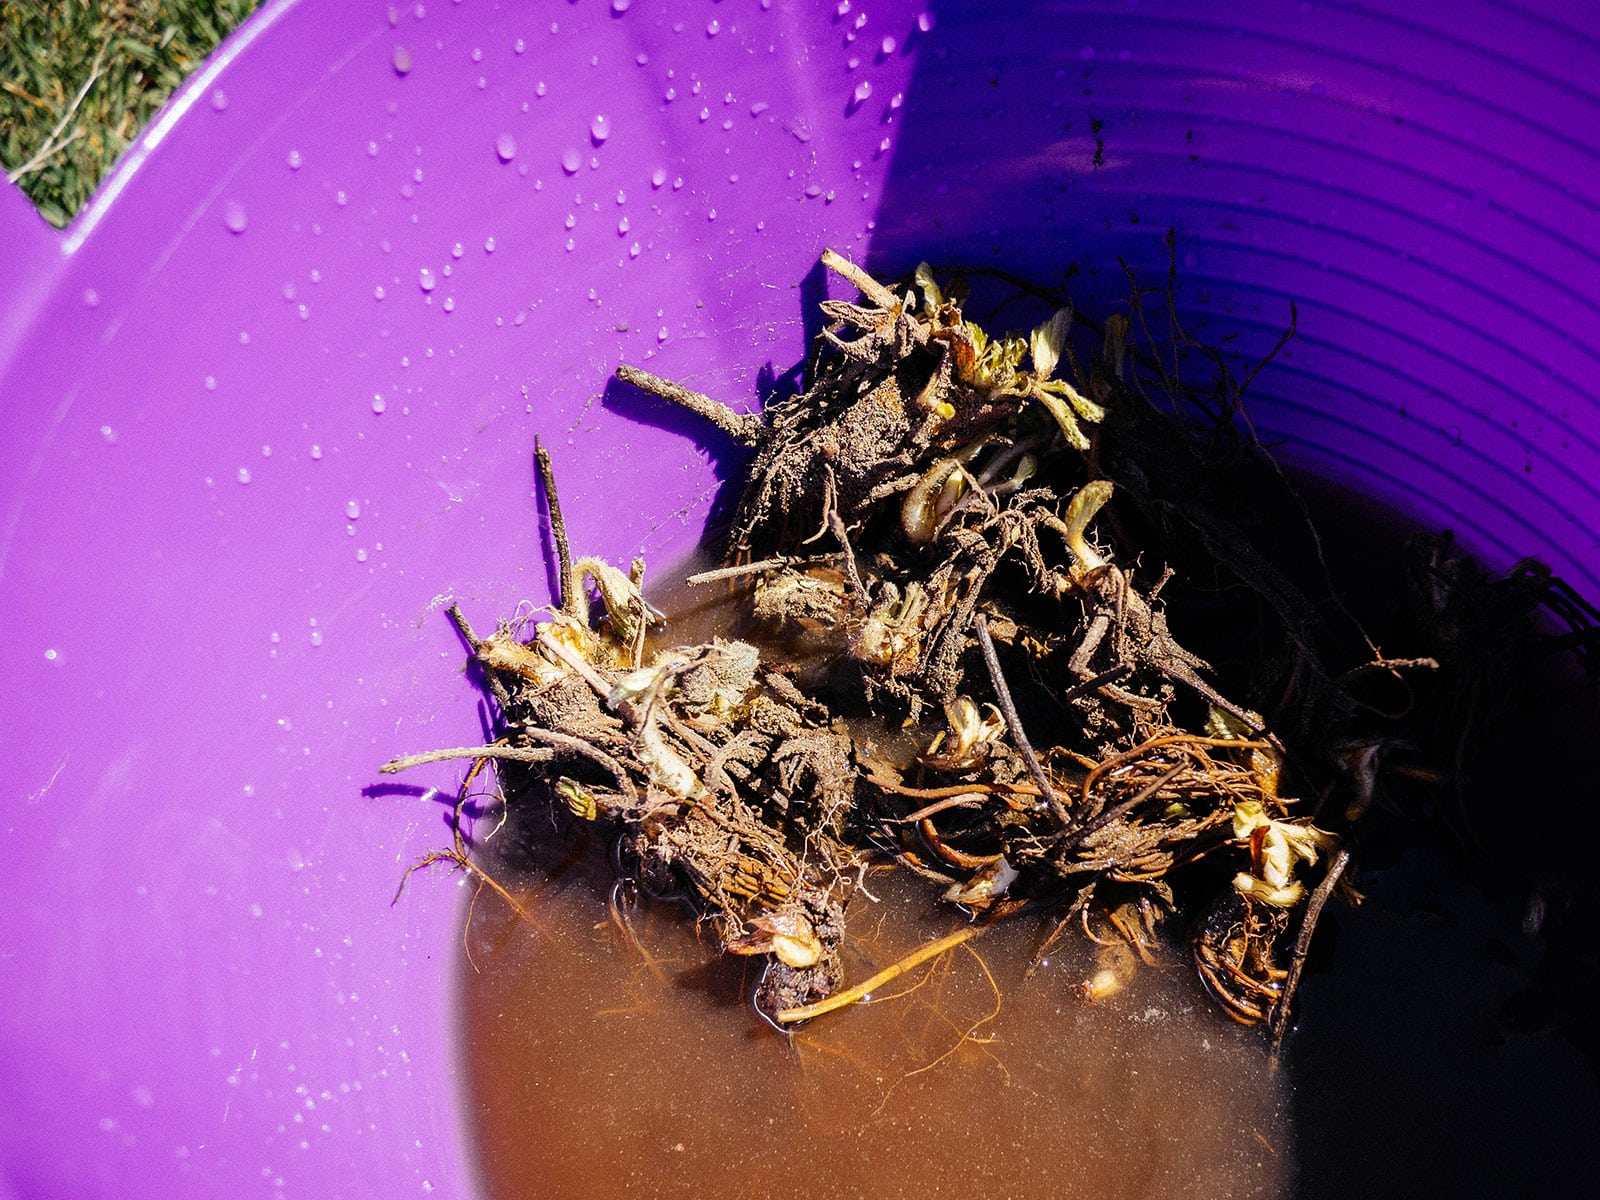
Step 1: Soak the roots.
Before planting, I like to separate the bundled bare-root plants and soak them in water to rehydrate them. This is an optional step, but I also use this time to add a little bit of liquid kelp (seaweed) to the water to give the plants a solid start in the garden.
Kelp contains high levels of natural growth hormones (including cytokinins and auxins) that stimulate cell division for healthy root and shoot development. It also has an array of trace minerals (including, but not limited to, zinc, manganese, iron, and copper) that support photosynthesis and nutrient uptake. Kelp is fairly mild as far as supplements go, and it won’t burn the roots or overload your plants with too much of a good thing (when used at the proper dilution ratio)
All that to say: If you have access to liquid kelp (my favorite brands are below), it’s worth using it to give your bare-root plants a boost!
Soak the roots in a few inches of liquid kelp solution (following the recommended dilution on the bottle) for no more than 30 minutes. Try to keep the crowns above the solution so they’re less likely to rot. While the roots are soaking, prepare your planting site.
Step 2: Prepare the soil.
Select a spot in full sun—if grown in the shade, strawberries will produce little, if any, fruit.
They are fairly tolerant of most soil conditions as long as drainage is good. This is important!
When I purchased my strawberry bare roots, the farm recommended that the soil comprise:
- 60 percent topsoil
- 30 percent stone grit, such as coarse sand (not play sand), pumice, perlite, or pea gravel
- 10 percent compost
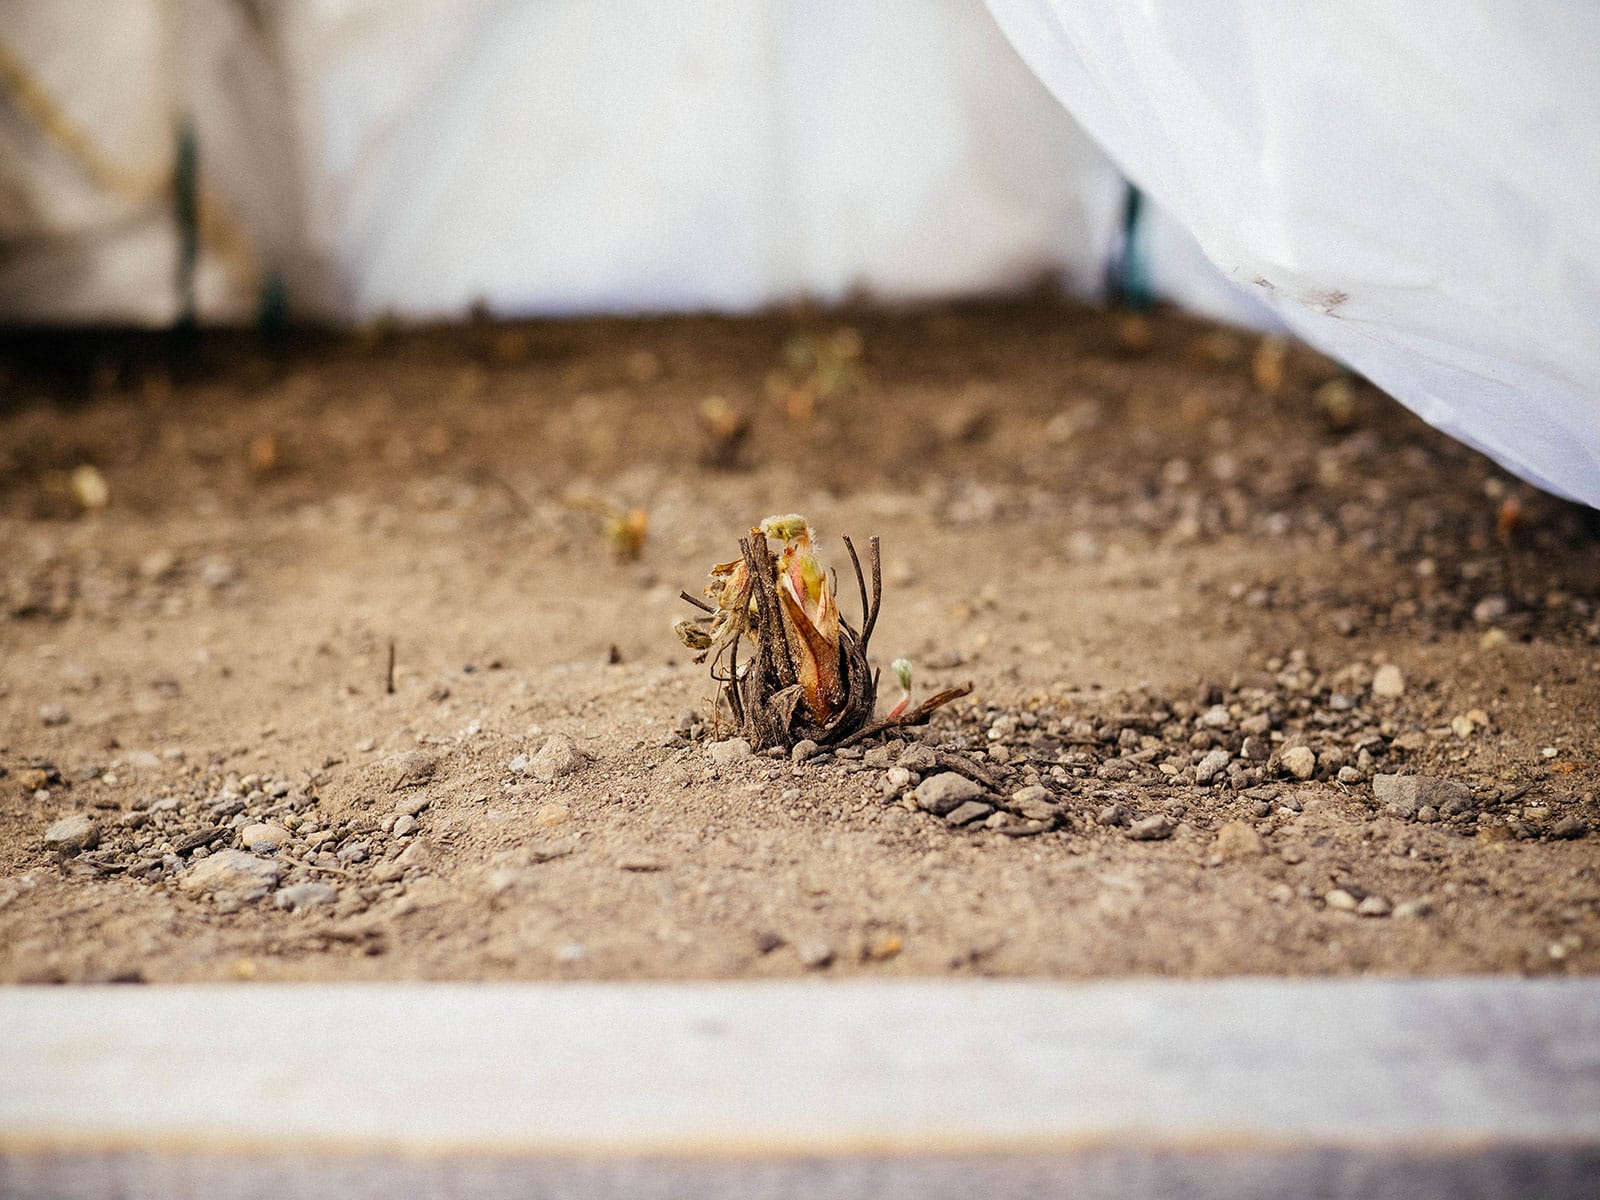
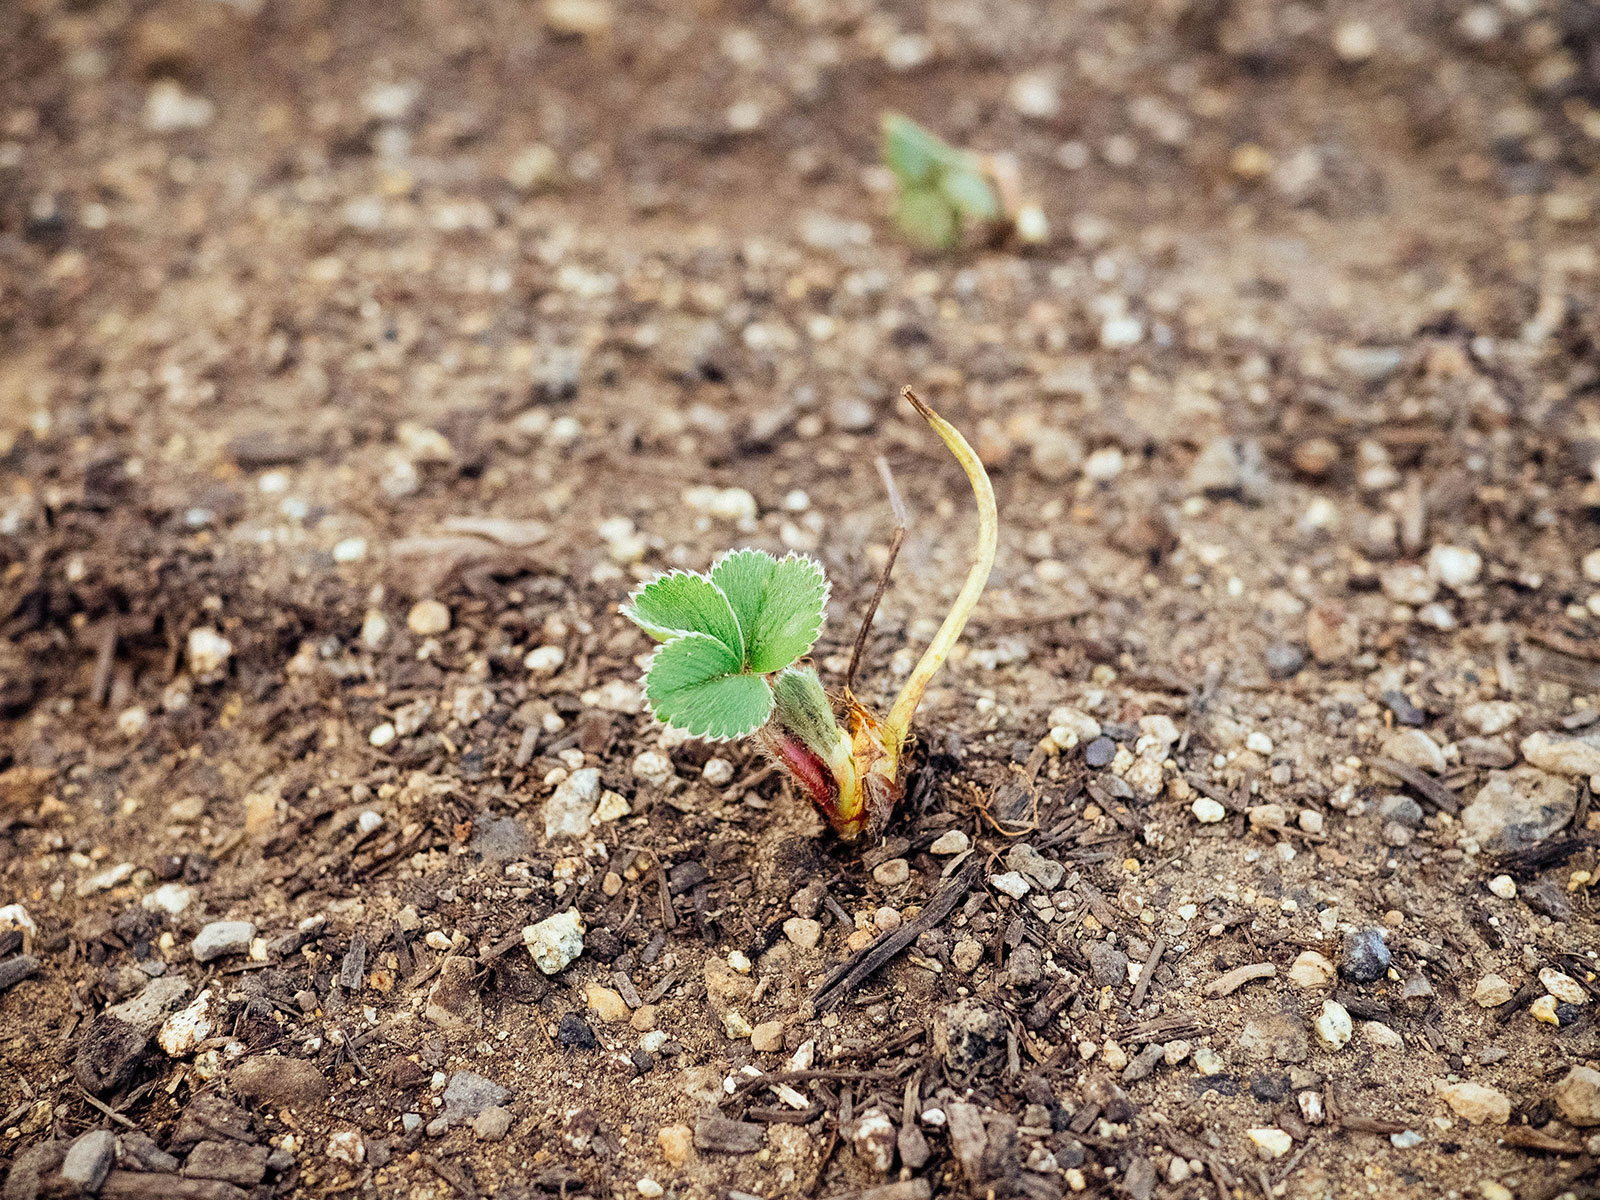
You’ll notice in this picture (with a newly planted crown) that my soil is pretty gritty. The top 6 inches of my raised strawberry bed is a loose mix consisting of topsoil, compost, pumice, and sand.
Strawberry plants don’t like to sit in compacted soil that stays too wet, as it can lead to black root rot. So if your soil is on the heavier side, be sure to amend it with ingredients that’ll provide proper drainage.
Since you’ve already incorporated compost into the soil, there’s no need to add fertilizer at this point.
Where to buy
Planting supplies and tools
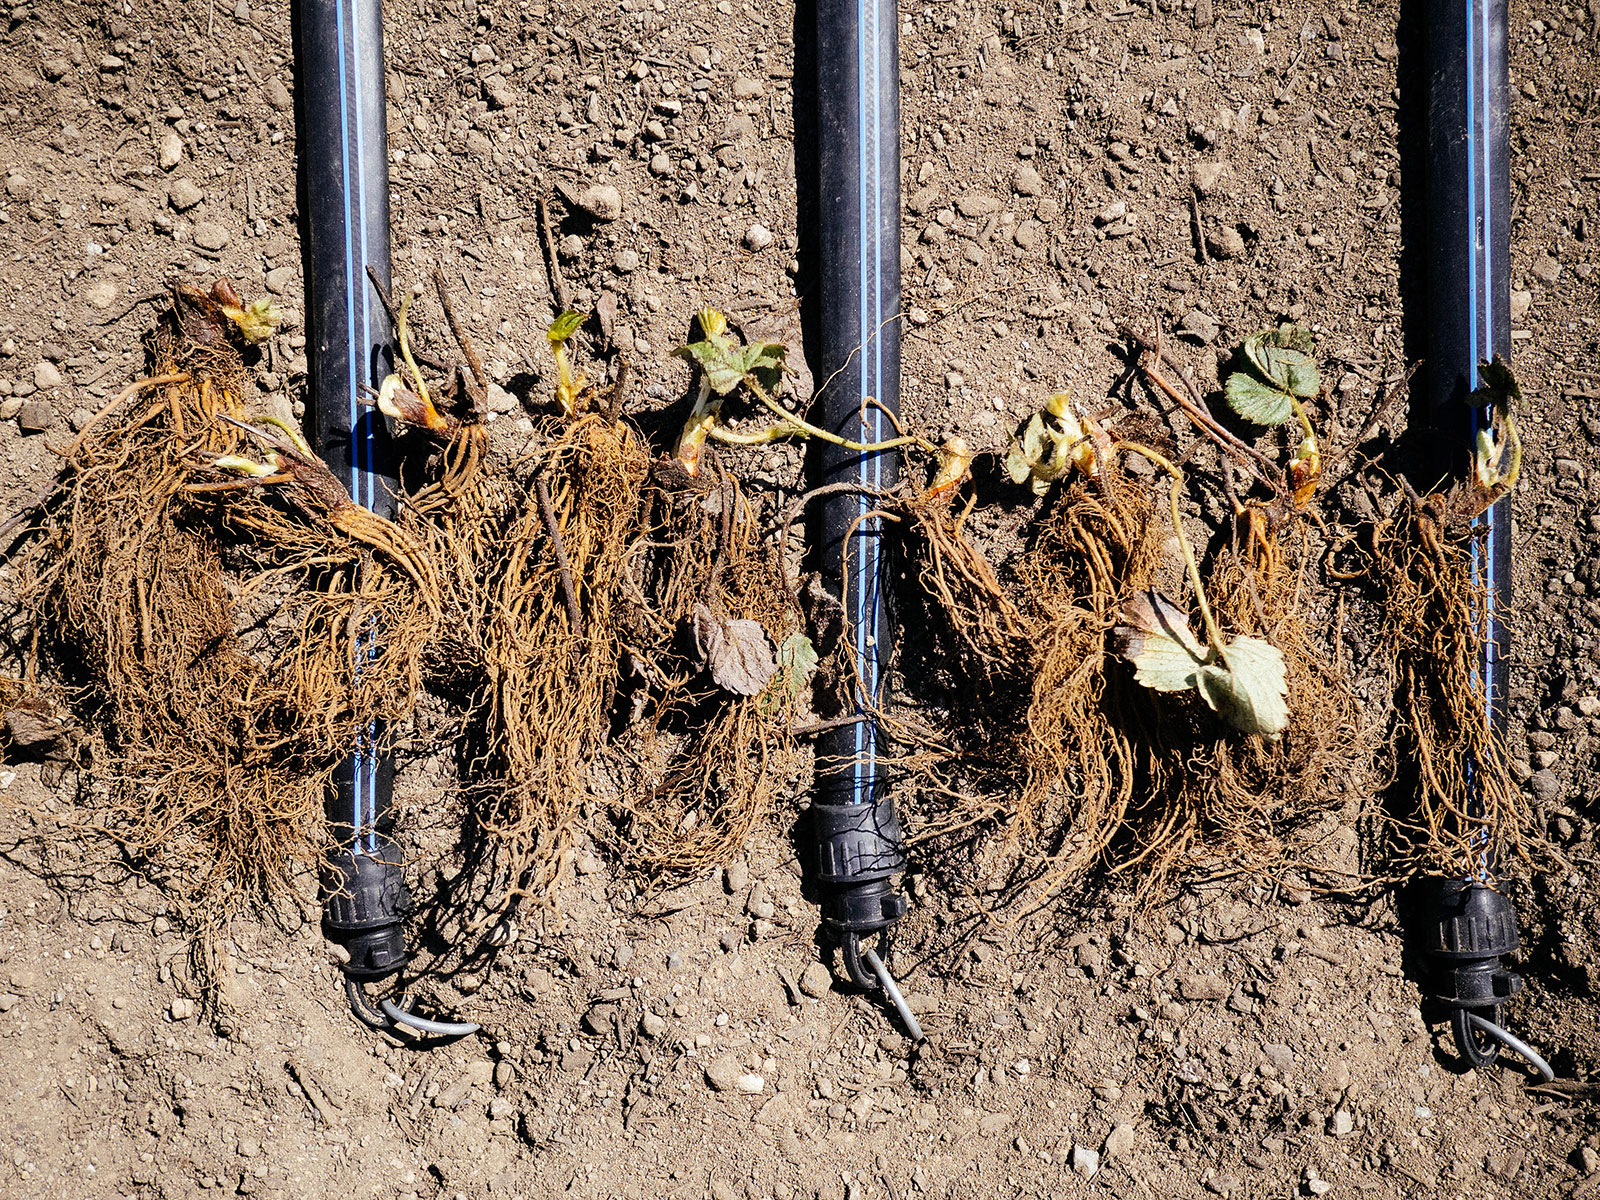
Step 3: Dig your holes at the right depth and spacing.
Your plant spacing will depend on the type of strawberry you have and what you want to get out of your garden. I’ve written about the ideal strawberry plant spacing, but in general:
- Day-neutral strawberries should be planted 10 inches apart
- Everbearers should be planted 12 inches apart
- Junebearers should be planted 18 inches apart
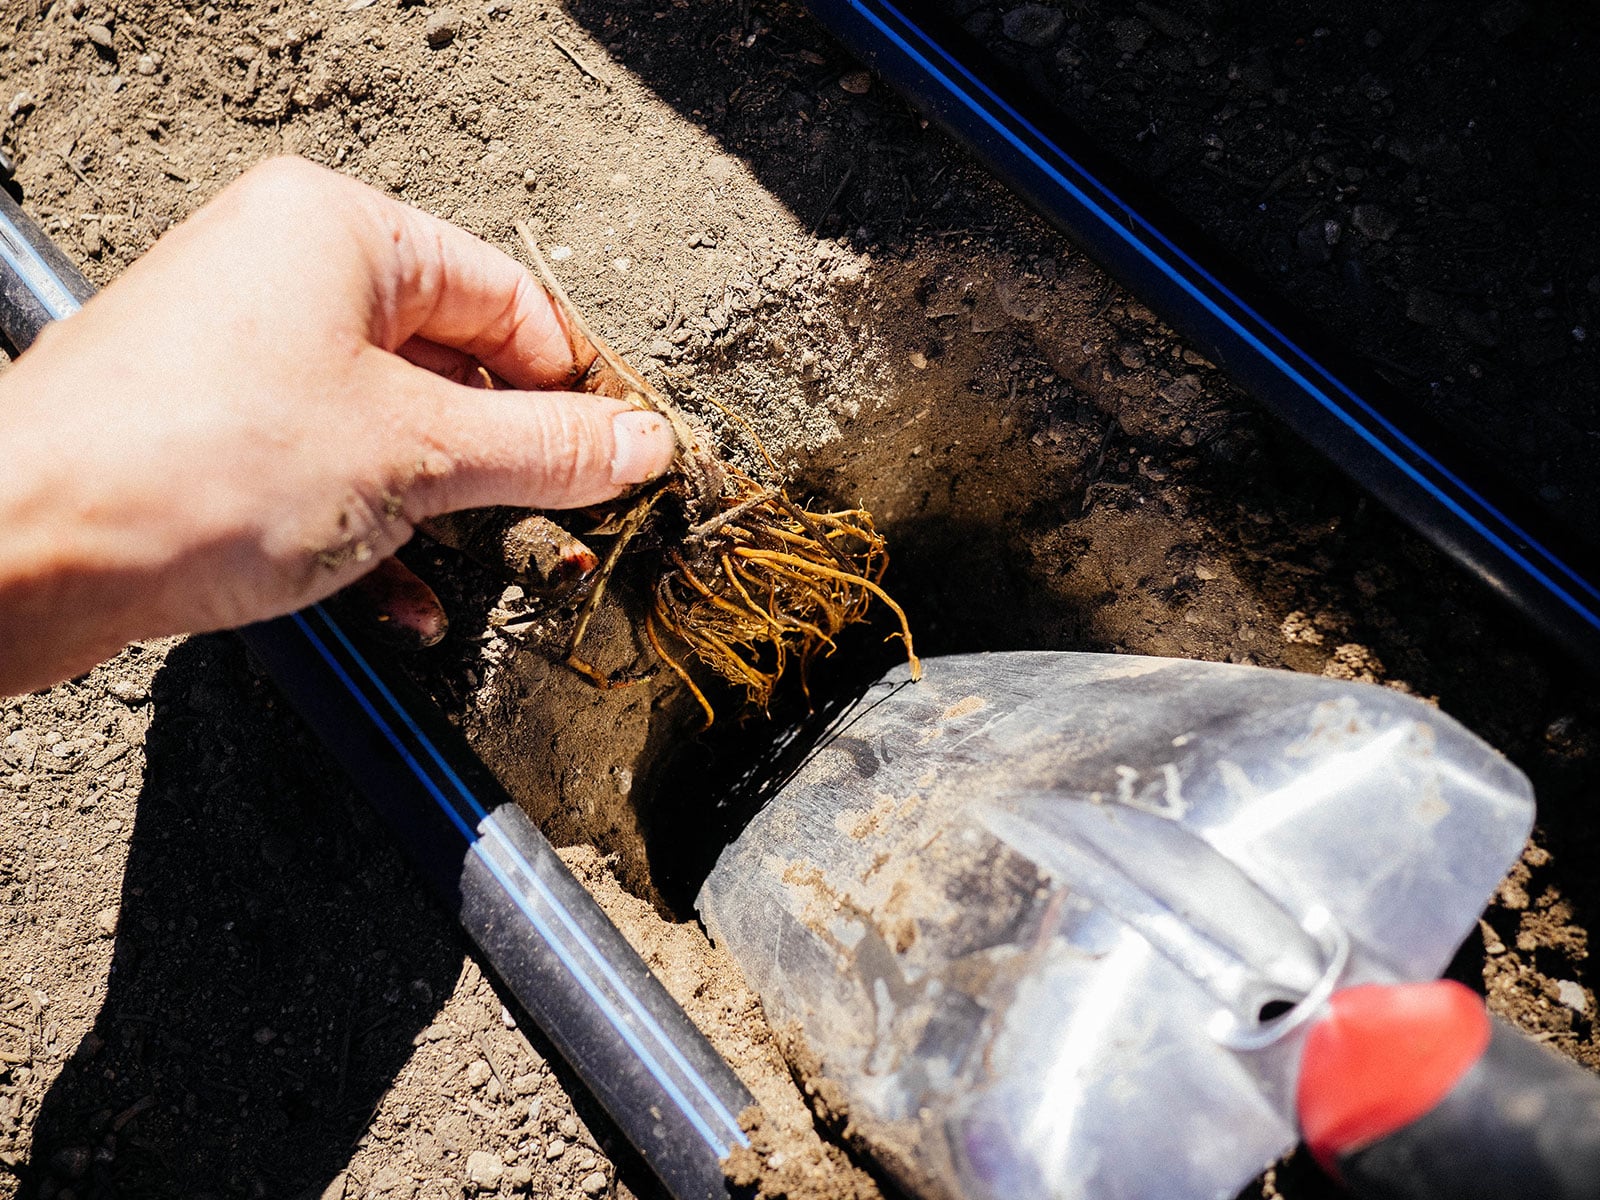
You want to make the hole deep enough so that the roots hang straight, without bending one way or another. This prevents J-root, a condition in which the roots are too long for the planting hole and end up pointing upwards (looping into a “J”).
Some bare-root strawberries may have excessively long roots (up to 12 inches), but that doesn’t mean you have to dig a 12-inch-deep hole. You can trim the roots to about 6 inches to make them more manageable for planting.
It’s easiest to stick a trowel in the soil, then wiggle it back and forth to enlarge the hole. This creates a perfect narrow slot for the plant to slide into while its roots stay pointed down. Then, remove the trowel and backfill the hole with your hand.
(See my list of recommended tools and supplies above for my favorite oversized trowel.)
Step 4: Plant your strawberries.
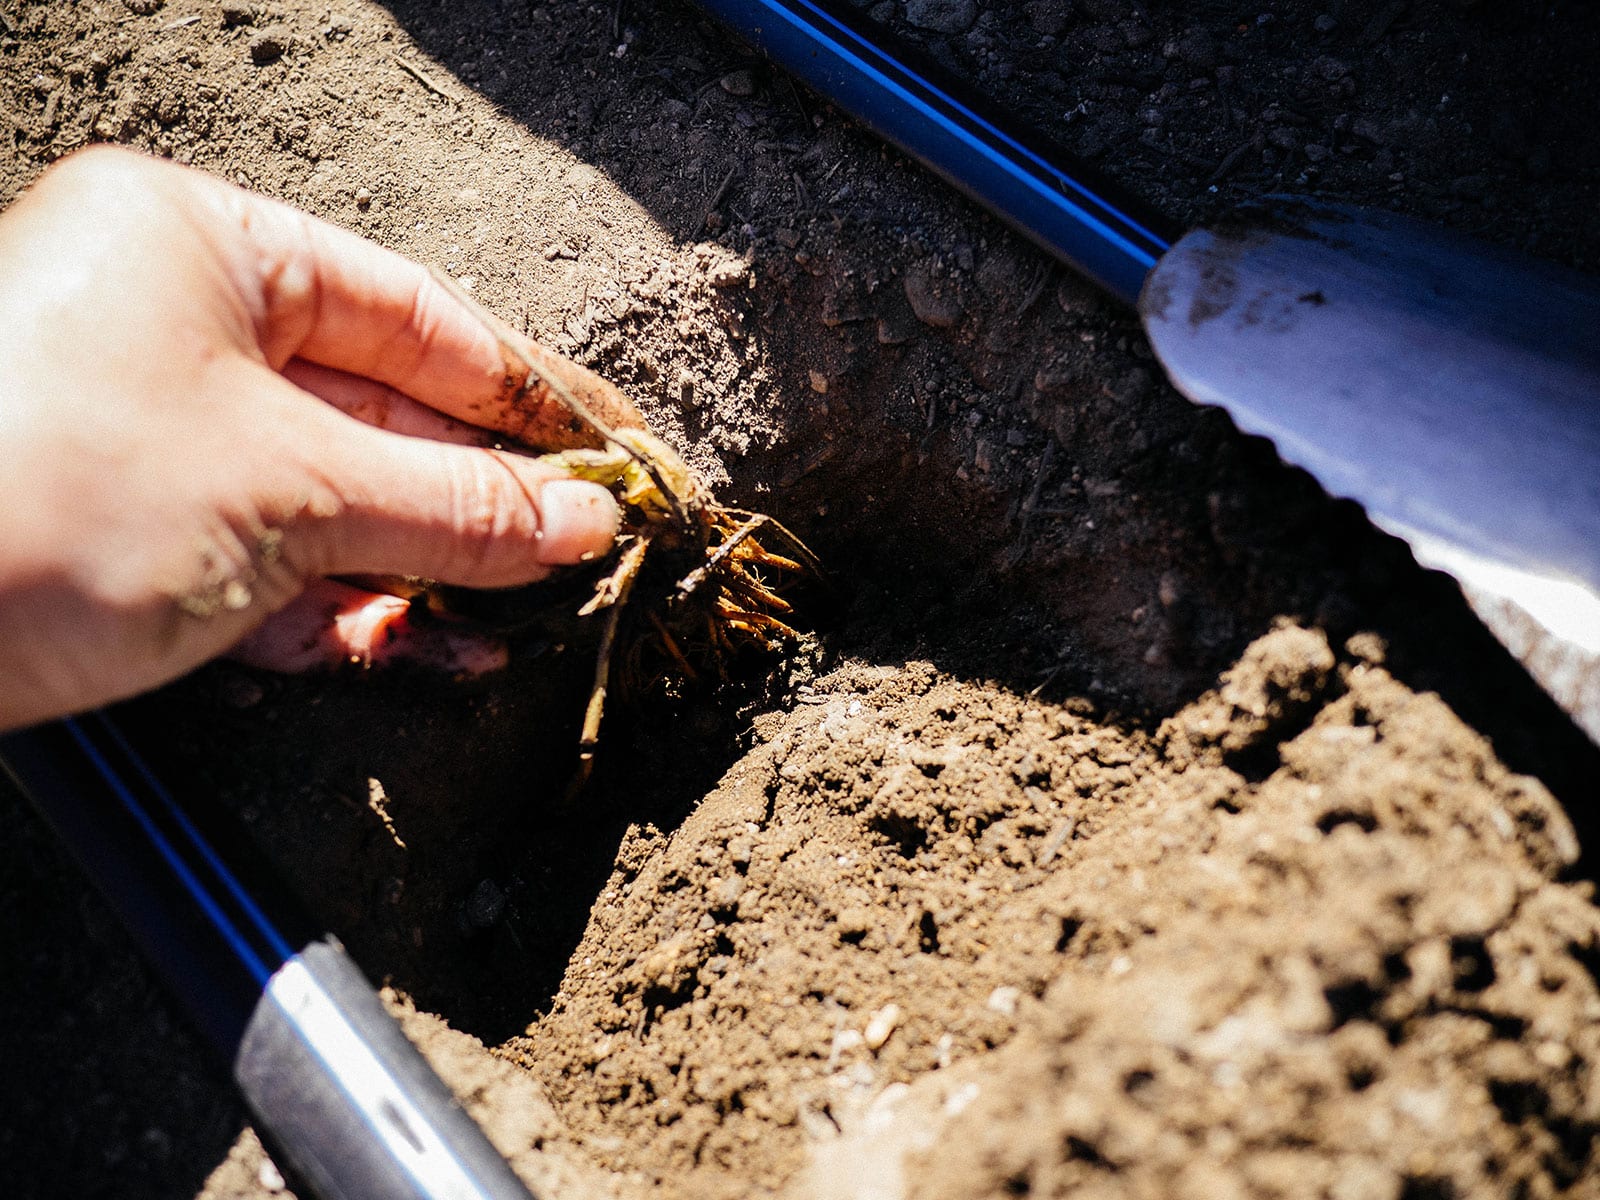
Strawberries are fussy about being too deep or too shallow, so when planting, make sure that only the roots and the base of the crown (a short, brown, thickened stem above the root mass) are covered with soil.
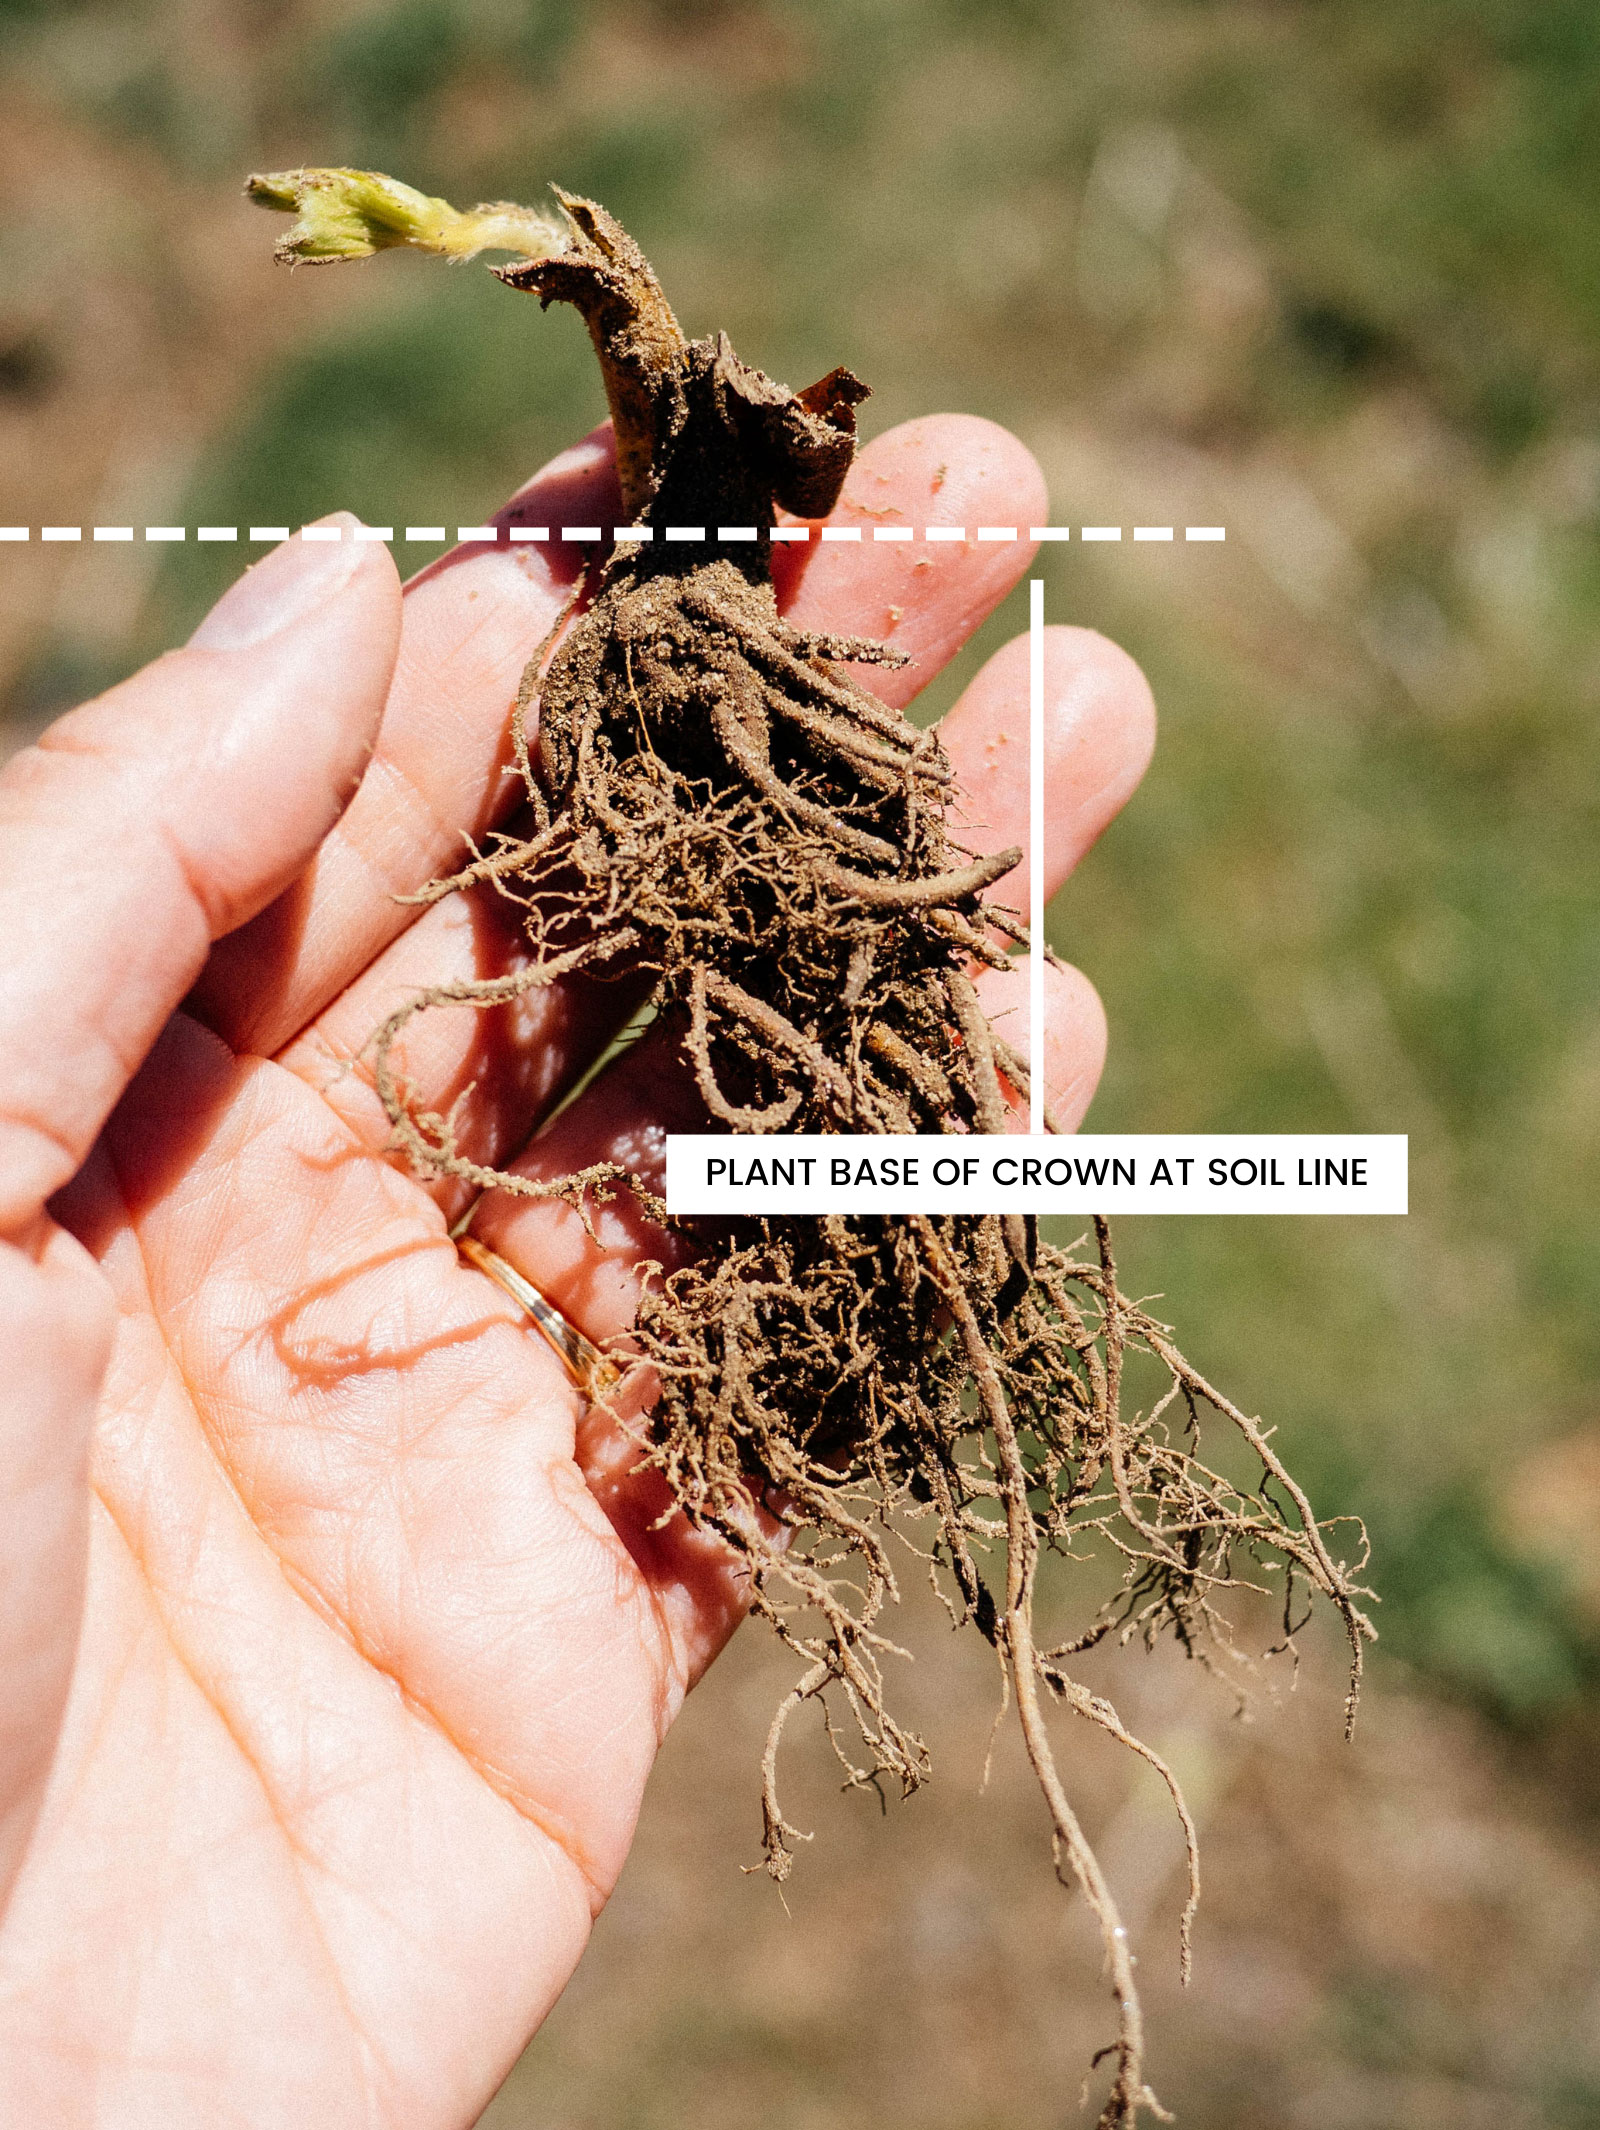
Pat the soil firmly to eliminate air pockets and ensure the roots have good contact with the soil, then water thoroughly. If the soil settles too much and the roots become exposed, cover them with more soil so they don’t dry out.
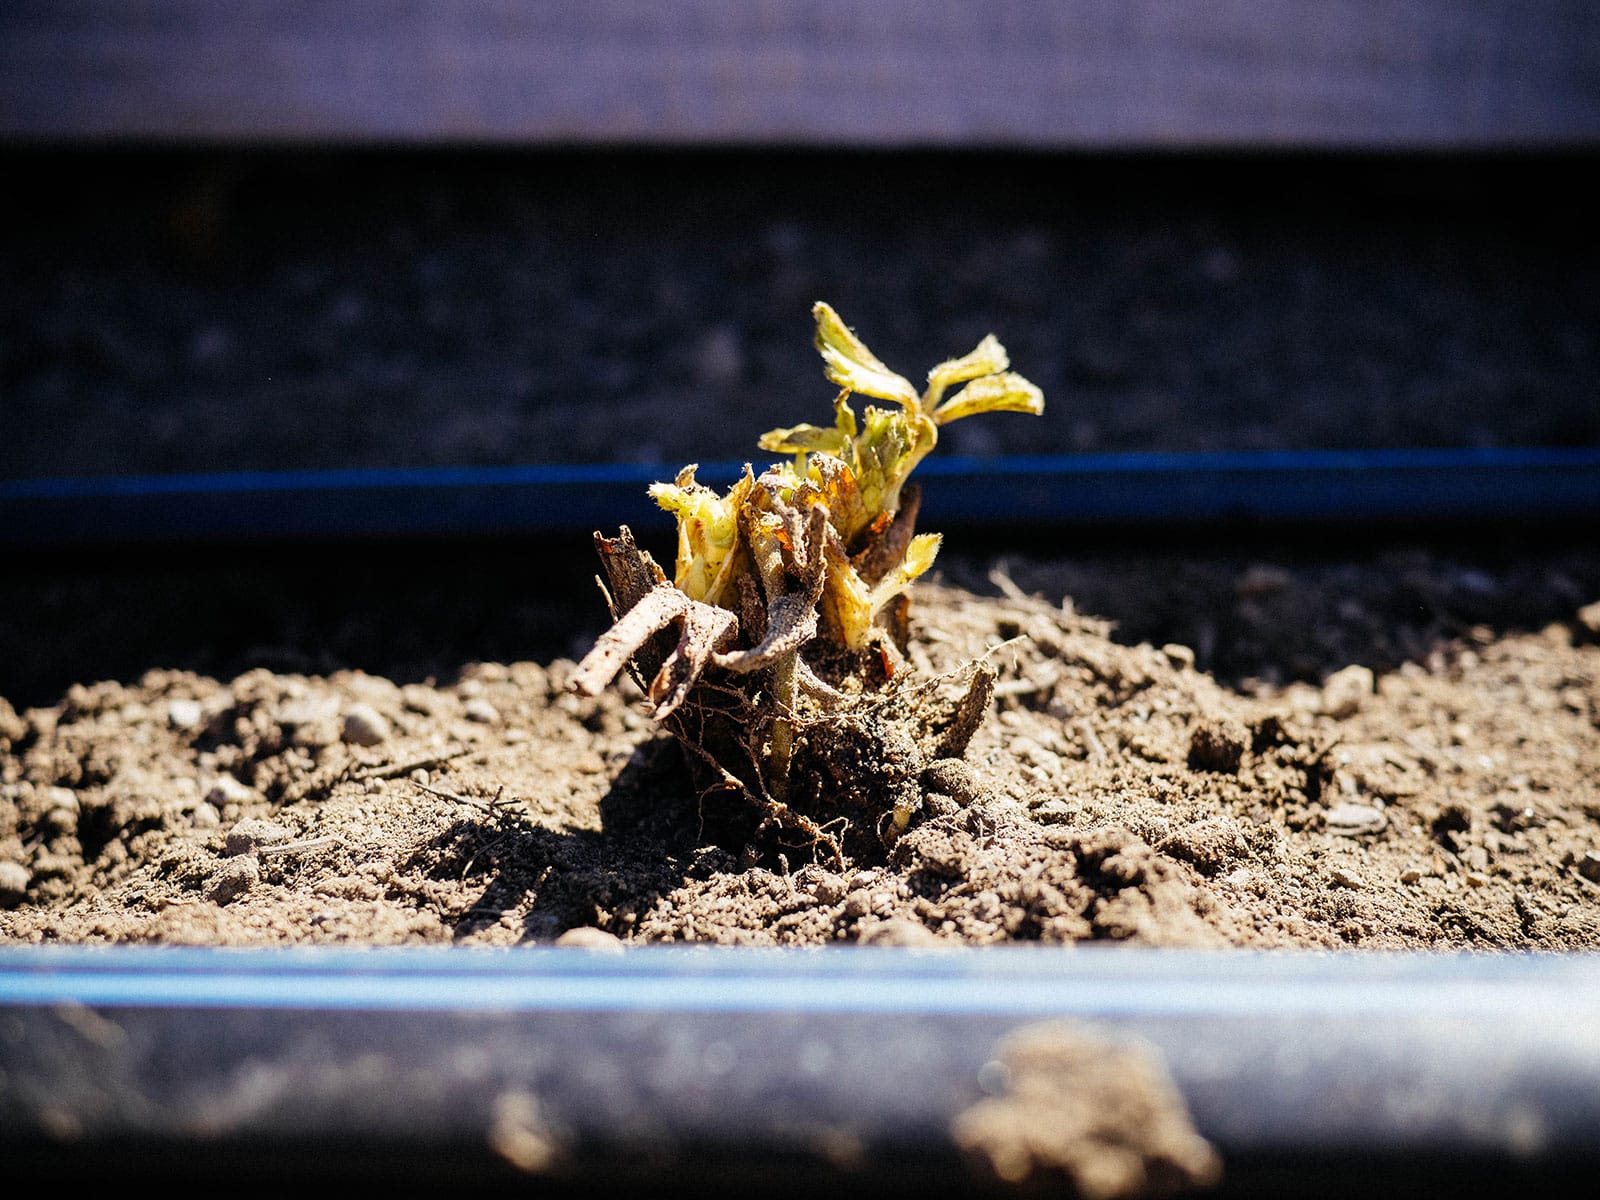
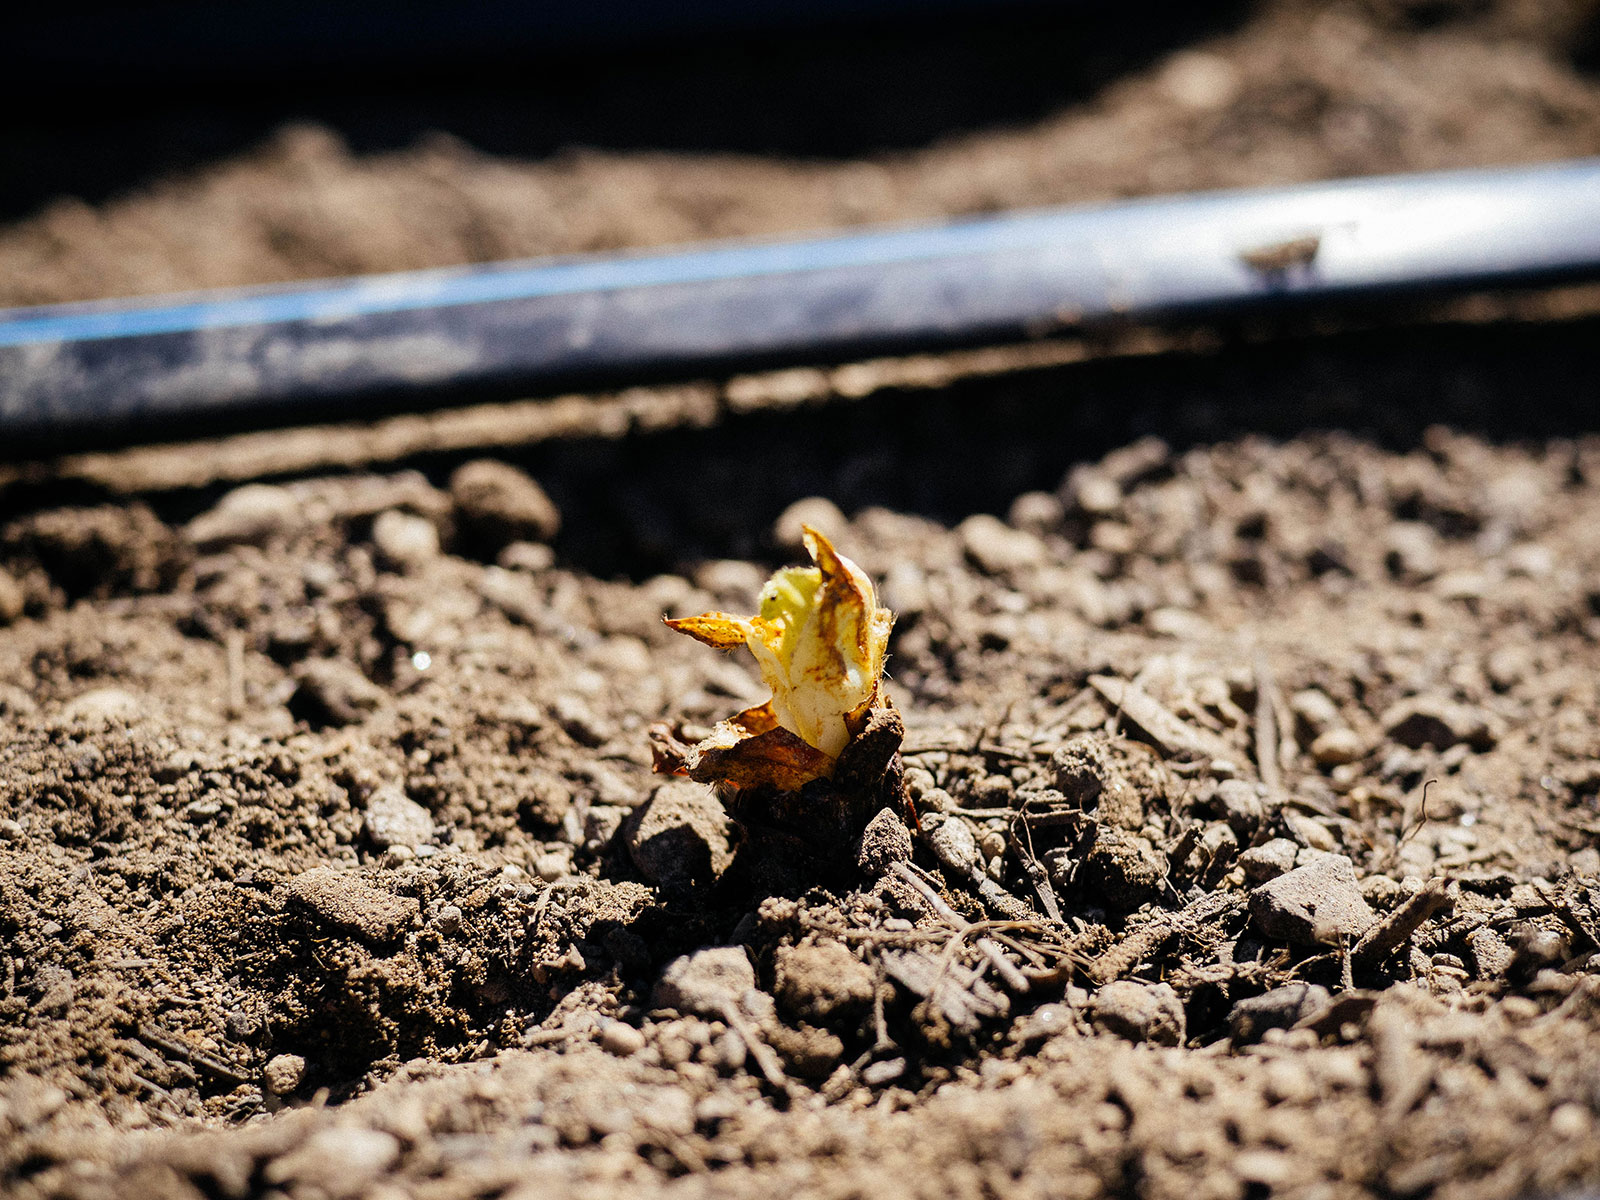
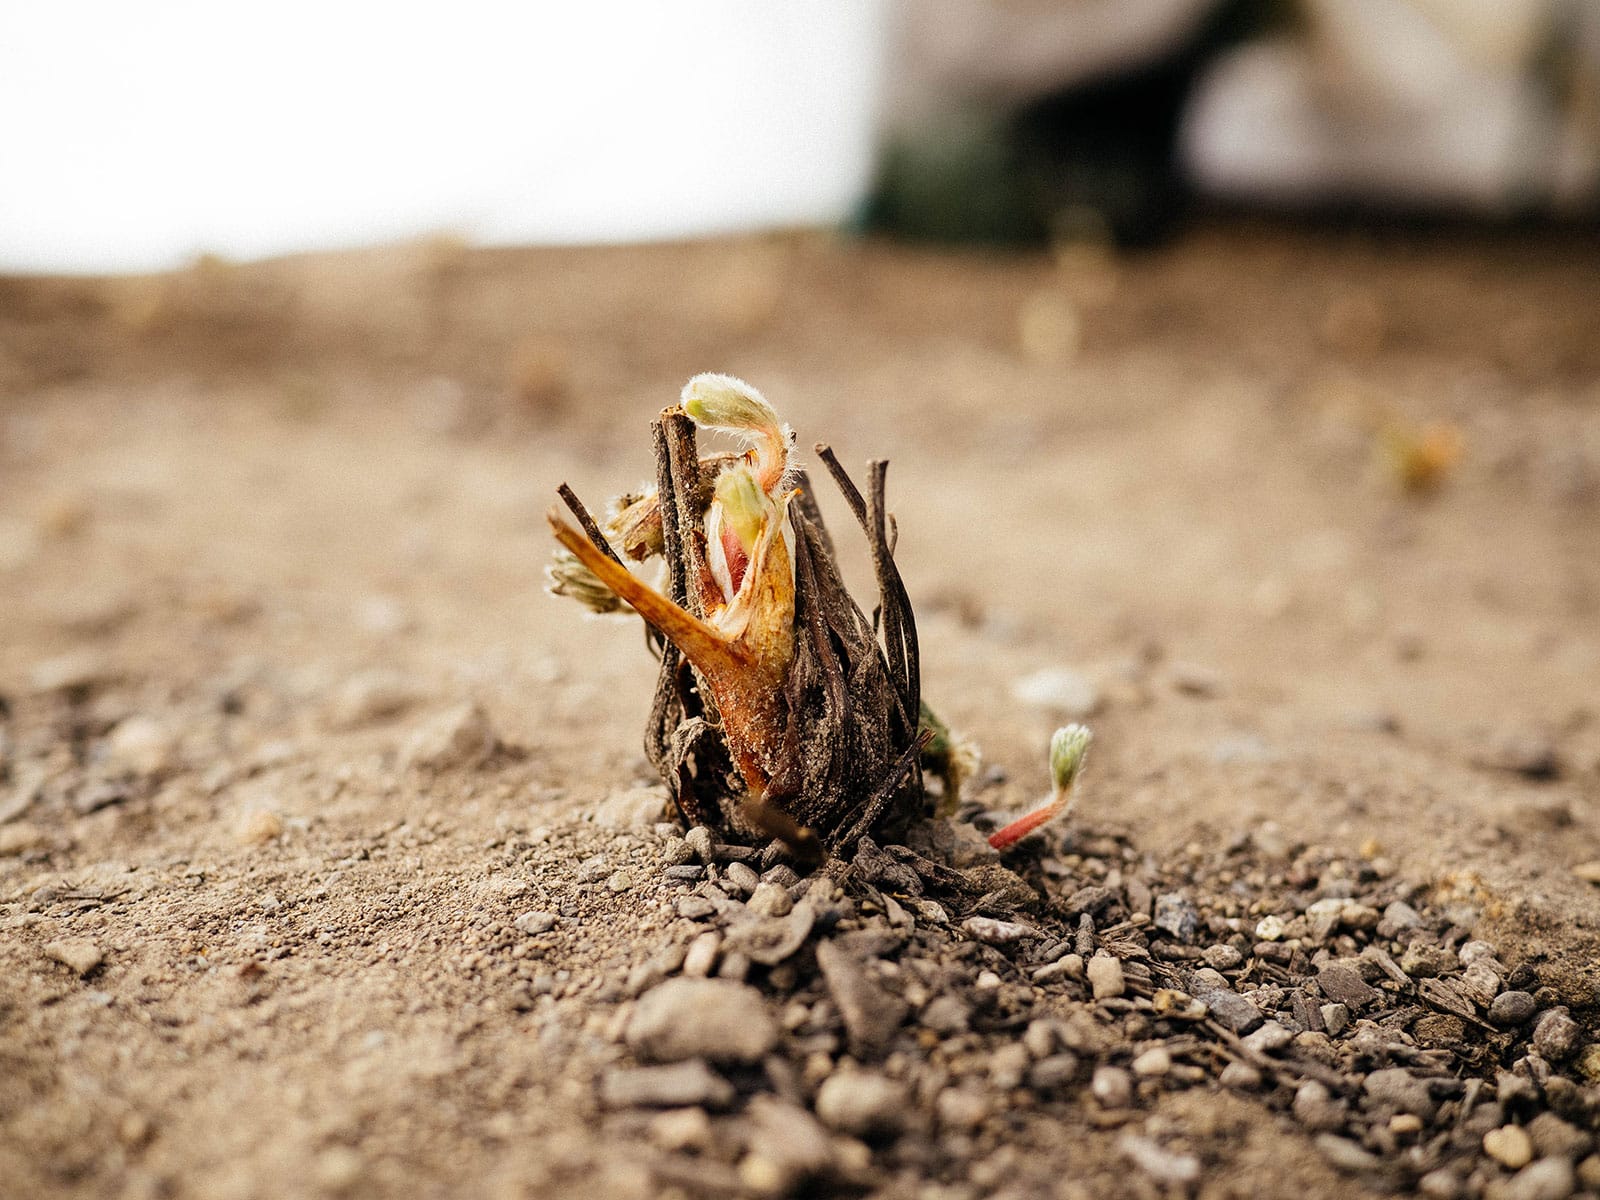
Here are a few examples of well-planted crowns:
If needed, you can mulch the bed with a couple inches of clean straw to suppress weeds, though I usually wait until the plants start growing and I start watering more regularly.
If you planted your strawberries early and there’s still a chance of hard freezes, you can cover the bed with frost cloth or add a thin layer of straw over the crowns. (Just be sure to remove the straw once temperatures warm up and you see new leaves emerging from the crowns.)
Within two to three weeks, depending on weather, you should start to see new leaf growth. Continue watering as needed but be careful not to overwater during the season.
Once your plants are growing in nicely and starting to flower, add a thin layer of straw mulch (if you haven’t already) to keep strawberries off the soil.
My fertilizing routine
Strawberry plants don’t need any fertilizer until they start flowering. Once the first flowers appear, I sprinkle a slow-release organic granular fertilizer around my plants (following the recommended amount on the package) and water it in well.
You can simply use an all-purpose fertilizer designed for vegetables and/or flowers, as you probably already have this around somewhere. (My favorites are listed below.) There’s no need to use specialty plant food formulated for strawberries, as these are often a marketing gimmick. They won’t hurt, but they also won’t help any more than an all-purpose fertilizer will.
From here, the frequency of fertilizing will depend on the type of strawberries you’re growing.
Junebearing strawberries: Fertilize plants again after the last harvest (generally in July). This encourages healthy flower bud formation in fall (from which new berries will grow the following year).
Day-neutral and everbearing strawberries: For maximum berry production, fertilize every month that the plants are flowering and fruiting (June to September), with the last feeding in early September. But, a word of caution: Don’t fertilize if your plants are showing signs of heat stress, and don’t fertilize in the middle of a heat spell.
Every year after in the spring, I add an inch or two of compost to my strawberry bed (before new growth appears) and then follow the summer fertilization routine as explained above.
Where to buy
Strawberry fertilizers
For a bigger harvest, remove the first flush of blossoms
The general rule of thumb for new strawberry plants is to pinch off all of the first season’s blossoms to help the plants focus their energy on growing roots (instead of producing fruits) and save their strength for heavier crops the following years.
But I’ve never been one to follow all the gardening “rules” anyway, and I believe a small harvest the first year is a nice reward!
As long as your new plants are off to a good early start and growing well, you can leave some flower buds since a few berries here and there won’t weaken the plants.
- On Junebearing types, remove two-thirds of the blossoms (and let the rest of them grow as a treat).
- On everbearing and day-neutral types, remove the first flush of blossoms. (Don’t worry, you’ll get another round of blossoms and can let these later blooms develop for a late-summer harvest.)


I am planning to relocate my strawberry bed and I am looking for information on when is the best time to dig them up and move them. I’m in Louisiana (USDA Zone 9A, 2023 map) and my strawberries are in full production right now.
The best time is after the last crop of berries are picked, or when they go dormant in the fall. You could move them now, but production may drop while they recover from the transplant.