You’d think a few hard freezes would hit the reset button on the garden. Temperatures dip into the teens, snow piles up on the beds, and every last squash bug should be a goner by New Year’s.
Surprise—plenty of them won’t be. Many garden pests are built to ride out winter right where you left them: tucked under a pile of spent squash vines, burrowed a few inches into the soil, or sealed inside a chrysalis hanging off last summer’s broccoli stalk. When the soil warms up in spring, they wake up hungry, and your fresh transplants are first in line.
So it’s tempting to clear everything out in your fall cleanup. But that same mess of leaves, stems, and stalks is also where ladybugs, ground beetles, bumble bee queens, and native bees spend the winter. Rake the garden bare and you evict the good guys along with the bad… but leave it all in place and you’ve set up a cozy winter rental for next year’s infestation.
So what to do?
I see it as a balancing act. The goal is not to rid your yard of every single pest; it’s to reduce and manage overwintering pests. Think of it as a targeted cleanup: take away the specific hiding spots that troublesome pests depend on, and protect the habitat that beneficial insects need to make it to spring. Here’s how to tell the difference (and why you can leave the tiller in the shed).
Which pests can overwinter in the garden?
Ooh, more than you might expect! Some spend winter as adults, waiting under debris for the first warm days. Others pass the cold months as eggs, larvae, or pupae (the resting stage between caterpillar and moth, or grub and beetle), either down in the soil or stuck to old plant material.


Once you know how a pest overwinters, you’ll know where to focus your efforts. Here are some of the most common culprits in North American vegetable gardens and orchards.
(Scroll right to view the entire table on mobile.)
|
Pest |
Overwinters as |
Where it hides |
|---|---|---|
|
Squash bug |
Adult |
Under spent vines, boards, rocks, and plastic or fabric mulch |
|
Cucumber beetle |
Adult |
In crop debris and weedy garden edges |
|
Flea beetle |
Adult |
In leaf litter and plant debris near last year’s host crops |
|
Slugs |
Eggs and adults |
Under mulch, boards, and dense, damp debris |
|
Imported cabbageworm |
Chrysalis |
Attached to old brassica stalks, leaves, and nearby debris |
|
Colorado potato beetle |
Adult |
In the soil in and around last year’s potato patch |
|
Tomato hornworm |
Pupa |
In the soil, 4 to 8 inches deep, near where tomatoes grew |
|
Squash vine borer |
Larva or pupa in a cocoon |
In the soil, 1 to 2 inches deep, near last year’s squash |
|
Codling moth |
Larva in a cocoon |
In bark crevices and in soil or debris under apple and pear trees |
(Exactly which pests survive depends on your climate. In mild-winter regions, some pests never fully go dormant, while in cold regions they only make it through in sheltered spots, which is good news, since sheltered spots are something you can control.)
Every strategy below disrupts that lifecycle in one of four ways: it takes away shelter, exposes pests to cold and predators, puts distance between pests and their next meal, or keeps you from carrying them around the garden yourself.
None of these will wipe out a pest population on its own (and you wouldn’t want it to—more on that later). Stacked together, they mean fewer pests emerge in spring, and the ones that do have a harder time finding dinner.
Know what to remove (and what to keep)
Before you grab the rake, here’s the short version: clean up crop debris and anything that harbored pests this year, and leave the rest of the yard a little wild. Your vegetable beds get the tidiest treatment, while your borders, hedgerows, and perennial beds get the lightest touch.
Fallen fruit
Dropped apples, pears, and plums are more than a mushy mess underfoot. Codling moth larvae leave the fruit to spin cocoons in bark crevices, soil, and debris under the tree, while apple maggots and plum curculio larvae burrow into the soil to pupate. Next spring, they emerge as adults ready to lay eggs in your new crop.


Try to pick up dropped fruit regularly throughout the season, not just in fall, since the larvae inside are on a timer. Bag and toss anything wormy, or let your chickens clean it up if you keep a flock.
Weeds
Weeds don’t just compete with your veggies for water and nutrients. Many of them double as backup food and shelter, keeping pests fed between crops and well into winter. Farmers call this a “green bridge.” A few to watch for:
- Wild mustards (like yellow rocket): Can host imported cabbageworm eggs, flea beetles, and other brassica pests
- Nightshade weeds (like horsenettle and black nightshade): Feed Colorado potato beetles and flea beetles when your potatoes and tomatoes aren’t around
- Chickweed and other winter annuals: Attract egg-laying black cutworm moths in spring
Pull weeds in and around your vegetable beds before they set seed, and pay extra attention to the edges where the garden meets the lawn or fence line.
Leaves
This is where the urge to tidy up does the most damage. Leaf litter is winter housing for bumble bee queens, firefly larvae, ground beetles, spiders, and the eggs, caterpillars, and chrysalises of many butterflies and moths you do want to keep around. If you bag up every leaf on the property, you’ll inadvertently bag up next year’s pollinators and pest patrol along with it.
So please don’t rake your yard completely clean. Instead, move leaves off the lawn and any vegetable beds where pests were a problem (squash bugs and slugs love a soggy leaf pile next to the zucchini), and move them to the spots where they do the most good: under shrubs, into perennial borders, or a dedicated leaf pile at the edge of the yard.

If you like to mulch your vegetable beds with leaves, shred them first. A thin layer of shredded leaves offers far fewer hiding spots than a deep, matted pile of whole ones.
Related: A few of my favorite ways to use fall leaves in the garden
Spent plants and other debris
Pull and remove any plant that had a pest or disease problem this year: cucumber plants infested with cucumber beetles, squash and pumpkin vines after a squash bug summer, brassica stalks dotted with cabbageworm chrysalises, tomato vines that fought off hornworms or blight. These go in the trash or a hot compost pile. (Most backyard piles don’t heat up enough, or stay hot long enough, to kill eggs, pupae, and pathogens, so when in doubt, bag it.)


Healthy plants that finished the season clean are a different story. Cut them off at the soil line and leave the roots to break down in place, where they feed soil life and keep the soil structure intact.
In your flower beds, leave the stems standing. Hollow and pithy stems (think bee balm, raspberry canes, elderberry, and sumac) shelter stem-nesting bees through winter. When you clean up in spring, cut them back to varying heights between 8 and 24 inches instead of down to the ground, so this year’s bees have somewhere to nest. New growth should hide the stubble within a few weeks.
Finally, hunt down the accidental hideouts: stacks of pots, piles of boards, forgotten row covers, and the edges of plastic or fabric mulch. Squash bugs in particular love to overwinter under weed fabric and plastic, so pull it up in fall if they gave you trouble this year.
Subscribe to Garden Betty
Sign up to get my free weekly emails and I’ll teach you how to keep your plants alive, maximize your garden bounty, and preserve the harvest.
Turn the soil over strategically
Let’s get this out of the way: You don’t need to till your garden to get rid of overwintering pests.
You’ll see plenty of advice to run a tiller through the whole garden in fall, and it does kill some pests in the soil. But a rototiller can’t tell a hornworm pupa from a ground beetle, and the predators living in your soil take the hit too.
Studies have found that loosening just the top 3 inches of soil with a tined hoe cut ground beetle numbers roughly in half and spider numbers by 25 percent. Tilling also breaks up soil structure and the fungal networks your plants rely on, so you pay for it again next season.
Instead, treat soil disturbance like a spot treatment. If you know exactly where a soil-dwelling pest spent the summer, you can target that one patch and leave the rest of the garden alone.
- Squash vine borers: They overwinter in cocoons only 1 to 2 inches down, close to where last year’s squash grew. Scratch through the top couple of inches with a hand cultivator or hoe to bring them to the surface.
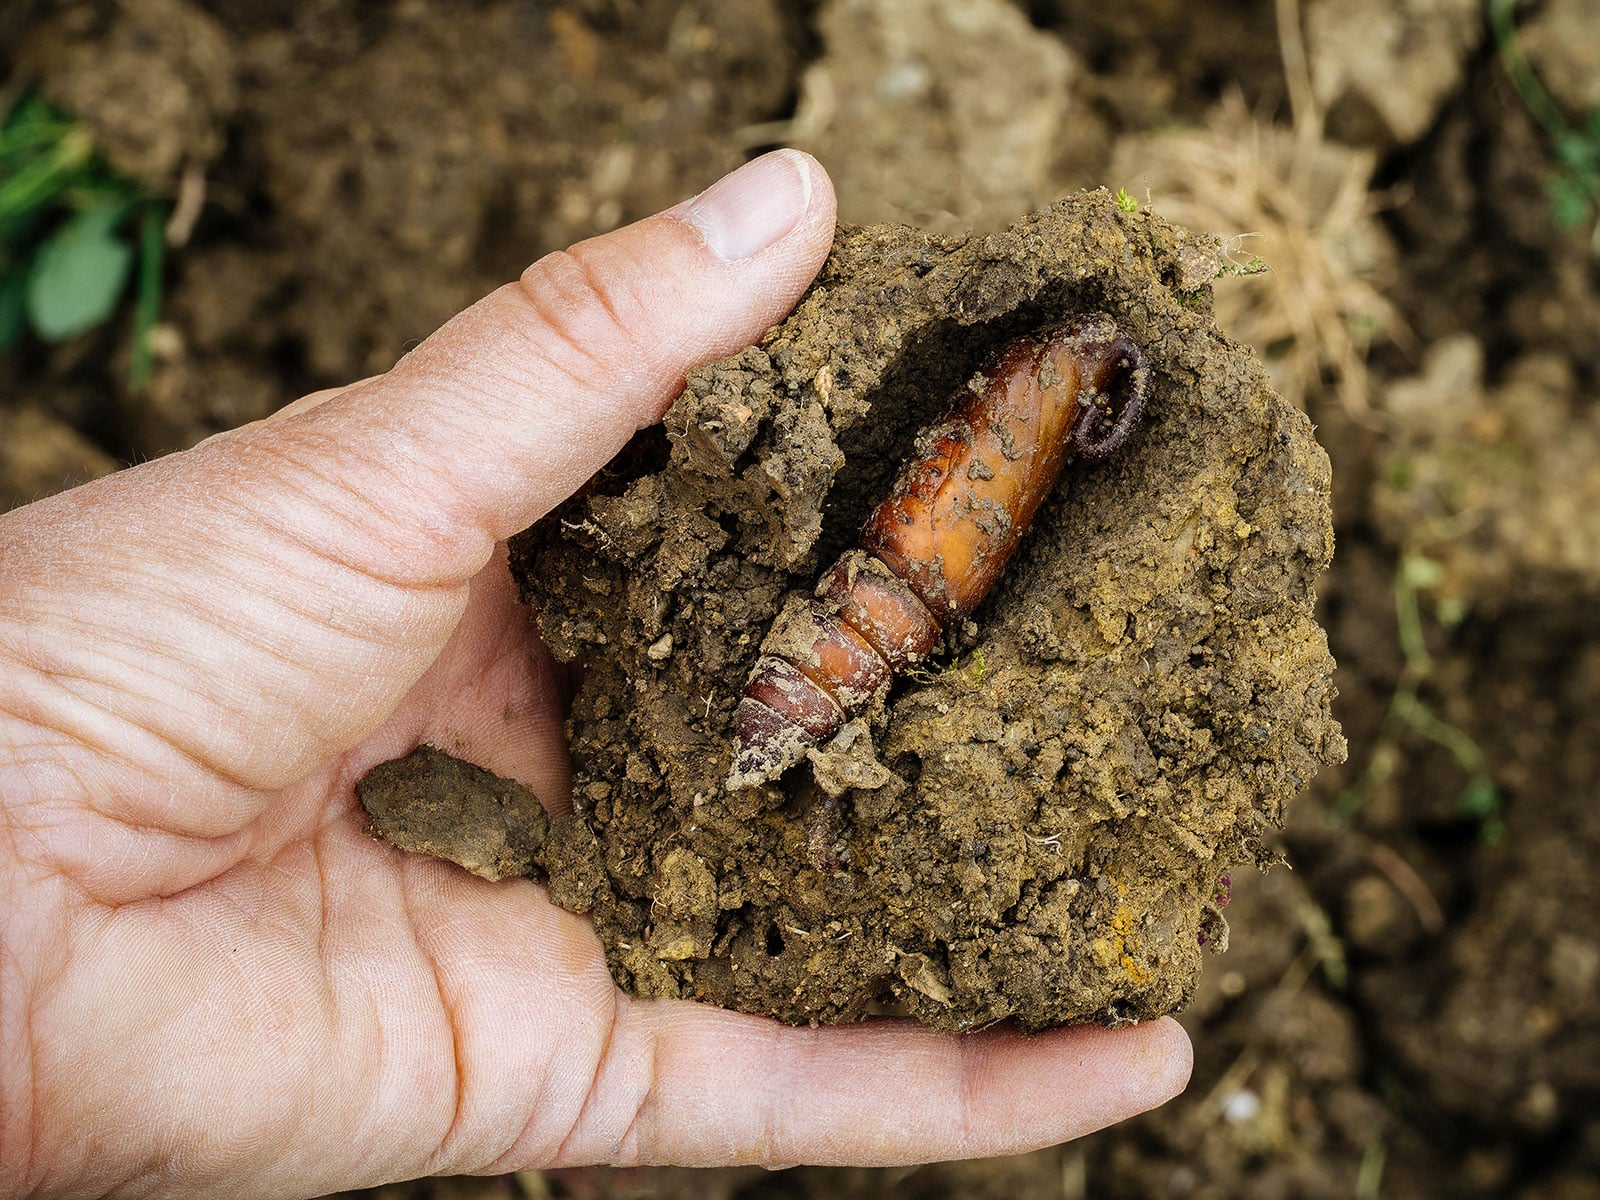
- Tomato hornworms: Their pupae sit deeper, typically 4 to 8 inches down. Use a garden fork to lift and turn the soil where your tomatoes grew, and pick out any shiny brown pupae you find. (They’re about 2 inches long with a little handle-like loop on one end, and hard to miss once you know what you’re looking for.)

Leave the turned clods and any exposed pupae on the surface for a few days. You might be surprised by how fast birds find them! (I’d say that chickens are even faster.) A hard freeze should take care of any stragglers after that. Late fall works well for this, or early spring before you plant. Afterward, cover the bed back up with mulch or a cover crop so the soil isn’t left bare all winter.
Rotate crops throughout the garden
Pests that overwinter in the soil wake up right where they went to sleep. If the same crop is waiting in the same spot, you’ve basically served them breakfast in bed. Move that crop somewhere else, however, and they have to work for it.

I recommend rotating your crops by plant family, since pests tend to target families rather than individual plants:
- Nightshades: Tomatoes, potatoes, peppers, eggplants, and tomatillos
- Cucurbits: Squash, pumpkins, cucumbers, melons, and gourds
- Brassicas: Cabbage, broccoli, kale, cauliflower, Brussels sprouts, radishes, and turnips
- Legumes: Beans, peas, and fava beans
- Alliums: Onions, garlic, leeks, and shallots
Aim to keep each family out of a given bed for at least three years. Sketch a quick map of your beds each season (or snap a photo from the same spot) so you’re not relying on memory next spring.
Now for a reality check. Crop rotation works beautifully on a farm, where fields can sit a quarter-mile apart. Penn State Extension recommends planting potatoes one-quarter to one-half mile from last year’s patch to manage Colorado potato beetles. But in a typical backyard, your “rotated” bed might be 10 feet from last year’s.
That still buys you a little time though, often enough for transplants to size up before the pests find them, but it won’t stop mobile pests on its own. So pair rotation with a barrier. A piece of floating row cover over your cucurbits, from planting until the female flowers appear, keeps squash bugs, squash vine borers, and cucumber beetles off young plants. Then you can uncover them so pollinators can do their job.
Learn more: All the different types of row covers, explained
Rethink your crop selection
Sometimes the best pest control is simply not growing the thing pests love most. Or growing a version they like a little less.
Your garden has actually been dropping clues all season. Write them down now, before winter wipes them from memory:
- What thrived and what struggled: Note which crops produced well and which ones got hammered by pests.
- Where everything grew: A rough map of each bed helps you plan rotations and spot problem areas.
- Which varieties held up: Some cultivars are far less appealing (or more resilient) to certain pests than others.
- When pests showed up: The date you spotted your first squash bug eggs or flea beetle holes tells you when to start scouting, and covering, next year.
- What you tried, and whether it worked: Record every control measure, from row covers to hand-picking to trap crops, along with how it turned out.
The variety matters more than most people expect. Squash vine borers have a well-known weakness for Blue Hubbard squash (Cucurbita maxima), so some gardeners take advantage of that by planting a few Hubbards as a trap crop to lure borers away from the main planting. But Cucurbita moschata is less susceptible, so simply switching to a butternut, for example, is a good way to thwart squash vine borers.

Timing helps too: Overwintering squash bugs prefer larger, more established plants, so a later planting can sometimes sidestep the first wave.
The good news is squash bugs strongly prefer zucchini and other Cucurbita pepo varieties, which reach maturity fast. I usually grow 50- to 60-day summer squash in my zone 5 microclimate, and a sowing in mid to late June yields plenty of squash before my first frost in September.
After a season or two of notes, you’ll start to see patterns emerge. You’ll know what’s worth growing again, what needs a new home in the garden, and what to retire for the time being.
Ultimate Garden Diary
Track what happens in your garden every year
My printable, mix-and-match garden planner and record-keeper helps you keep tabs on everything going on in your garden, year after year—no refills needed.
Clean your tools
Tools spread plant diseases more often than insects, but they can still play taxi. Clods of soil stuck to a shovel can ferry slug eggs and soil-dwelling larvae from bed to bed, and the pots, tomato cages, and row covers left outside all winter make perfect hideouts.
Before you put everything away for the season:
- Knock off the soil: Scrape shovels, forks, and trowels clean, then scrub them with a stiff brush and soapy water.
- Disinfect cutting tools: Wipe pruners and loppers with 70 percent rubbing alcohol, especially after cutting diseased plants. (Be careful using a bleach solution, since it corrodes metal.)
- Clean and store pots, trays, and cages: Empty pots, scrub them out, and store them in a shed or garage instead of stacking them in the garden. (There’s no need to disinfect your pots, as I explain in that post.)
- Shake out row covers: Brush off debris, let them dry completely, and fold them away indoors.
Quick tip
Those same boards you just cleared out of the garden make handy squash bug traps in spring. Lay a few near your squash plants, and the bugs will gather underneath overnight. Flip the boards first thing in the morning and drop the bugs into a bucket of soapy water.
Can pests overwinter in cover crops?
Yes, some can. A thick stand of cereal rye or crimson clover is shelter, and pests don’t care whether you planted it on purpose.
The usual suspects:
- Slugs: Thrive in the cool, damp cover and the residue it leaves behind, especially in beds that aren’t tilled
- Cutworms and armyworms: Black cutworm moths lay eggs in green cover crops and broadleaf weeds in spring, and armyworms can turn up after grassy covers like rye and wheat
- Cucumber beetles: Spotted cucumber beetles are drawn to legume cover crops like clover
The pests themselves rarely do much damage to the cover crop. The trouble starts when you cut it down and plant right away, and every hungry larva in the bed moves straight onto your seedlings.
The fix is a buffer: Cut, mow, or smother your cover crop three to four weeks before planting, which gives pests time to starve out or move on before your crop arrives. It also makes sense to choose a cover crop from a different plant family than what follows it (so skip the mustard cover before your broccoli).

Further reading: My simple guide to growing cover crops in a home garden
Most of this research comes from farm fields, not backyard beds, so your mileage may vary. One Penn State study found cutworm damage was lower when rye was terminated later. But the three-to-four-week buffer is the standard extension advice, and it’s an easy rule to follow at home.
So don’t let any of this scare you off cover crops. The same stand that shelters a few slugs also shelters ground beetles, spiders, and other predators, while protecting and feeding your soil all winter. For most home gardens, the benefits easily outweigh the risks.
Why a few pests are worth keeping around
A garden with zero pests isn’t the goal, and it wouldn’t be a healthy garden anyway. Ladybugs, lacewings, ground beetles, and parasitic wasps only stick around if there’s something to eat. Clear out every aphid and caterpillar, and the predators move on or starve, leaving nothing to stop the next outbreak when it rolls in.
That’s why a handful of hornworms or a smattering of aphids is okay to keep around: It’s a food source. (If you find a hornworm covered in what look like tiny grains of white rice, leave it be! Those are the cocoons of a braconid wasp, and they’ll hatch into the next generation of hornworm hunters.)
Read more: How to get rid of tomato hornworms without sprays
So clean up where pests caused real trouble, and leave habitat where the good guys need it. Come spring, you’ll have fewer pests waking up in your beds, and plenty of predators ready to handle the rest.